 by
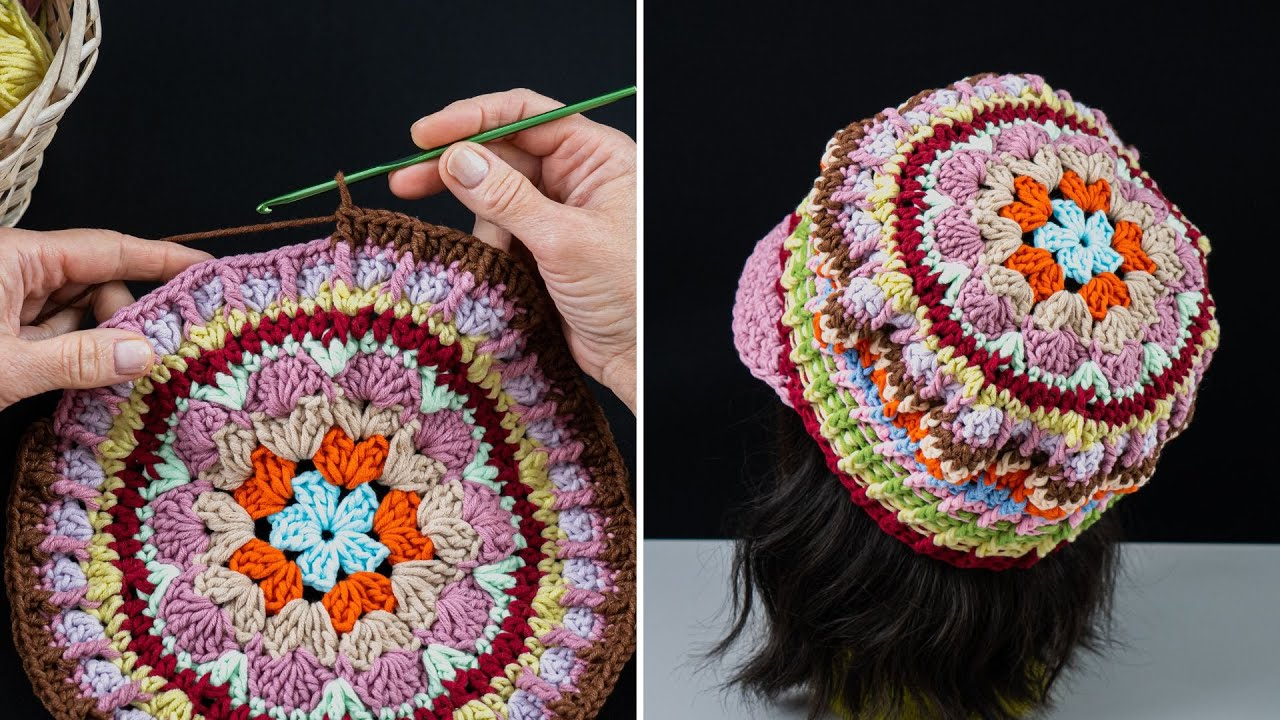
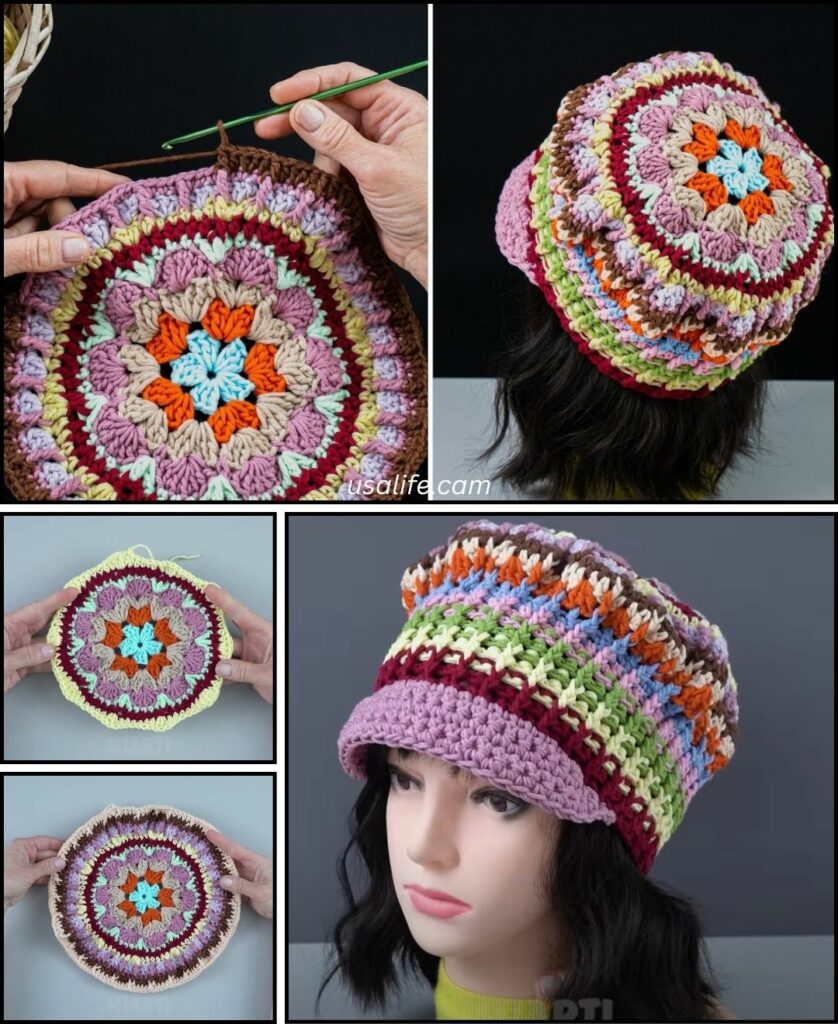
by That’s an excellent choice for a crochet project, especially with the abundance of beautiful colors available! A multicolor crochet granny squares hat is a fantastic way to use up scrap yarn, create a vibrant accessory, and showcase your granny square skills.
Given that it’s currently hot in Phnom Penh, a 100% cotton yarn or a sturdy cotton blend is highly recommended for your hat. Cotton is breathable, comfortable, and helps the hat maintain its shape without being too warm. Avoid wool or heavy acrylics for this particular project, as they might be uncomfortable in the current climate.

How to Crochet a Multicolor Granny Squares Hat
This guide will walk you through making a hat by creating a series of individual granny squares and then joining them together to form the hat shape. This method is excellent for showcasing different colors in each square and is very beginner-friendly once you master the basic granny square.
1. Essential Materials You’ll Need
- Yarn:
- Worsted Weight (Aran / Medium / Category 4) Cotton Yarn: Gather your scrap yarn in various colors. You’ll need about 100-150g total for an adult-sized hat.
- Joining/Border Color: Choose one color that will be used to join all your squares and create the brim. This can be a neutral color or a contrasting one that pulls all your scrap colors together.
- Crochet Hook: A 4.0mm (US G/6) or 4.5mm (US 7) hook. Aim for a hook size that creates a fabric that is firm but not stiff, ensuring the hat holds its shape nicely.
- Scissors: For cutting yarn.
- Yarn Needle (Tapestry Needle): Absolutely essential for weaving in all those loose ends (and there will be many!) and seaming the squares together.
- Stitch Markers (Optional but helpful): To mark the beginning of rounds or corners.
2. Basic Crochet Stitches You’ll Use
This project relies on the core stitches used in classic granny squares and simple joining techniques:
- Magic Ring (MR) / Adjustable Ring: (Highly Recommended!) Creates a tight, hole-free center for your first round. Alternatively, you can
ch 4, then sl st to joininto the first chain to form a ring. - Chain (ch): Used for foundation, spacing, and forming corner spaces within the granny squares.
- Slip Stitch (sl st): For joining rounds within the granny square and for seaming.
- Double Crochet (dc): The main stitch for forming the “clusters” in a granny square.
- Single Crochet (sc): Often used for joining squares and for the final brim rounds.
- Working in Rounds: You’ll build each granny square in circles from the center out.
- Fasten Off: Securely ending your work.
- Weaving in Ends: Hiding yarn tails for a neat and professional finish.

Crochet Granny Square Hat Pattern
This pattern will guide you through making a hat using a specific arrangement of granny squares. The most common method involves 6 squares for the main body of the hat and an optional top square (which can be a larger granny square or a solid circle/square).
Sizing Tip: The number of rounds in your granny squares will determine the overall size of your hat. For an adult-sized hat, 4-round or 5-round granny squares are common.
- 4-round squares: Will likely result in a snugger fit or require a slightly larger hook.
- 5-round squares: Generally provide a more comfortable fit for an average adult head circumference (approx. 21-22 inches / 53-56 cm). Make a sample square and measure it!
Abbreviations (US Crochet Terms):
- MR: Magic Ring
- ch: chain
- sl st: slip stitch
- dc: double crochet
- st(s): stitch(es)
- ch-sp: chain space
(...): work stitches into the same stitch or space[...]: repeat instructions in brackets- FO: Fasten off
Part 1: Making the Granny Squares (Make 6-7 Total)
You’ll need 6 identical 4-round or 5-round granny squares for the sides of the hat, and optionally 1 larger square or a solid circle/square for the very top. Feel free to use different colors for each round or stick to one solid color for some squares.
Example: 4-Round Granny Square (Repeat 6 times)
- Start (Color A): Create a Magic Ring (MR).
- (Alternatively: Ch 4, then sl st into the 1st ch to form a ring.)
- Round 1: Ch 3 (counts as 1st dc). Work 2 dc into the ring.
*Ch 2 (creates a corner space). Work 3 dc into the ring.*Repeat from*to*2 more times. Ch 2. Join with a sl st to the top of the beginning Ch 3. (4 clusters of 3 dc, 4 ch-2 spaces).- Fasten off Color A.
- Round 2 (Color B): Join Color B with a sl st into any ch-2 corner space. Ch 3 (counts as 1st dc). Work (2 dc, ch 2, 3 dc) all into the same ch-2 corner space.
*Ch 1 (creates a side space). In the next ch-2 corner space, work (3 dc, ch 2, 3 dc).*Repeat from*to*2 more times. Ch 1. Join with a sl st to the top of the beginning Ch 3.- Fasten off Color B.
- Round 3 (Color C): Join Color C with a sl st into any ch-2 corner space. Ch 3 (counts as 1st dc). Work (2 dc, ch 2, 3 dc) all into the same ch-2 corner space.
*Ch 1. Work 3 dc into the next ch-1 side space. Ch 1. In the next ch-2 corner space, work (3 dc, ch 2, 3 dc).*Repeat from*to*2 more times. Ch 1. Work 3 dc into the last ch-1 side space. Ch 1. Join with a sl st to the top of the beginning Ch 3.- Fasten off Color C.
- Round 4 (Color D or repeat C): Join Color D (or continue with Color C) with a sl st into any ch-2 corner space. Ch 3 (counts as 1st dc). Work (2 dc, ch 2, 3 dc) all into the same ch-2 corner space.
*Ch 1. Work 3 dc into the next ch-1 side space. Ch 1. Work 3 dc into the next ch-1 side space. Ch 1. In the next ch-2 corner space, work (3 dc, ch 2, 3 dc).*Repeat from*to*2 more times. Ch 1. Work 3 dc into the next ch-1 side space. Ch 1. Work 3 dc into the last ch-1 side space. Ch 1. Join with a sl st to the top of the beginning Ch 3.- Fasten off Color D.
- Weave in ALL yarn ends on each individual granny square as you complete them. This is crucial for a neat finish and to avoid a huge task at the end.

Part 2: Assembling the Hat Body
You’ll use your joining/border color for all seams. A single crochet (sc) join or a slip stitch (sl st) join are good choices. The sc join creates a more defined, slightly raised seam, while the sl st join is flatter.
Visual Aid (Highly Recommended!): It’s easiest to visualize the assembly with the squares laid out. Imagine your 6 squares forming a rectangle, then folded into a tube.
- Create a Strip:
- Take 6 of your granny squares.
- Place Square 1 and Square 2 with their wrong sides together.
- Join your joining color yarn with a sl st into the corner space of both squares (going through both layers).
- Ch 1. Work single crochet (sc) evenly along the edge, through both layers, to join the squares. Work 1 sc into each dc stitch and 1 sc into each ch-1 space.
- When you reach the next corner of the joined squares, work 1 sc into that corner (through both layers).
- Fasten off joining yarn, leaving a tail to weave in.
- Repeat this process until you have a long strip of 6 joined squares.
- Form the Hat Tube:
- Take your long strip of 6 joined squares.
- Bring the two short ends together (the first and last squares in your strip).
- Using your joining method (sc or sl st), seam these two ends together to form a tube. This is the main body of your hat.
- Fasten off and weave in ends.
- Close the Top (Option 1: Pinch and Sew):
- Flatten the tube so that the seams are on the sides.
- Pinch the top opening together. Use your yarn needle and joining color yarn to sew the top edges shut in a straight line, going through both layers of granny squares. This will create a slightly pointed or creased top.
- This is the simplest method for beginners.
- Close the Top (Option 2: Add a Top Square/Circle – More Advanced/Neater):
- If you prefer a flatter, rounder top, you can crochet one more square (or a solid circle/square that fits the opening) and seam it to the top of your hat tube. This requires measuring the opening and possibly adjusting your 7th square to fit. For a beginner, Option 1 is simpler.

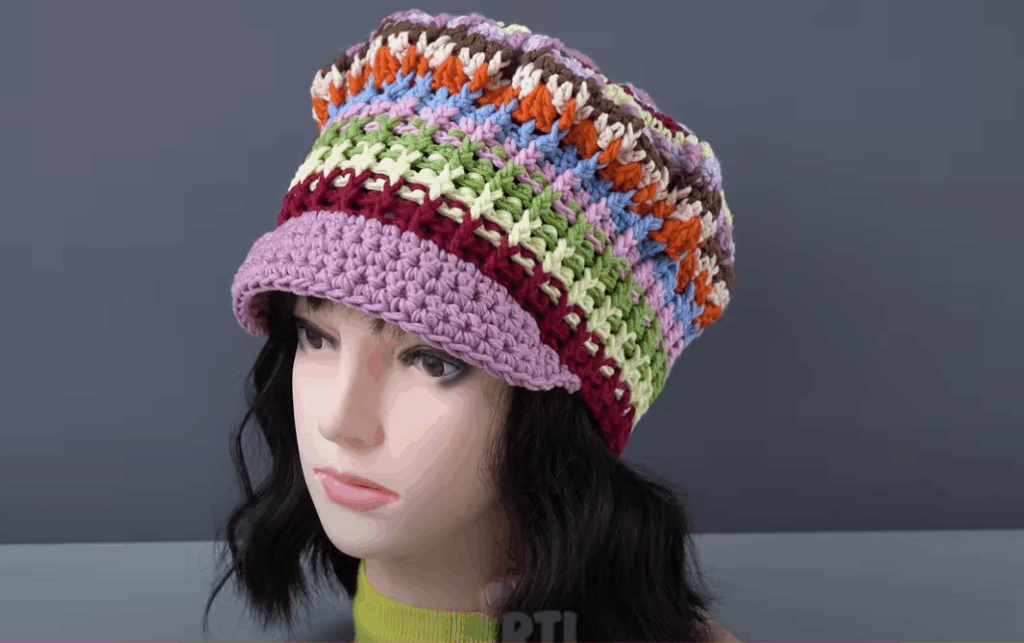
Part 3: Adding the Brim
The brim will give your hat a finished look and help it fit better.
- Initial Sc Round:
- Join your joining/border color yarn with a sl st to any stitch along the bottom raw edge of your hat tube.
- Ch 1. Work single crochet (sc) evenly around the entire bottom opening of the hat. Aim for 1 sc in each dc stitch and 1 sc in each ch-1 space. Work 1 sc into each corner stitch for neat transitions.
- Join with a sl st to the first sc.
- Brim Rounds (Single Crochet):
- Round 1 (Brim): Ch 1. Sc in each sc around. Join with a sl st to the first sc.
- Repeat this sc round for about 3-5 more rounds, or until your brim is the desired width (e.g., 1-2 inches / 2.5-5 cm).
- Fasten off, weave in end.
4. Finishing Your Multicolor Granny Squares Hat
- Weave in ALL Remaining Ends NEATLY: This is the most crucial step for a polished and durable hat. You’ll have many ends from the granny squares and joining. Take your time with your yarn needle to carefully weave in every single yarn tail securely into the stitches on the inside of the hat. Go back and forth through stitches several times to ensure they’re hidden and won’t unravel with wear.
- Blocking (Optional but Recommended for Cotton): Blocking can significantly improve the drape and finished look of your hat.
- Gently wet the entire hat (you can immerse it in cool water and gently squeeze out excess).
- Place it over a balloon, a suitable-sized bowl, or a wig head to help it dry in the correct shape.
- Allow it to air dry completely. Blocking helps to even out your stitches and gives the hat a more professional appearance.
5. Tips for a Charming & Comfortable Granny Square Hat
- Consistent Tension: Maintaining even tension throughout all your granny squares and joining seams is vital for a symmetrical and well-fitting hat.
- Seaming Method: While single crochet joining is sturdy, a slip stitch join or whip stitch (using a yarn needle) can create a flatter, less visible seam, allowing the individual granny squares to stand out more. Experiment with a small sample to see what you prefer.
- Trying It On: As you assemble and add the brim, periodically try the hat on to ensure it’s fitting correctly and the brim is the desired length.
- Customization:
- Stripey Brim: Change colors in your brim rounds for a striped effect.
- Decorative Border: After the sc brim, add a final round of a decorative stitch like a picot border or a shell stitch for extra flair.
- Ear Flaps: For a warmer hat (though less suitable for Phnom Penh), you could add ear flaps to the bottom edge before the brim.
You’re now ready to crochet a beautiful and unique multicolor granny squares hat! It’s a fantastic project that’s both fun to make and wonderful to wear. Enjoy the process of seeing all your colorful scraps come together!