by
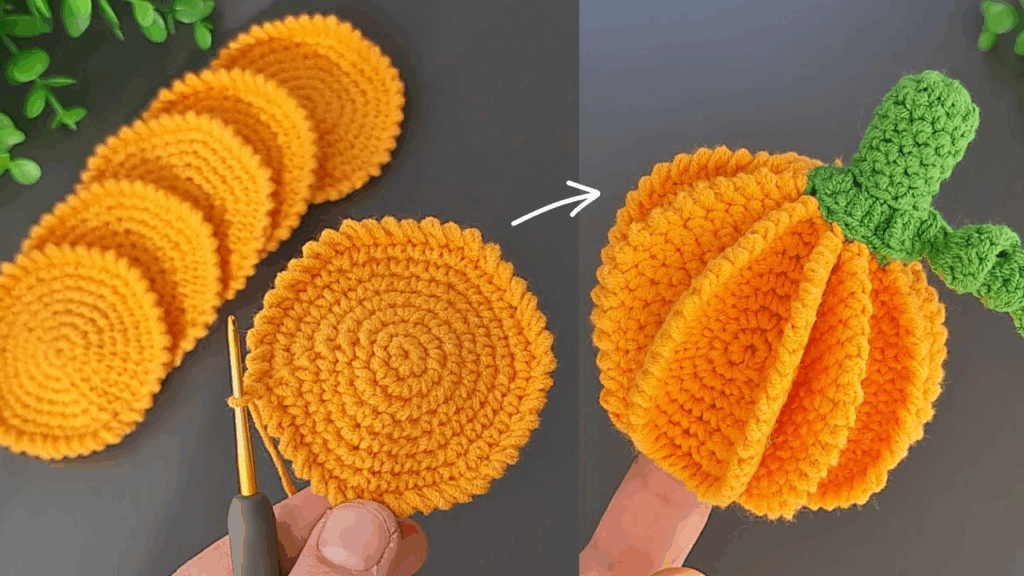
by Creating a mini crochet pumpkin keychain is a super fun and quick project, perfect for adding a touch of autumn charm to your keys, bag, or even as a small gift! These little pumpkins are surprisingly simple to make and use very little yarn.
Since you’re in Phnom Penh, where it’s warm, 100% cotton yarn or a cotton blend is an excellent choice for this keychain. Cotton holds its shape well, is durable, and can withstand daily handling.
How to Crochet a Mini Pumpkin Keychain
This tutorial will guide you through making an adorable, tiny pumpkin that you can attach to a keychain.
1. Essential Materials You’ll Need
- Yarn:
- Main Color (Orange): Small amount (approx. 5-10 yards / 4.5-9 meters) of 100% Worsted Weight Cotton Yarn.
- Stem Color (Brown/Green): Very small amount (1-2 yards) of 100% Worsted Weight Cotton Yarn.
- Crochet Hook: A 3.0mm (US C/2) or 3.5mm (US E/4) hook. A slightly smaller hook will create a denser fabric, which is ideal for a small amigurumi item like a keychain, preventing stuffing from showing through.
- Scissors: For cutting yarn.
- Yarn Needle (Tapestry Needle): Essential for weaving in ends and shaping the pumpkin.
- Stuffing: A very small amount of polyester fiberfill or yarn scraps for stuffing.
- Keychain Hardware: A split ring or a lobster clasp. You can find these at craft stores or online.
- Optional: Stitch marker (helpful for marking the beginning of rounds, especially for beginners).
2. Basic Crochet Stitches You’ll Use
This project relies on just a few fundamental stitches:
- Chain (ch): To begin your work.
- Slip Stitch (sl st): For joining rounds.
- Single Crochet (sc): The main stitch for the pumpkin body, creating a tight and sturdy fabric.
- Magic Ring (MR): (Also known as Magic Circle or Adjustable Ring). This is the best way to start the pumpkin for a tight, hole-free center. An alternative chain method is also provided.
- Increase (inc): Work 2 sc in the same stitch.
- Decrease (dec): Work 1 sc over 2 stitches (invisible decrease recommended for a smoother finish).
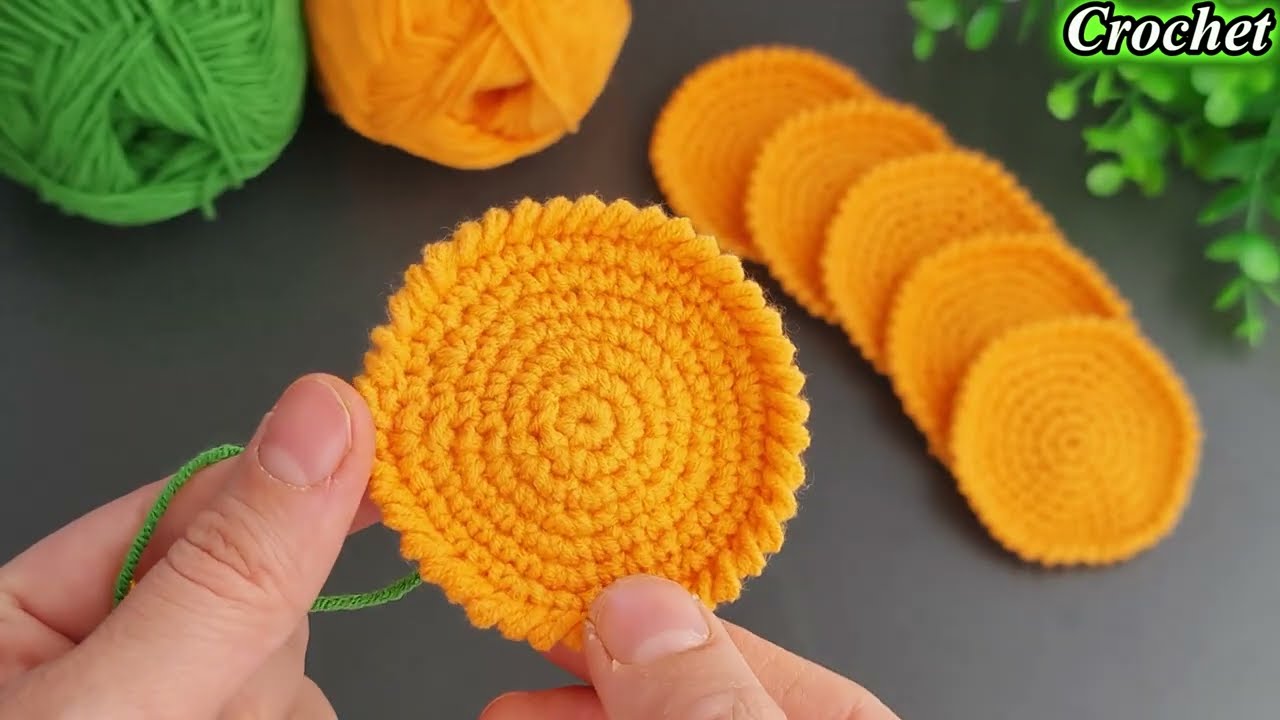
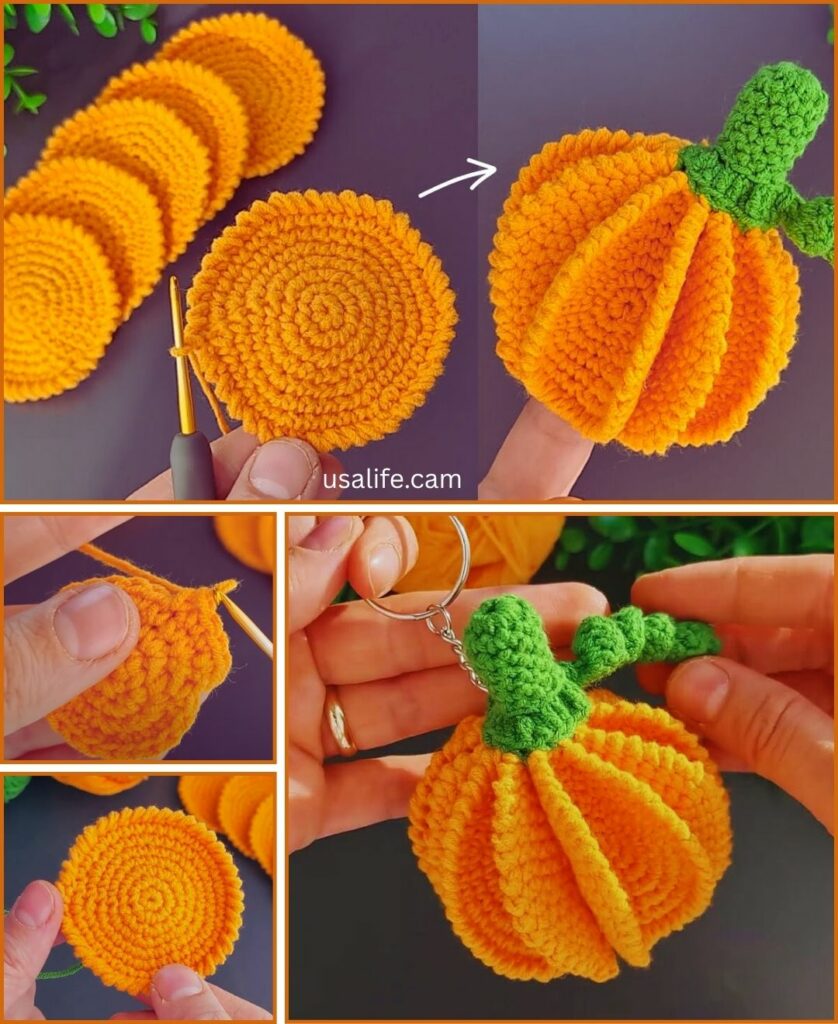
Part 1: Crocheting the Pumpkin Body
We’ll start by crocheting a small tube that will become your pumpkin.
Abbreviations (US Crochet Terms):
- ch: chain
- sc: single crochet
- sl st: slip stitch
- MR: magic ring
- inc: increase (work 2 sc in same stitch)
- dec: decrease (work 1 sc over 2 stitches)
- st(s): stitch(es)
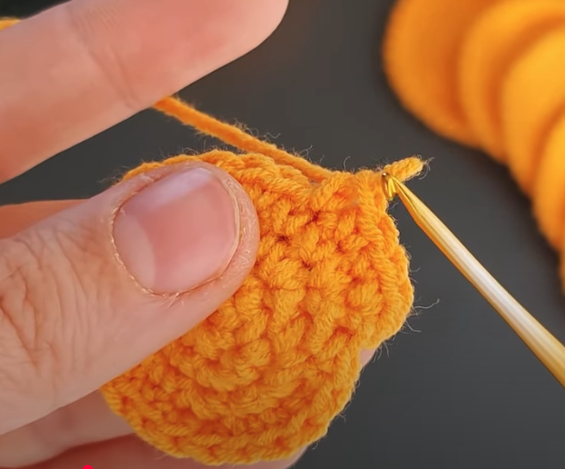
Instructions (Using your orange yarn):
- Start (Choose ONE method):
- Method A: Magic Ring (Recommended for a tighter center)
- Create a Magic Ring (MR).
- Ch 1 (does NOT count as a stitch).
- Work 6 sc into the Magic Ring.
- Gently pull the yarn tail to close the center hole tightly.
- Do NOT join with a slip stitch; we will work in continuous rounds for the pumpkin body. Use a stitch marker to mark the first stitch of each round. (6 sc)
- Method B: Chain Method (Easier for Beginners)
- Ch 2.
- Work 6 sc into the second chain from your hook (the very first chain you made).
- Do NOT join with a slip stitch; we will work in continuous rounds. Use a stitch marker to mark the first stitch of each round. (6 sc)
- Method A: Magic Ring (Recommended for a tighter center)
- Round 1: Work 2 sc in each st around (inc in each st). (12 sc)
- Round 2: *1 sc in the next st, inc in the following st*. Repeat from * to * around. (18 sc)
- Rounds 3-5: Work 1 sc in each st around. (18 sc per round – 3 rounds total of straight sc)
- This creates the height of your pumpkin.
- Round 6: *1 sc in the next st, dec over the next 2 sts*. Repeat from * to * around. (12 sc)
- Invisible Decrease (recommended): Insert hook into front loop of first stitch, then immediately insert hook into front loop of second stitch. Yarn over, pull through both front loops (2 loops on hook). Yarn over, pull through both loops.
Part 2: Stuffing and Shaping the Pumpkin
Now we’ll give your pumpkin its characteristic round, squishy shape.
- Stuffing: Before the opening gets too small, gently push a small amount of polyester fiberfill into your pumpkin. Stuff it firmly but not so much that the stitches stretch open.
- Close the Opening:
- Continue working 1 sc in each st around for a few stitches if needed to align for closing.
- Work dec over the next 2 sts around. (6 sc remaining)
- Cut your orange yarn, leaving a long tail (about 8-10 inches / 20-25 cm).
- Thread the tail onto your yarn needle.
- Pass the needle through the front loop of each remaining stitch, then pull gently to cinch the hole closed. Secure with a knot.
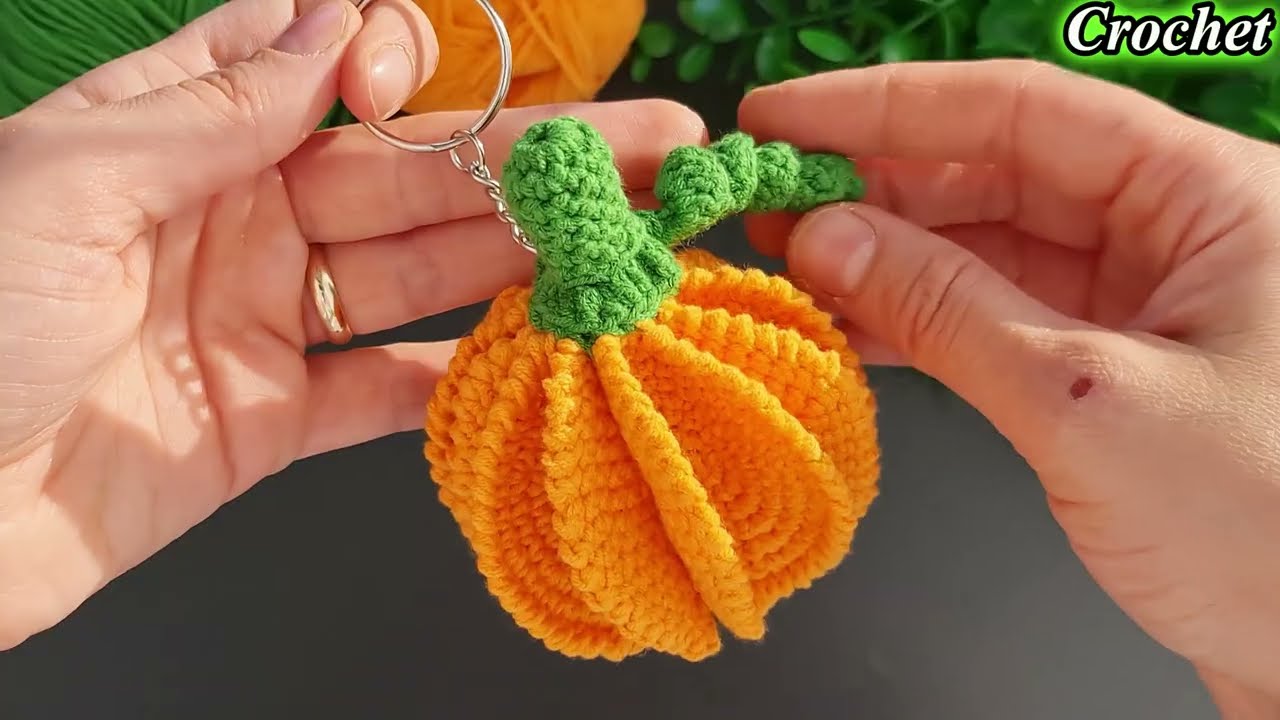
- Shaping the Ridges: This step gives the pumpkin its classic segmented look.
- Insert your yarn needle (with the long orange tail still threaded) through the center top of the pumpkin and out the center bottom.
- Pull firmly, indenting the pumpkin slightly.
- Wrap the yarn around the outside of the pumpkin, bringing the needle back up through the center bottom and out the center top again, slightly offset from the first “ridge.”
- Repeat this 3-4 more times, evenly spacing the wraps around the pumpkin to create 4-5 distinct segments or “ribs.” Pull firmly each time to create the indentation.
- Once you’re happy with the shape, secure the yarn tail by weaving it into the pumpkin body. Trim any excess.
Part 3: Crocheting the Stem
A tiny stem completes the pumpkin!
Instructions (Using your brown or green yarn):
- Ch 4.
- Work 1 sl st into the 2nd chain from your hook. Work 1 sl st in the next chain. Work 1 sc in the last chain.
- This creates a short, slightly curled stem.
- Fasten off, leaving a tail of about 6 inches (15 cm).
Part 4: Assembly & Finishing
Bringing it all together!
- Attach the Stem: Using your yarn needle, thread the tail from the stem. Sew the base of the stem firmly to the center top of the pumpkin, right where all your shaping stitches meet. Make several small, secure stitches.
- Create the Keychain Loop:
- With the same yarn tail from the stem, or by joining a new piece of the stem color, Ch 15-20 (adjust this length for your desired loop size; hold it up to your keychain hardware to test).
- Sl st into the base of the stem (or a very secure stitch directly adjacent to it). This forms the loop.
- Fasten off, leaving a short tail.
- Reinforce the Loop: Use your yarn needle to weave the last yarn tail securely around the base of the chain loop and into the stem/pumpkin. Stitch several times to ensure the loop is very strong and won’t pull out with daily use. This is crucial for a keychain!
- Final Weaving: Weave in any remaining yarn tails into the pumpkin body or stem. Trim any excess yarn very close to the fabric.
Part 5: Attaching the Keychain Hardware
- Simply slide your split ring or lobster clasp onto the crocheted loop you just created. Make sure it’s fully on the loop and secure.
Tips for a Perfect Mini Pumpkin Keychain
- Tight Tension: For any small amigurumi like this keychain, maintaining a firm, tight tension is vital. This prevents the stuffing from showing through and helps the pumpkin maintain its cute, defined shape.
- Invisible Decrease: Learning the invisible decrease (mentioned in Round 6) makes a huge difference in the smoothness of your crocheted items.
- Secure Ends: Take extra care to weave in all your yarn tails thoroughly. Loose ends on a keychain are prone to unraveling due to constant handling.
- Reinforce the Loop: Do not skip the step of reinforcing the keychain loop with extra stitches. This is the main point of stress for a keychain and needs to be robust.
- Customization: You can adjust the size of your pumpkin by adding or subtracting increase/decrease rounds. Experiment with different colors for a whole pumpkin patch of keychains!
You’ve now created an adorable, durable, and unique mini crochet pumpkin keychain! It’s a perfect little accessory or a thoughtful handmade gift.