 by
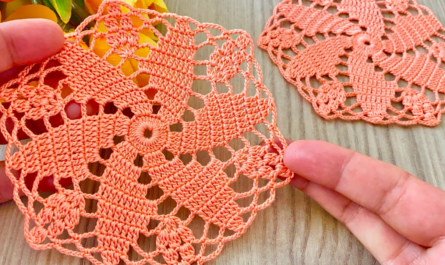
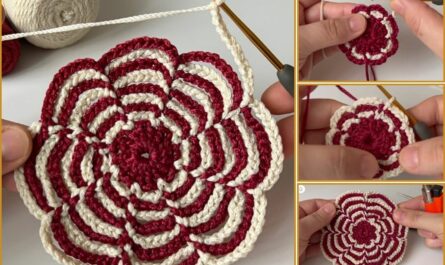
by That sounds like a fabulous, modern project! The Windmill Crochet Motif is an incredibly stylish choice for a blouse because it creates a dynamic, swirling effect that looks intricate but is often simpler to construct than you might think.
The “windmill” effect is usually achieved by alternating colors and manipulating stitch placement to create a visual spiral. We’ll use this motif to construct a modular woman’s blouse.
🌬️ Windmill Crochet Motif Pattern Tutorial
This pattern creates a square motif with a swirling, four-section windmill design, which is essential for assembling a modern blouse.
Materials You’ll Need
- Yarn: Fingering or Sport Weight Yarn (Size 1 or 2) in a soft fiber (cotton, bamboo, or silk blend) for a good drape.
- Colors: Color A (Swirl Color 1, e.g., White), Color B (Swirl Color 2, e.g., Blue), and Color C (Joining/Border Color).
- Crochet Hook: The size recommended for your yarn (e.g., 3.0 mm – 4.0 mm).
- Scissors, Tapestry Needle.
Key Crochet Terms
| Abbreviation | Stitch Name |
| ch | Chain |
| sl st | Slip Stitch |
| sc | Single Crochet |
| dc | Double Crochet |
| Shell | (3 dc, ch 2, 3 dc) in one space (for corners) |
Part 1: The Windmill Motif (Working in the Round)
We will work a small central circle and then build four swirling quadrants.
Round 1: The Center (Color A)
- Start: With Color A, make a Magic Ring.
- Base: ch 3 (counts as dc). Work 15 dc into the ring.
- Finish: Pull the tail tight. Join with a sl st to the top of the ch 3. Fasten off Color A. (16 sts).

Round 2: Setting up the Blades (Color B)
- Join: Join Color B into any stitch with a sl st.
- First Blade Anchor: ch 5 (counts as 1 dc, ch 2). dc into the same stitch. (Creates a V-stitch).
- Side: ch 1, skip 3 sts.
- Repeat: [V-stitch (dc, ch 2, dc) in the next st, ch 1, skip 3 sts] 3 more times. (4 V-stitches total).
- Finish: Join with a sl st to the 3rd ch of the beginning ch 5. Fasten off Color B.
Round 3: The Swirl (Color A)
We work clusters into the V-stitches and the space before the V-stitches, creating the angular motion.
- Join: Join Color A into the ch-1 space before any V-stitch with a sl st.
- First Side: ch 3 (counts as dc).1 Work 2 dc into the same ch-1 sp. ch 1.
- Next: Work 3 dc into the V-stitch ch-2 space. ch 1.
- Repeat: [3 dc into the next ch-1 sp, ch 1, 3 dc into the next V-stitch ch-2 sp, ch 1] 3 more times.
- Finish: Join with a sl st to the top of the ch 3. Fasten off Color A. (8 clusters total).

Round 4: Squaring Up (Color C)
This round defines the four corners using the alternating colors from R3 as anchors.
- Join: Join Color C into the ch-1 space between the two clusters of the same color (A or B—you should see two clusters of the same color separated by a chain).
- First Corner: ch 3. Work (2 dc, ch 2, 3 dc) into the same space.
- Side: ch 1. Work 3 dc into the next ch-1 sp. ch 1. Work 3 dc into the next ch-1 sp.
- Next Corner: Work (3 dc, ch 2, 3 dc) into the next ch-1 space.
- Repeat: Continue the sequence [Corner Shell, ch 1, 3 dc cluster, ch 1, 3 dc cluster, ch 1] around.
- Finish: Join with a sl st to the top of the ch 3.
Part 2: Constructing the Woman’s Blouse
A blouse constructed with square motifs requires a simple grid layout, similar to a classic granny square top.
1. Determining Sizing and Motif Count
- Measure: Determine your ideal chest circumference and blouse length.
- Motif Size: Measure your completed R4 motif. Example: 5 inches.
- Calculation: If your chest is 35 inches, you need 7 motifs across the front and back (7 x 5 = 35 inches). You will need 7 motifs wide by [desired length / motif size] long.
- Total Motifs: A simple top might require 40–60 motifs.

2. Layout and Assembly
The blouse is built by joining rectangles for the front and back, then joining those two panels.
- Front Panel: Lay out your required motifs in a grid (e.g., 7 wide x 5 long).
- Back Panel: Lay out an identical grid.
- Join: Use the Join-as-You-Go (JAYG) method (joining on the final round) for the neatest, most stylish finish.
- JAYG Technique: When working the final round of a new motif, replace the center chain of the side chains and corner chains with a sl st into the corresponding chain space of the finished motif.
3. Shaping the Neckline
- When assembling the front panel, leave a central gap (2–3 motifs wide) at the top of the front panel to form the neckline.
- The gap should be filled later with a small, solid piece or a simple edging.
4. Joining and Finishing
- Shoulder Seams: Join the top two motif rows of the Front and Back panels at the shoulders.
- Side Seams: Join the Front and Back panels along the sides, leaving a large opening for the armholes.
- Edging:
- Neckline/Armholes: Work 1-2 rounds of simple single crochet (sc) or Moss Stitch (sc, ch 1) around all open edges to provide stability and a clean, non-stretching finish.
- Hem: Work a simple scalloped edge or a few rows of solid double crochet for weight and drape.

5. Final Step: Blocking
Blocking is crucial for a motif-based garment. It straightens the seams and allows the yarn to relax, giving the blouse the beautiful drape required for a stylish garment.
Video tutorial: