 by
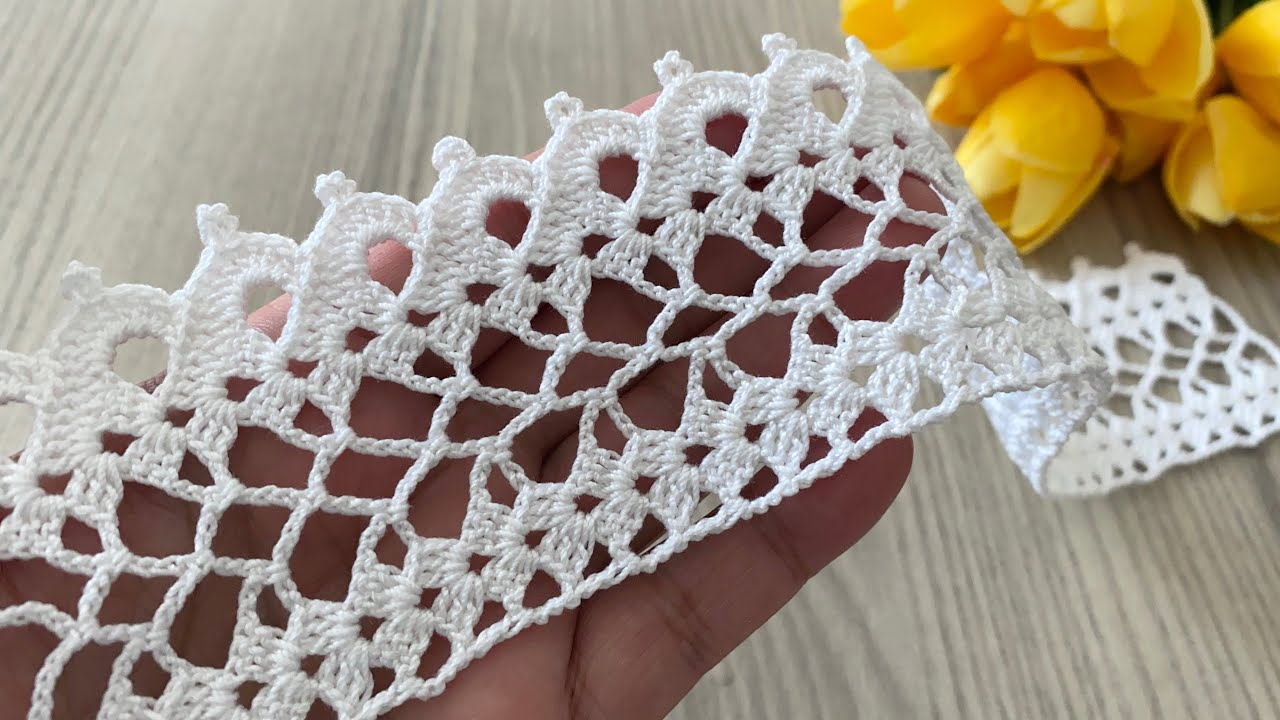
by That’s a fantastic skill to master! A Multi-Purpose Edge Lace is a border pattern that is flexible enough to be applied to straight edges (like towels or runners), curved edges (like necklines), and corners (like blankets or scarves).
The key is choosing a design that uses a simple, easily adjustable repeat count and has a defined corner structure. The Shell and Picot Edge is the most popular choice for its versatility, ease of adjustment, and classic elegance.
Here is a detailed tutorial on how to create and adapt this highly versatile edge lace.
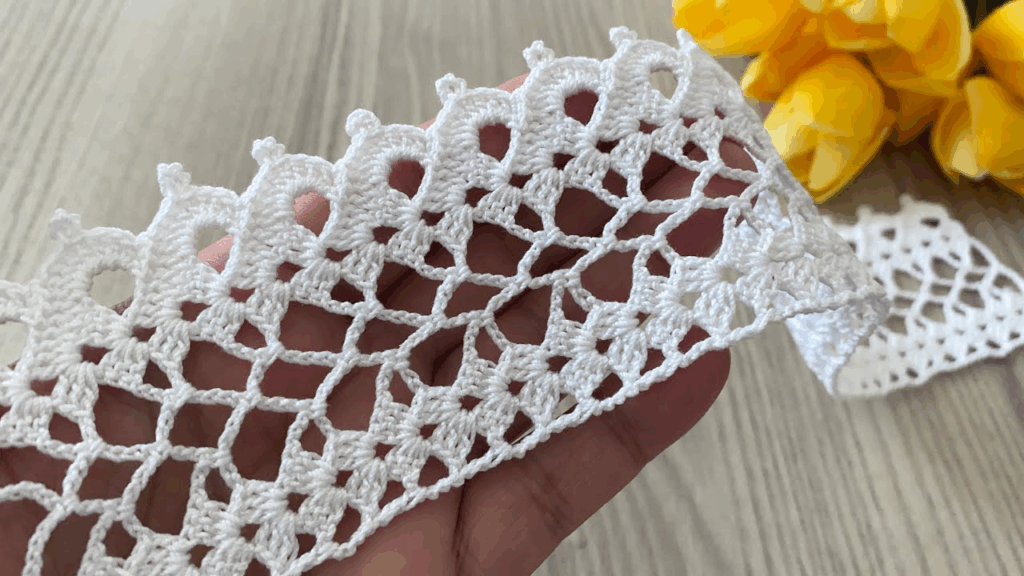
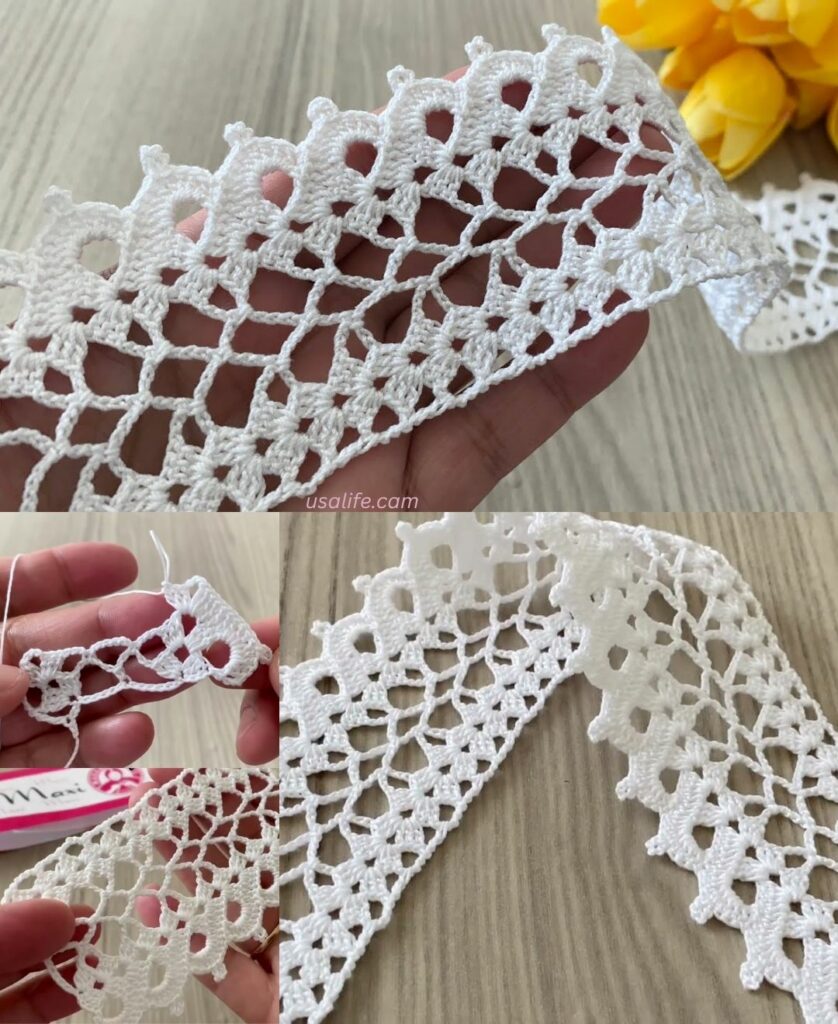
🌊 Multi-Purpose Shell and Picot Edge Lace Tutorial
This lace uses the classic double crochet shell for the scallop shape and a picot stitch for the delicate, pointed finish.
Materials You’ll Need
- Project: Your item (blanket, towel, shawl, etc.) ready for the border.
- Yarn/Thread: Compatible weight with your project (cotton thread for fine edges; yarn for blankets).
- Crochet Hook: Appropriate size for your yarn.1
- Scissors, Tapestry Needle.
Key Crochet Terms
| Abbreviation | Stitch Name |
| ch | Chain |
| sl st | Slip Stitch |
| sc | Single Crochet |
| dc | Double Crochet |
| Picot | Ch 3, sl st into the first ch (creates a small loop/point) |
| Shell | A group of stitches worked into one space/stitch |
Foundation: The Preparation Round (Crucial!)
Before starting the lace, you must establish an even base of single crochet (sc) stitches along the entire perimeter. This base gives the lace a sturdy anchor and allows you to control the final tension.
- Join Yarn: Join your yarn to any corner (if applicable) or a straight edge.
- Work SC Evenly: Work a round of sc evenly all the way around the edge.
- Crucial Edge Check: The repeat for this Shell pattern is 6 stitches. Therefore, the total number of single crochet stitches along any edge should ideally be a multiple of 6 + 1.
- Corners: If your item has corners (blanket, square), work 3 sc into each corner stitch to keep the edge flat.
- Join with a sl st to the first sc.

Part 1: Shell and Picot Lace Pattern
This pattern is worked over the base of the Preparation Round.
- Round 2 (Shell Creation): ch 1 (does not count as st).
- Work sc in the same stitch (anchors the round).
- Skip: Skip the next 2 stitches.
- First Shell: Work [5 dc] into the next stitch.
- Skip: Skip the next 2 stitches.
- Anchor: Work sc into the next stitch.
- Repeat: Repeat the sequence [Skip 2 sts, 5 dc Shell in next st, Skip 2 sts, sc in next st] around the entire perimeter.
- Join with a sl st to the first sc.
Round 3 (Picot Finish)
This round adds the decorative picot points and finishes the lace.
- sl st into the next 3 dc stitches (to move to the peak of the first shell).
- Petal Point: Work sc in the 3rd dc (the center of the 5-dc shell).
- Work a Picot (ch 3, sl st into the first ch).
- Descent: Work sc in the next sc anchor between the shells.
- Repeat: [sl st over the next 3 dc of the shell, sc in the center of the shell, Picot, sc in the sc anchor between the shells] around the entire perimeter.
- Join with a sl st. Fasten off.

Part 2: Adapting the Lace for Different Shapes
A. Straight Edge (Towel, Scarf)
- Adjustment: Ensure the starting Preparation Round (R1) count is a multiple of 6 + 1. You may need to decrease or increase slightly in R1 to hit this number exactly, making sure the beginning and end of the final border meet cleanly.
- Method: Work R2 and R3 straight across the edge, turn, and finish.
B. Corner Adaptation (Blanket, Square Motif)
You need to place a Shell cluster exactly at the corner for a crisp turn.
- R1 Adjustment: When planning your sc count in the Preparation Round, ensure the 3 sc corner increase is treated as the center anchor for the first shell of the new edge.
- Corner Placement in R2: You must adjust the skip count so that the 5 dc Shell is worked directly into the center sc of the corner (the 2nd sc of the 3 sc cluster). This forces the lace to turn smoothly.

C. Curved Edge (Neckline, Doily)
Curved edges naturally require more stitches to lay flat than a straight edge of the same measurement.
- R1 Adjustment: Do NOT try to hit the exact multiple of 6 + 1. Instead, aim for a slightly denser SC count in R1.
- R2 Adjustment (Increase): If the lace starts to pucker, you can substitute a few of the
scanchors with a sl st or use a ch 3 instead ofch 2for the skip count to add ease without disrupting the shell pattern.
Final Step: Blocking
For a professional finish, wet the lace (especially if using cotton thread) and use pins to gently shape and flatten the edge while it dries. This locks in the scallop shape and opens up the picots.
Video tutorial: