by
by 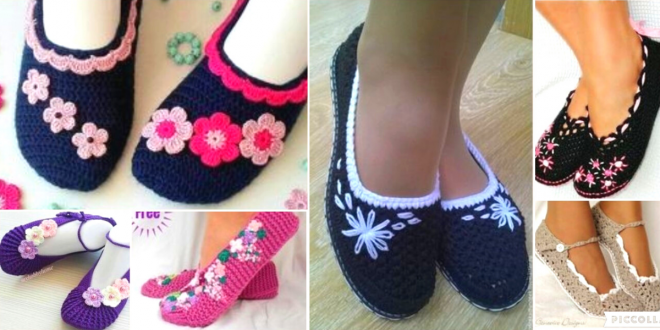
The feeling of slipping into a warm, handcrafted pair of slippers is pure bliss. Whether you’re enjoying a cup of tea by the fireplace or lounging on the couch, these personalized foot warmers add a touch of comfort and charm. But forget store-bought, generic options! Today, we’ll delve into the delightful world of crocheting your own beautiful slippers, perfect for both beginners and experienced stitchers.
Choosing Your Yarn and Hook:
The key to comfortable and stylish slippers lies in the right materials. Opt for soft, bulky yarn like chenille or acrylic that’s gentle on your skin and machine washable. Consider adding a strand of mohair for extra fluffiness. A hook size recommended for your chosen yarn weight will ensure proper stitch gauge and drape.
Pattern Options:
For beginners, a simple slipper pattern with basic stitches like single crochet and double crochet is ideal. Look for patterns with clear instructions and visuals like charts or diagrams. As you gain confidence, explore fancier stitches, textures, and embellishments like cables, bobbles, or pom-poms.
Let’s Get Crocheting!
Here’s a basic slipper pattern to get you started:
Materials:
- Bulky yarn (2 skeins)
- Crochet hook (size recommended for yarn)
- Yarn needle
- Optional: tapestry needle, pom-poms, buttons
Instructions:
1. Sole:
- Chain a number of stitches to fit your foot width (around 20-25 for an average adult foot).
- Single crochet into each chain, turning at the end of each row.
- Continue crocheting rows until the sole reaches your desired length (measure your foot for reference).
2. Heel shaping:
- Decrease stitches at both ends of each row until you have a small opening remaining.
- Sew the opening closed using a yarn needle.
3. Sides and toe:
- Starting from the sole, single crochet up one side of the heel opening.
- Chain a few stitches to turn the corner and continue crocheting up the other side.
- Decrease stitches as needed to shape the toe (refer to your pattern for specifics).
- Sew the toe closed using a yarn needle.
4. Finishing touches:
- Weave in any loose ends.
- Add embellishments like pom-poms, buttons, or embroidery for a personalized touch.
Tips for Success:
- Gauge your stitches carefully to ensure the slippers fit well.
- Use stitch markers to keep track of your rounds and rows.
- Don’t hesitate to adjust the pattern based on your foot size and preferences.
- Practice basic stitches before starting the project.
- Most importantly, have fun and experiment!
Beyond the Basics:
Once you’ve mastered the basic slipper, explore a world of creative possibilities:
- Make different slipper styles like moccasins, booties, or flip-flops.
- Use vibrant colors, textures, and patterns to express your personality.
- Add a non-slip sole for extra safety and durability.
- Craft slippers for friends and family as thoughtful gifts.
Crocheting beautiful slippers is a rewarding journey that combines practicality with creativity. So, grab your yarn, hook, and get ready to cozy up in style!
Remember: This is just a starting point. There are countless slipper patterns and resources available online and in craft books. Don’t be afraid to search, experiment, and personalize your project to create the perfect pair of slippers that reflect your unique taste and skill level.
Happy crocheting!
Video tutorial