by
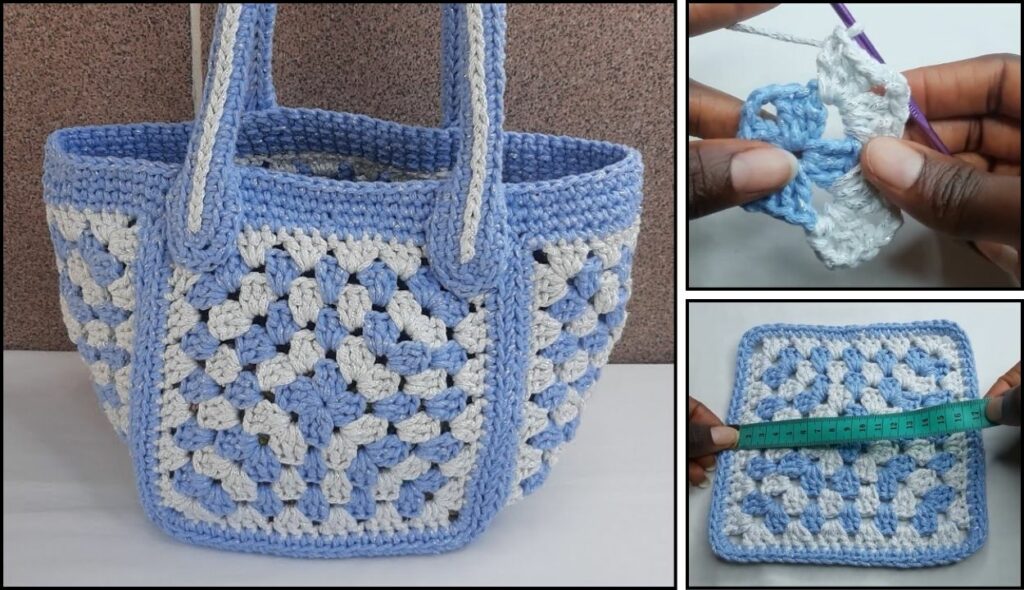
by A square crochet bag is a fantastic project for beginners! It’s straightforward, uses basic stitches, and lets you create a sturdy, stylish accessory that’s perfect for everyday use or as a market bag. Plus, it’s a great way to use up yarn scraps and play with different colors.
Since you’re in Phnom Penh, where it’s generally warm, 100% cotton yarn or a sturdy cotton blend is an excellent choice for your bag. Cotton is durable, holds its shape well (important for a bag), has great stitch definition, and is breathable. It’s also easy to wash, which is practical for a bag that will see a lot of use.
How to Crochet a Simple Square Bag
This tutorial will guide you through creating a medium-sized, top-down square bag. This means you’ll start at the bottom of the bag and work your way up in rounds, creating a seamless main body. We’ll then add handles.
1. Essential Materials You’ll Need
- Yarn:
- Main Color (MC): For the body of the bag. Worsted Weight (Aran / Medium / Category 4) is a good standard. For a sturdier bag, consider using a bulky (Category 5) yarn or holding two strands of worsted weight yarn together.
- Quantity: Approximately 150-250g for a medium bag, depending on size and yarn thickness.
- Crochet Hook:
- For Worsted weight yarn, a 5.0mm (US H/8) or 5.5mm (US I/9) hook. If you’re holding two strands together or using bulky yarn, you might need a 7.0mm (US K/10.5) or 8.0mm (US L/11) hook.
- Choose a hook size that makes your stitches fairly dense and firm. You want the bag to have structure and not stretch too much when filled.
- Scissors: For cutting yarn.
- Yarn Needle (Tapestry Needle): Essential for weaving in ends.
- Stitch Markers (Highly Recommended!): Crucial for marking corners and the beginning of rounds, especially when working in a spiral.
2. Basic Crochet Stitches You’ll Use
This pattern uses fundamental crochet stitches, perfect for beginners:
- Chain (ch): Used for the foundation and turning chains.
- Slip Stitch (sl st): For joining rounds and neatening.
- Single Crochet (sc): Creates a dense, sturdy fabric, great for the base and handles.
- Half Double Crochet (hdc): A medium-height stitch, good for the bag’s body.
- Double Crochet (dc): A taller stitch, also good for the bag’s body if you want more drape.
- Working in Rounds (Joined or Spiral): You’ll build the bag in circles from the base up.
- Fasten Off: Securely ending your work.
- Weaving in Ends: Hiding yarn tails for a neat finish.

Crochet Square Bag Pattern (Medium Size)
This pattern will create a bag that’s roughly 8-10 inches (20-25 cm) wide and tall, but you can easily adjust the size. We’ll use half double crochet (hdc) for the body, as it provides good density and works up relatively quickly.
Abbreviations (US Crochet Terms):
- MC: Main Color
- ch: chain
- sl st: slip stitch
- sc: single crochet
- hdc: half double crochet
- st(s): stitch(es)
(...): work stitches into the same stitch or space[...]: repeat instructions in brackets- FO: Fasten off
Part 1: The Base of the Bag
We’ll start with a rectangular foundation chain and work around it to create a flat, square-ish base.
- Foundation Chain: Ch 21. (This determines the length of your bag’s base. For a longer bag, chain more; for a shorter one, chain less. Keep it an odd number if you want a central stitch for increases).
- Round 1:
- Work 2 hdc into the 2nd ch from hook.
- Work 1 hdc in each of the next 18 chains.
- In the last chain, work 5 hdc. (This creates the first corner curve).
- Now, working down the opposite side of the foundation chain (into the unused loops): Work 1 hdc in each of the next 18 chains.
- Work 3 hdc into the very last chain (which is also the first chain you worked into).
- Join with a sl st to the top of the first hdc. (46 hdc total)
- Place stitch markers in the 3rd of the 5-hdc group and the 2nd of the 3-hdc group at the ends – these will be your corner stitches for the next round.
- Round 2:
- Ch 1 (does not count as a stitch).
- Work 1 hdc in each st until you reach the stitch marker at the corner.
- In the marked corner stitch, work (hdc, ch 2, hdc). (This creates a sharp corner).
- Work 1 hdc in each st along the side until you reach the next stitch marker.
- In the marked corner stitch, work (hdc, ch 2, hdc).
- Continue working 1 hdc in each st until you reach the first corner you made (where you started).
- Join with a sl st to the top of the first hdc.
- Move your stitch markers to the newly created ch-2 spaces.
- Round 3 (Optional – for a larger base):
- Ch 1.
- Work 1 hdc in each st until you reach a ch-2 corner space.
- In the ch-2 corner space, work (hdc, ch 2, hdc).
- Repeat this across all four sides, increasing in each ch-2 corner space.
- Join with a sl st to the first hdc.
- Continue repeating Round 3 until your base is the desired size. For a perfectly square base, ensure your stitch count on each side is equal before starting the body.
Part 2: The Body of the Bag
Now we’ll make the sides stand up, working in continuous rounds (spiral) or joined rounds (less visible seam). I’ll provide instructions for joined rounds for easier corner management for beginners.
- Round 4 (Creating the Defined Edge):
- Ch 1.
- Work 1 sc in the back loop only (BLO) of each stitch around. When you reach a ch-2 corner space, simply skip it. This will pull the stitches inwards and make the sides stand up crisply.
- Join with a sl st to the first sc.
- This round transitions from the flat base to the upright sides. Your stitch count will decrease slightly as you skip the ch-2 spaces.
- Round 5 onwards (Building Height):
- Ch 1.
- Work 1 hdc in each stitch around (working through both loops now).
- Join with a sl st to the first hdc.
- Repeat this round until your bag reaches your desired height (leaving room for the handles). Aim for a height that complements the base.

Part 3: Creating the Handles
You’ll create spaces for the handles by chaining across the top opening of the bag.
- Handle Placement Round (Final Hdc Round):
- Before you do your very last hdc round of the bag’s body, determine where you want your handles to be.
- Example for a square bag: Work hdc stitches along the front side. When you reach the desired start point for your first handle (e.g., about 8-10 stitches in from the corner), ch 20-30 (adjust chain length for handle drop). Skip the next 15-20 stitches (the opening for the handle). Work hdc in the next stitch to secure the chain.
- Continue hdc across the side, repeat the handle chain and skip process for the second handle on the back side.
- Finish the round with hdc until the beginning. Join with a sl st.
- Adjust chain length and skipped stitches to customize handle size and placement.
- Reinforcing the Top Edge and Handles:
- Round 1 (Sc around): Ch 1. Work 1 sc in each hdc stitch and 1 sc into each chain of the handle. This means you’ll work sc stitches into the chains you made for the handles, strengthening them.
- Join with a sl st to the first sc.
- Round 2 (More Sc): Ch 1. Sc in each sc around. This creates a neat and firm top edge.
- Join with a sl st to the first sc.
- Fasten off MC, leaving a tail for weaving in.
4. Finishing Your Square Bag
- Weave in All Ends NEATLY: This is absolutely crucial for a polished, professional-looking bag. Use your yarn needle to carefully weave in every single yarn tail securely into the stitches on the inside of your bag. Take your time to hide them well.
- Blocking (Optional but Recommended): Blocking can significantly improve the shape and drape of your bag.
- Gently wet the entire bag.
- Stuff the bag lightly with towels or plastic bags to help it hold its square shape.
- Allow it to air dry completely. Blocking helps even out your stitches and gives the bag a more finished look.
5. Tips for a Charming & Durable Square Bag
- Yarn Choice & Hook Size: Using cotton yarn and a slightly smaller hook (to create denser stitches) will result in a sturdier bag that holds its shape better. If your stitches are too loose, the bag will stretch and sag when filled.
- Consistent Tension: Maintain even tension throughout your project to ensure the bag is symmetrical and the stitches are uniform.
- Stitch Count: Always count your stitches at the end of each round, especially on the base, to ensure your bag stays square.
- Handle Comfort: Consider the weight you’ll put in the bag. Wider handles (more rows of sc or a denser stitch) are generally more comfortable for heavier loads.
- Personalize It:
- Stripes: Change colors every few rounds for a striped effect.
- Textured Stitches: Experiment with different stitch patterns for the body (e.g., moss stitch, linen stitch, basket weave) to add texture.
- Lining: For a more finished and durable bag, you can sew a fabric lining inside. This is a bit more advanced and requires basic sewing skills.
- Pockets: Crochet a separate flat rectangle and sew it to the inside of the bag for an interior pocket.
You’re now ready to crochet a fantastic square bag! Enjoy creating your own handmade accessory for everyday use in Phnom Penh.