 by
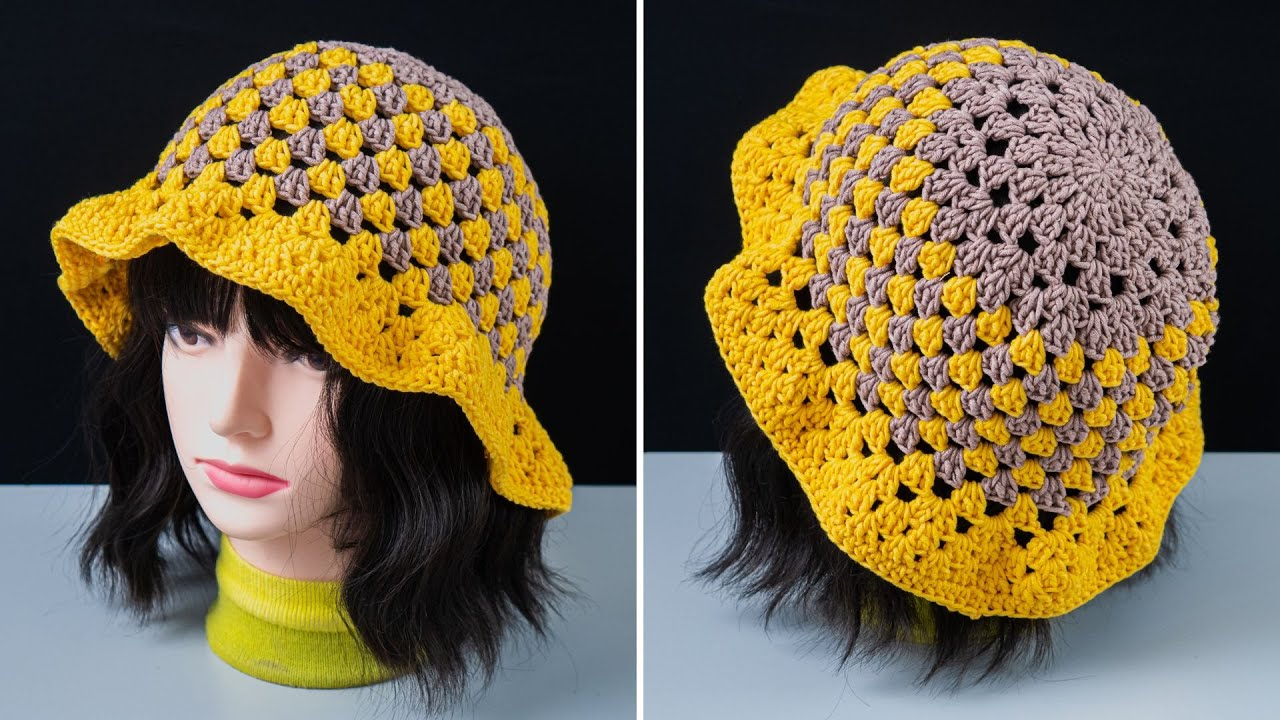
by How to Crochet a Granny Square Summer Bucket Hat
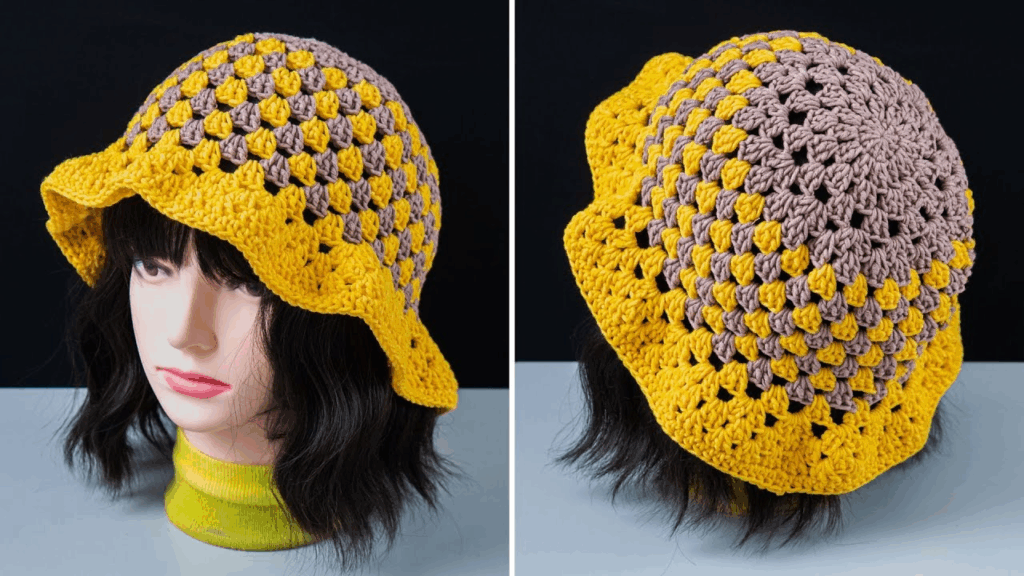
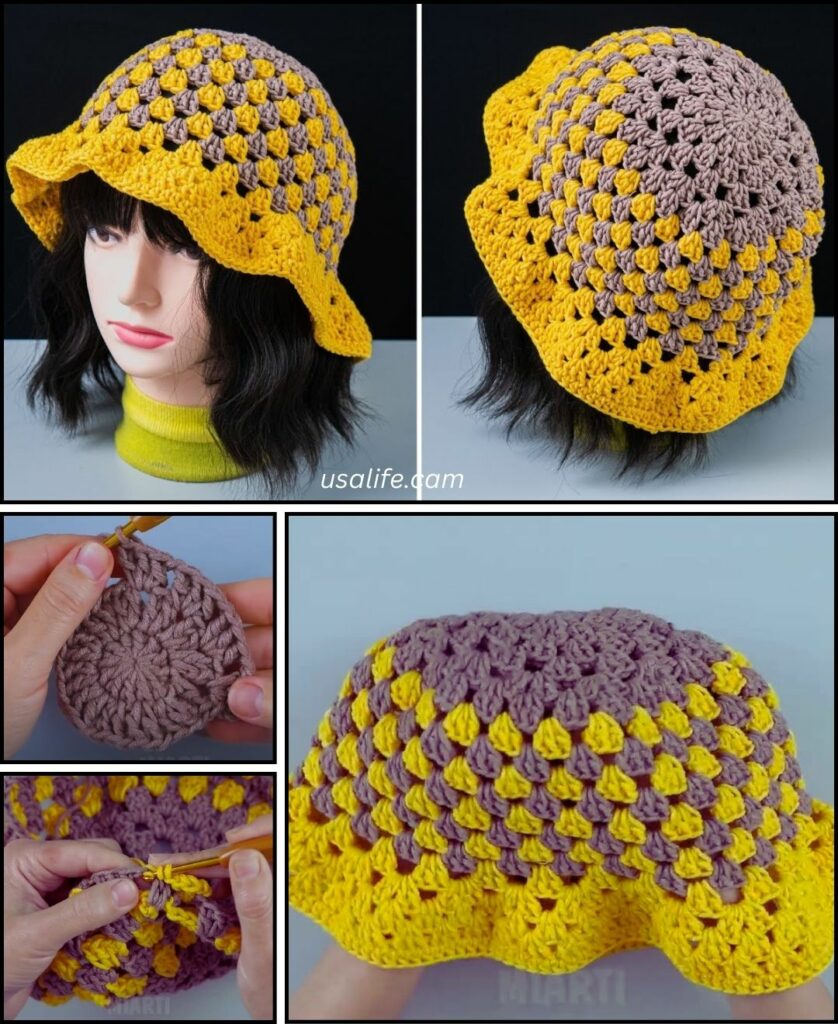
A granny square summer bucket hat is a fantastic project that combines classic crochet charm with a trendy, functional accessory! It’s perfect for warm weather in Phnom Penh, as it allows for great airflow, especially when using cotton yarn. Plus, it’s a wonderful way to play with colors and make a truly unique piece.
For this project, I highly recommend using 100% cotton yarn or a cotton blend (e.g., cotton/bamboo, cotton/linen). Cotton is breathable, durable, and has excellent stitch definition, which is ideal for showing off those granny square details. It also helps the hat keep its shape without being too heavy.
1. Essential Materials You’ll Need
- Yarn:
- Fiber: 100% Cotton or a Cotton Blend (DK or Worsted weight). These are light, breathable, and great for summer.
- Colors: Get creative! You’ll need at least one color for your granny squares and potentially a main color for joining and the brim. This is a brilliant stash-busting project for yarn scraps.
- Quantity: For a standard adult-sized hat, you’ll need approximately 100-150g of yarn in total, depending on your hook size and the exact pattern of your granny squares.
- Crochet Hook:
- For DK weight yarn, a 3.5mm (US E/4) or 4.0mm (US G/6) hook.
- For Worsted weight yarn, a 4.5mm (US 7) or 5.0mm (US H/8) hook.
- Choose a hook size that creates a fabric with good drape but isn’t too flimsy. You want some structure for the hat.
- Scissors: For cutting yarn.
- Yarn Needle (Tapestry Needle): Crucial for weaving in ends and securely joining your squares.
- Stitch Markers (Optional but helpful): To mark corners or the beginning of rounds.
- Measuring Tape: To check hat circumference and depth as you go.
2. Basic Crochet Stitches You’ll Use
This project relies on fundamental crochet stitches, particularly those found in classic granny squares:
- Chain (ch): Used for foundation, spacing, and forming corner spaces.
- Slip Stitch (sl st): For joining rounds and neatening.
- Double Crochet (dc): The main stitch for granny square clusters.
- Single Crochet (sc): Often used for joining squares and for the brim.
- Working in Rounds & Rows: You’ll work squares in rounds and then join them. The brim is typically worked in rounds.
- Magic Ring (MR) / Adjustable Ring: (Optional but highly recommended) Creates a tight, hole-free center for your first round. Alternatively,
ch 4, then sl st to joininto the first chain to form a ring.
3. Granny Square Pattern (Classic Style)
You’ll need to make several identical granny squares. The exact number will depend on the size of your squares and the desired circumference of your hat. For most adult hats, you’ll need around 8-10 squares for the sides and 1 large square or a round top for the crown.
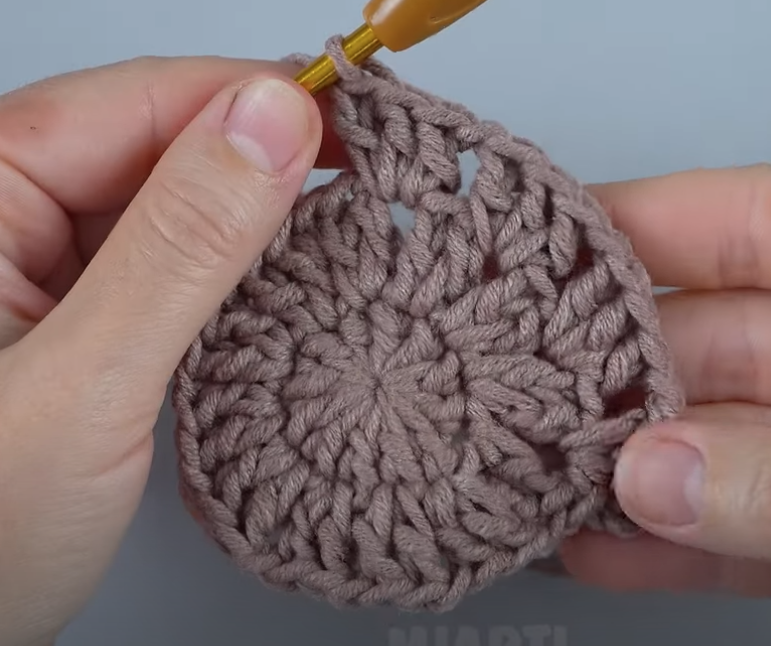
To Make One Granny Square (Example with 3 Rounds/Colors):
- Start (Color A): With Color A, create a Magic Ring (MR).
- (Alternatively: Ch 4, then sl st into the 1st ch to form a ring.)
- Round 1: Ch 3 (counts as 1st dc). Work 2 dc into the ring.
*Ch 2 (creates a corner space). Work 3 dc into the ring.*Repeat from*to*2 more times. Ch 2. Join with a sl st to the top of the beginning Ch 3. (You’ll have 4 clusters of 3 dc, separated by ch-2 corner spaces).- Fasten off Color A.
- Round 2 (Color B): Join Color B with a sl st into any ch-2 corner space. Ch 3 (counts as 1st dc). Work (2 dc, ch 2, 3 dc) all into the same ch-2 corner space.
*Ch 1 (creates a side space). In the next ch-2 corner space, work (3 dc, ch 2, 3 dc).*Repeat from*to*2 more times. Ch 1. Join with a sl st to the top of the beginning Ch 3.- Fasten off Color B.
- Round 3 (Color C): Join Color C with a sl st into any ch-2 corner space. Ch 3 (counts as 1st dc). Work (2 dc, ch 2, 3 dc) all into the same ch-2 corner space.
*Ch 1. Work 3 dc into the next ch-1 side space. Ch 1. In the next ch-2 corner space, work (3 dc, ch 2, 3 dc).*Repeat from*to*2 more times. Ch 1. Work 3 dc into the last ch-1 side space. Ch 1. Join with a sl st to the top of the beginning Ch 3.- Fasten off Color C.
- Weave in ALL yarn ends on each individual granny square as you complete them, or at least before you start joining. This will save you a lot of time later!
4. Planning Your Hat Layout
For a standard bucket hat, you typically have:
- One large square or a crocheted circular top for the crown (the top of the hat).
- A band of squares forming the sides of the hat. This band is usually made of squares joined side-by-side to form a circle.
- A brim that extends outwards.
Common Layouts:
- Round Top with Square Sides:
- Top: Crochet a solid circle in single crochet (sc) or double crochet (dc) until its diameter matches the side length of your granny squares. For example, if your squares are 4×4 inches, make a 4-inch diameter circle.
- Sides: Join 5-6 granny squares together in a straight line, then join the ends to form a large ring.
- The circumference of this ring should match the circumference of your circular top.
- Granny Square Top with Square Sides:
- Top: Use one larger granny square (e.g., 5-6 rounds) for the top of the hat.
- Sides: Join 4 identical granny squares (e.g., 3-4 rounds) to form the four sides of the hat. When using a square top and square sides, the hat will naturally have a more squared shape.
- All-Granny Square Construction (More Advanced): Some patterns use smaller squares or half-squares to perfectly shape a round top and tapered sides. This is more complex for beginners.
Let’s assume the “Round Top with Square Sides” method for this tutorial as it’s often more beginner-friendly for achieving a rounded bucket hat shape.

5. Joining Your Granny Squares (Main Color Recommended)
Use a consistent method for joining your squares. The single crochet join is durable and creates a subtle ridge, or the whip stitch with a yarn needle for a flatter, less visible seam. Use your main joining color for this.
- Form the Side Band:
- Take 5-6 (or whatever number fits your head circumference) completed granny squares.
- Using your chosen joining method (e.g., single crochet join): Place two squares wrong sides together, then sc through both loops of both squares along one edge.
- Continue joining squares in a line until you have a long strip.
- Finally, join the two ends of the strip to form a large ring. Ensure it’s not twisted.
6. Attaching the Crown to the Side Band
- Crochet the Crown (Round Top):
- With your main joining color, start with a Magic Ring.
- Rnd 1: 8 sc into MR. (8 sc)
- Rnd 2: Inc in each st around. (16 sc)
- Rnd 3: [Sc 1, inc] 8 times. (24 sc)
- Rnd 4: [Sc 2, inc] 8 times. (32 sc)
- Rnd 5: [Sc 3, inc] 8 times. (40 sc)
- Rnd 6: [Sc 4, inc] 8 times. (48 sc)
- Continue increasing in this manner (e.g., [Sc 5, inc], [Sc 6, inc] etc.) until the diameter of your circle matches the length of one side of your granny squares. For instance, if your squares are 4 inches, stop increasing when your circle is about 4 inches in diameter.
- Important: The stitch count of your final crown round should ideally match the total stitch count around the top edge of your joined granny square band. You might need to add a final round of sc (without increases) to match counts if they are slightly off.
- Join Crown to Side Band:
- Align the top edge of your granny square side band with the edge of your crocheted crown circle.
- Using your main joining color, use a slip stitch join or single crochet join to neatly attach the crown to the side band, working around the entire circumference. Ensure the stitches are evenly spaced.
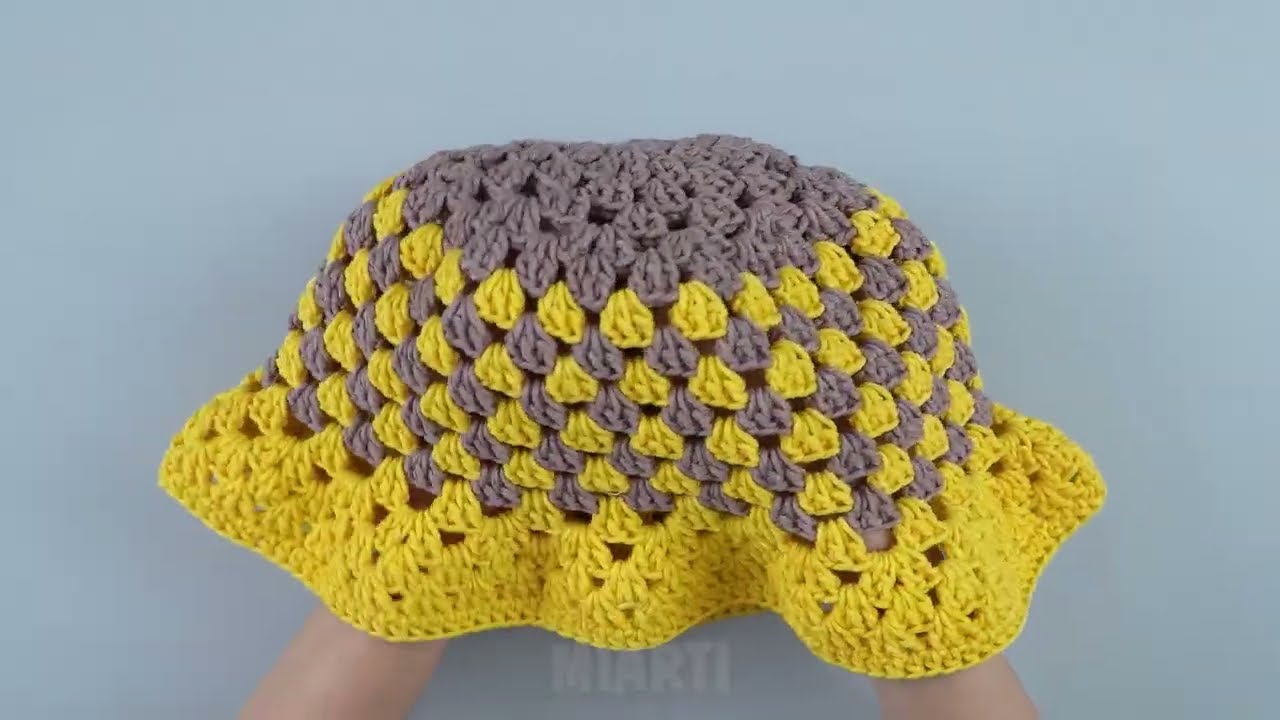
7. Crocheting the Brim
The brim gives the bucket hat its characteristic shape and provides sun protection. This is typically worked in rounds, increasing stitches to create the flare.
- Row 1 (Brim Start):
- Join your main color yarn to any stitch on the bottom edge of your hat.
- Ch 1 (does not count as st). Work 1 sc in each stitch around the entire bottom circumference of the hat.
- Join with a sl st to the first sc.
- Row 2 (Brim Flare):
- Ch 1. Work [sc in next 2 sts, inc] evenly around. (Adjust the
incspacing to achieve the desired flare. For example, if you have 80 sts around, you might do [sc 9, inc] 8 times for a subtle flare). - Join with a sl st.
- Ch 1. Work [sc in next 2 sts, inc] evenly around. (Adjust the
- Row 3:
- Ch 1. Work [sc in next 3 sts, inc] evenly around. (Continue increasing on each round, spacing increases further apart each time, e.g., [sc 10, inc], [sc 11, inc] etc.).
- Join with a sl st.
- Repeat these increasing rows for about 3-5 more rounds, or until your brim reaches your desired width. You can alternate between sc and hdc for a slightly different texture, but keep the increases consistent to maintain the flare.
- Final Brim Round (Optional for a stiff edge): Ch 1. Sc in each stitch around, without any increases. This helps solidify the brim.
- Fasten off, leaving a tail for weaving in.
8. Finishing Your Summer Bucket Hat
- Weave in ALL Remaining Ends: This is absolutely critical for a polished look and to prevent unraveling. Go back through your entire hat and meticulously weave in every yarn tail using your yarn needle.
- Blocking (Optional but Recommended): Blocking can significantly improve the shape and drape of your hat, especially the brim.
- Gently wet the entire hat.
- Lay it flat or place it over a bowl/head-shaped object to dry, shaping the crown and flattening/shaping the brim as desired. You can use pins to hold the brim in place while it dries.
- Allow it to air dry completely. Blocking helps even out your stitches and gives the hat a more professional finish.
You’re now ready to crochet a stylish and breathable granny square summer bucket hat! Enjoy wearing your unique creation in the Phnom Penh sunshine.