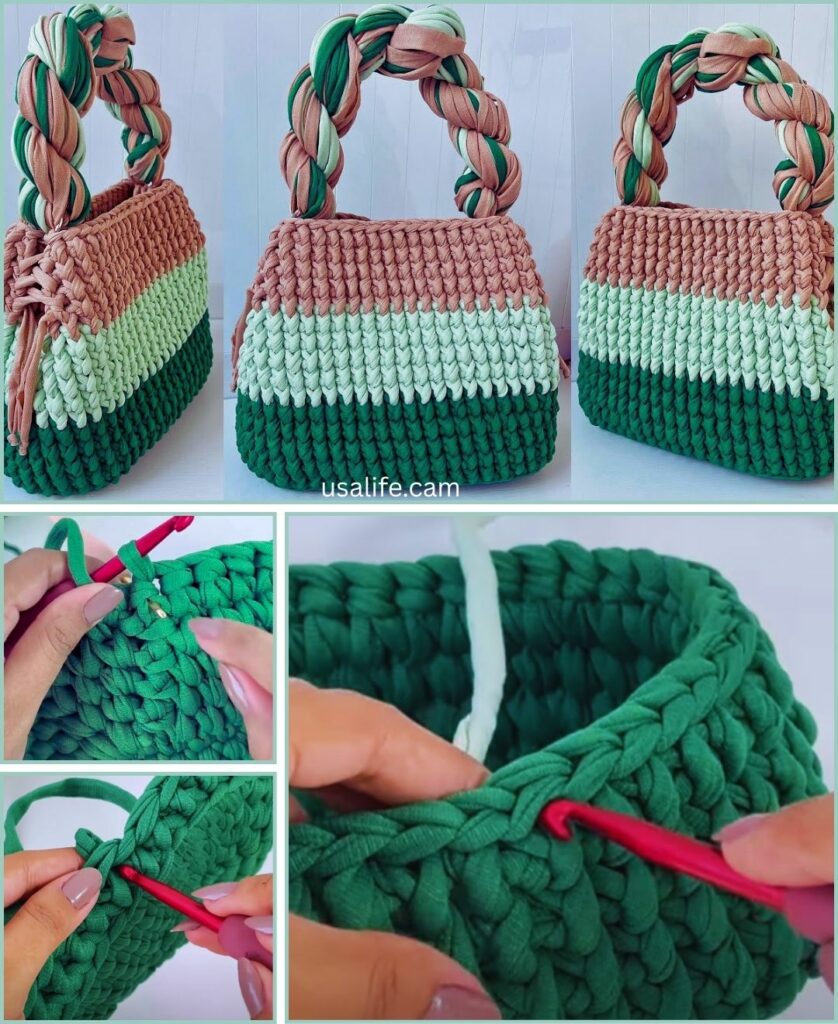
You’re ready to dive into the colorful world of crochet handbags! A 3-color striped bag is a fantastic project, allowing for creativity and a truly personalized accessory. For a durable bag, especially in a warm climate like Phnom Penh, 100% cotton yarn or a cotton blend is your best bet. Cotton is breathable, less prone to stretching out of shape, and holds stitch definition beautifully.
This guide will walk you through making a sturdy, rectangular 3-color striped handbag using simple single crochet stitches, which create a dense fabric perfect for bags.

How to Make a 3-Color Crochet Handbag
This pattern is designed to be beginner-friendly while producing a practical and stylish handbag.
1. Essential Materials You’ll Need
- Yarn:
- Type: 100% Cotton or Cotton Blend (e.g., 80% Cotton / 20% Acrylic) is highly recommended. It’s durable, resists stretching, and has excellent stitch definition. Avoid 100% acrylic if you want a stiff, long-lasting bag, as it can stretch more easily, especially with weight.
- Weight: Worsted Weight (Aran / 4) is ideal for a sturdy bag.
- Colors: Choose three distinct colors (Color A, Color B, Color C). These could be complementary, contrasting, or a gradient!
- Quantity: For a medium-sized bag (approx. 10-12 inches wide, 12-14 inches tall), you’ll need about 500-700 yards (450-640 meters) total. Distribute this among your three colors based on your stripe design (e.g., equal amounts, or more of a main color).
- Crochet Hook: A 4.0mm (US G/6) or 4.5mm (US 7) hook. You want your stitches to be quite tight to ensure the bag holds its shape and doesn’t sag. If your stitches feel loose, go down a hook size.
- Scissors: For cutting yarn.
- Yarn Needle (Tapestry Needle): Crucial for weaving in all those stripe ends and sewing on handles.
- Stitch Markers (Optional but Recommended): Very useful for marking the start of rounds or handle placement.

2. Basic Crochet Stitches You’ll Use
This project relies on just a few fundamental stitches, making it accessible for beginners:
- Chain (ch): To begin the project and create handle loops.
- Slip Stitch (sl st): For joining rounds.
- Single Crochet (sc): The primary stitch for the bag’s body. It creates a dense and firm fabric.
- Back Loop Only (BLO) (Optional): Working into only the back loop of a stitch can create a subtle ridge, which is great for defining the base from the sides of the bag.
3. Understanding Seamless Color Changes for Stripes

This technique is key to creating neat, professional-looking stripes. You change colors on the last step of the last stitch of your current color.
- When you’re working the last single crochet (sc) stitch of a round in your current color (e.g., Color A), insert your hook into the stitch, yarn over with Color A, and pull up a loop (you now have 2 loops on your hook).
- Stop here. Drop Color A.
- Pick up your new color (e.g., Color B) and yarn over with Color B.
- Pull Color B through both loops on your hook to complete the sc stitch.
- Now, Color B is active and ready for the next round.
- Carrying Yarn: For multi-color stripes, especially if you’re alternating colors frequently (e.g., every 1-2 rounds), you can carry the inactive yarns up the inside seam of your bag. Don’t cut the yarn unless you’re done with that color for a long stretch. To carry: simply drop the inactive color behind your work, ensuring it’s not pulled too tightly (which would pucker your fabric) or too loosely (which would create large loops). When you need that color again, pick it up from the side. This significantly reduces the number of ends you’ll have to weave in!
Part 1: The Base of the Handbag
We’ll start by creating an oval base, which provides a sturdy bottom for your bag.
Abbreviations (US Crochet Terms):
- ch: chain
- sc: single crochet
- sl st: slip stitch
- st(s): stitch(es)
- Rnd: round
- BLO: back loop only
Instructions for Bag Base (Using Color A):
- Starting Chain: Ch 31. (This will determine the length of your bag’s base. For a smaller bag, chain fewer stitches; for a larger bag, chain more).
- Rnd 1: Work 2 sc into the 2nd ch from hook. Sc in each of the next 28 ch. Work 4 sc into the last ch. (You’ve now turned the corner and are working along the opposite side of the starting chain). Sc in each of the next 28 ch. Work 2 sc into the very last ch (this completes the second corner). Join with a sl st to the first sc. (64 sc total).
- Rnd 2: Ch 1 (does not count as a st). Work 2 sc in the first st. Sc in each of the next 30 sts. Work 2 sc in the next st. Sc in each of the next 30 sts. Work 2 sc in the last st. Join with a sl st to the first sc. (68 sc total).
- This completes a slightly wider, flatter base. You can add more rounds to the base if you want an even wider bottom for your bag, always increasing by 4 stitches per round (2 at each “corner” of the oval).

Part 2: The Body of the Handbag (Stripes!)
Now, we’ll build up the sides of the bag, incorporating your three colors. We’ll work in continuous rounds, joining with a slip stitch at the end of each round to ensure clean stripe changes.
- Rnd 3 (First Side Round): With Color A, Ch 1 (does not count as a st). Work 1 sc in the BLO (back loop only) of each st around. Join with a sl st to the first sc. (68 sc).
- Working in the BLO for this round creates a subtle, defined ridge that helps the bag “turn the corner” from the flat base to the upright sides. It’s optional but gives a nice finish.
- Rnd 4: With Color A, Ch 1. Work 1 sc in each st around. Join with a sl st to the first sc. (68 sc).
- Change to Color B on the last sl st of this round using the technique described in Section 3.
- Rnd 5: With Color B, Ch 1. Work 1 sc in each st around. Join with a sl st to the first sc. (68 sc).
- Rnd 6: With Color B, Ch 1. Work 1 sc in each st around. Join with a sl st to the first sc. (68 sc).
- Change to Color C on the last sl st of this round.
- Rnd 7: With Color C, Ch 1. Work 1 sc in each st around. Join with a sl st to the first sc. (68 sc).
- Rnd 8: With Color C, Ch 1. Work 1 sc in each st around. Join with a sl st to the first sc. (68 sc).
- Change to Color A on the last sl st of this round.
- Continue Striping Pattern: Repeat Rnds 4-8 (or your chosen stripe sequence) until your bag reaches your desired height. A typical handbag might be 12-14 inches (30-35 cm) tall.
- Stripe Variations: You can create stripes of any width! For example:
- Alternating 2-round stripes: A (2 rounds), B (2 rounds), C (2 rounds), repeat.
- Thicker stripes: A (4 rounds), B (3 rounds), C (2 rounds), repeat.
- Asymmetrical stripes: Vary the number of rounds for each color randomly.
- Remember to carry the inactive yarns up the inside seam if you plan to use them again soon to avoid cutting and weaving in too many ends.
- Stripe Variations: You can create stripes of any width! For example:

Part 3: Adding the Handles
We’ll create simple integrated loop handles as part of the bag’s top edge.
- Handle Placement (Use the color of your last stripe, or a new coordinating color):
- Once your bag body is tall enough, lay it flat. You have 68 stitches around the top. We’ll divide these to create two handles.
- A good distribution for handles:
- 10 sc for the front/back panels (where the handle isn’t).
- 14 stitches skipped for the handle opening.
- 20 sc for the top middle section between the handles.
- 14 stitches skipped for the second handle opening.
- 10 sc for the remaining side.
- Check: 10 + 14 + 20 + 14 + 10 = 68 stitches.
- Rnd (Handle Prep): Ch 1 (does not count as st).
- Sc in the first 10 sts.
- Ch 28 (This forms your first handle loop. Adjust this chain length to make your handles longer or shorter. Test it out!).
- Sk 14 sts (skip these stitches on the bag body – this is the opening for the handle).
- Sc in the next 20 sts.
- Ch 28 (This forms your second handle loop).
- Sk 14 sts.
- Sc in the remaining 10 sts.
- Join with a sl st to the first sc of this round.
- Rnd (Handle Finish/Reinforcement): Ch 1. Work 1 sc in each sc around. When you reach a chain-loop handle, work 28 sc evenly into the chain loop (1 sc per chain). Continue working 1 sc in each sc of the body and 1 sc in each chain of the second handle loop. Join with a sl st to the first sc.
- This round solidifies the handles. You can repeat this round once or twice more if you want really thick, sturdy handles.
4. Finishing Your Handbag
- Fasten Off: Cut your yarn, leaving a tail of about 6-8 inches. Yarn over your hook, pull the tail completely through the loop, and pull tight to secure.
- Weave in All Ends: This is the most crucial step for a neat, durable bag. Use your yarn needle to carefully weave in every single yarn tail. Go back and forth through stitches on the inside of the bag, making sure they are well hidden and secure. Take your time here!
- Optional Lining: For added durability, structure, and to prevent small items from slipping through stitches, consider sewing a fabric lining into your crochet bag. This is especially useful in a humid climate like Phnom Penh, as it can help the bag maintain its shape. You can hand-sew it in using a regular needle and thread.
- Blocking (Optional): While cotton bags hold their shape reasonably well, you can gently steam block your bag to even out the stitches and shape it perfectly. For cotton, you can also wash it according to yarn instructions, then stuff it with towels or newspaper to hold its shape as it air dries.

Tips for a Beautiful 3-Color Striped Handbag
- Tension is Key: Consistent, firm tension is vital for a bag that holds its shape. If your bag feels too floppy, try going down a hook size.
- Yarn Management: When carrying yarn up the side for stripes, make sure you don’t pull it too tight or leave it too loose. A common mistake is pulling too tightly, which puckers the fabric.
- Stitch Markers: Use them religiously! They save so much frustration, especially for marking handle placement and the start of rounds.
- Experiment with Color Order: Before you start, lay out your three yarn colors in different sequences to see which stripe pattern you like best.
- Customization: Don’t be afraid to adjust the length of the starting chain for a wider/narrower bag, or the number of body rounds for a taller/shorter bag. You can also vary the handle length by chaining more or fewer stitches.
Enjoy making your vibrant 3-color crochet handbag! It will be a fantastic, personalized accessory.


