 by
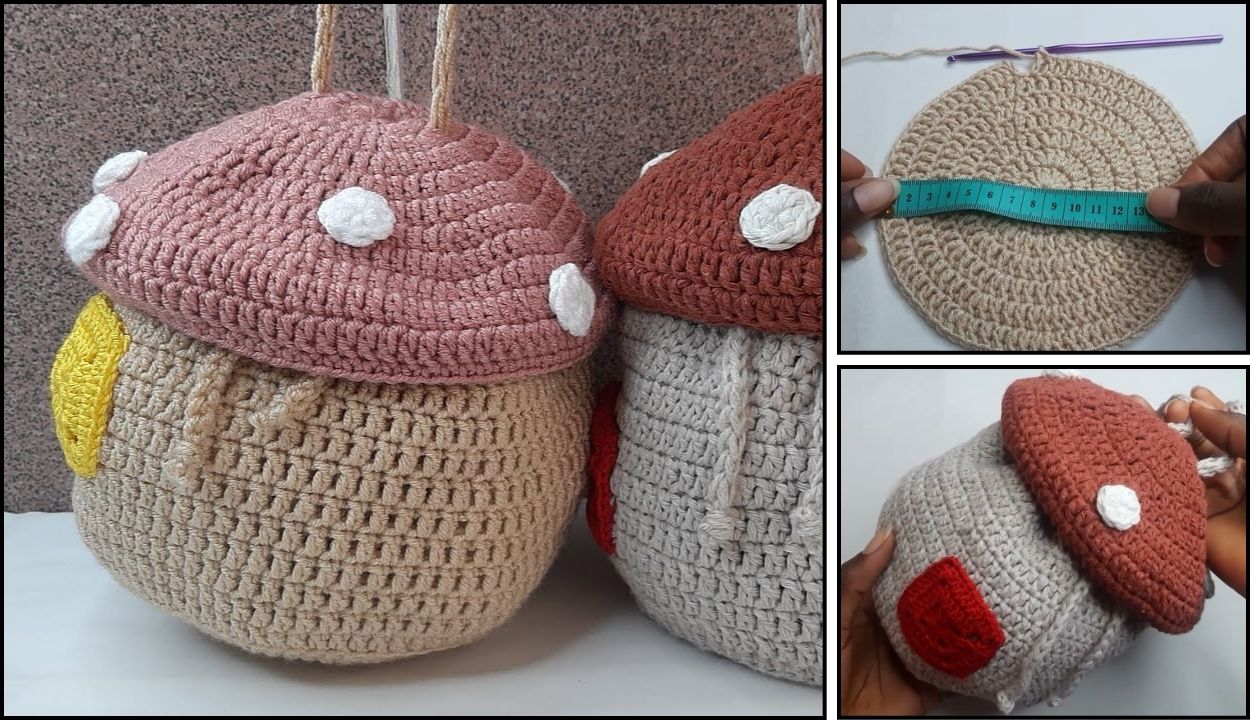
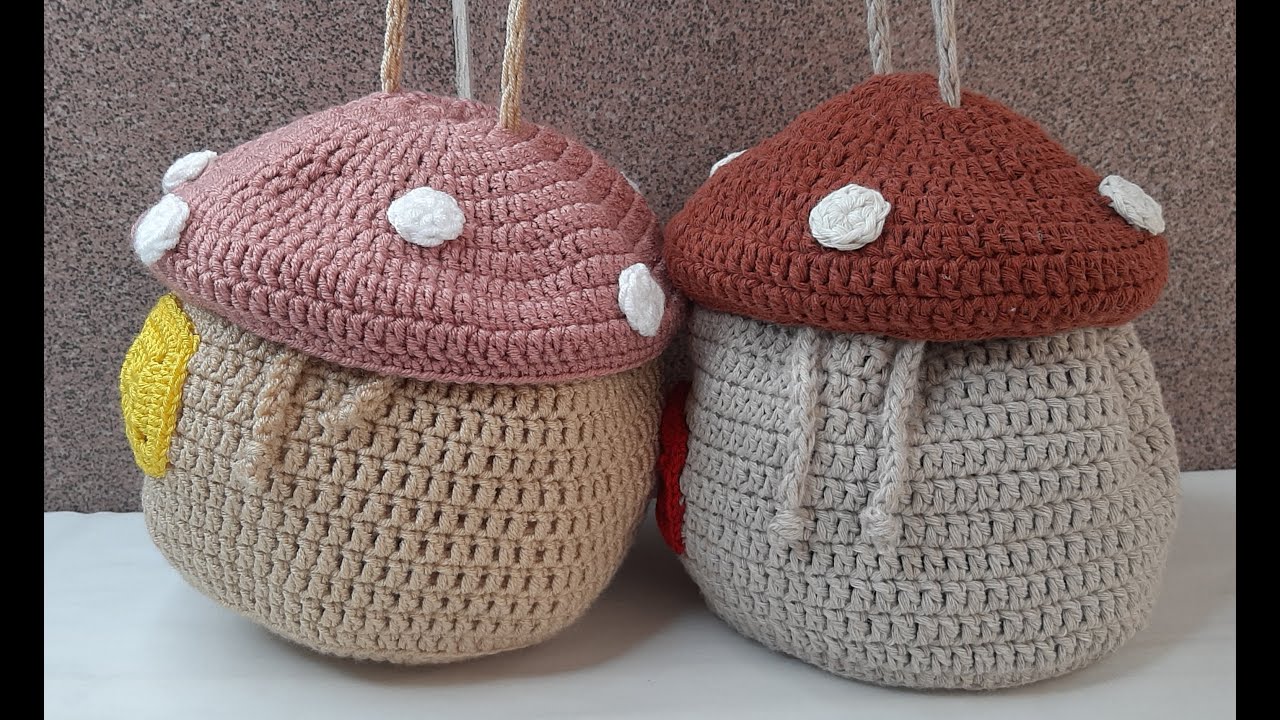
by You want to crochet a mushroom bag! That’s a super cute and whimsical project. A mushroom bag can range from a small coin purse to a larger tote, but the defining features are usually a rounded cap, a distinct stem, and often some spots.
Given that you’re in Phnom Penh, where it’s generally warm, 100% cotton yarn or a sturdy cotton blend is an excellent choice for your bag. Cotton is durable, holds its shape well (which is important for a bag), has great stitch definition, and is less prone to stretching excessively compared to some other fibers. It’s also breathable and easy to wash, making it practical for a bag that might see some use.

How to Crochet a Whimsical Mushroom Bag: A Detailed Tutorial
This tutorial will guide you through creating a charming medium-sized mushroom bag, perfect for carrying small essentials or just as a delightful decorative piece. We’ll focus on creating a rounded mushroom cap, a sturdy stem, and adding some signature spots.
1. Essential Materials You’ll Need
- Yarn:
- Cap Color (CC): For the mushroom top (e.g., red, brown, white, cream). Worsted Weight (Aran / Medium / Category 4) is a good choice.
- Stem Color (SC): For the mushroom stem (e.g., white, cream, light beige). Worsted Weight, matching your cap yarn in thickness.
- Spot Color (SpotC): For the spots (e.g., white, cream, contrasting color). Small scrap of Worsted Weight.
- Optional – Lining Yarn (LC): For the inner “lining” of the cap (often a darker color like grey or black, representing gills). Small scrap of Worsted Weight.
- Quantity: For a medium-sized bag (around 6-8 inches tall), you’ll need approximately 50-100g of Cap Color, 30-50g of Stem Color, and very small amounts of Spot Color and Lining Color.
- Crochet Hook:
- A 4.0mm (US G/6) or 4.5mm (US 7) hook. Choose a hook size that makes your stitches fairly dense and firm, especially for the stem and cap, so the bag holds its shape well.
- Scissors: For cutting yarn.
- Yarn Needle (Tapestry Needle): Absolutely essential for weaving in ends, sewing pieces together, and embroidering spots.
- Stitch Marker (Highly Recommended!): Crucial for keeping track of rounds when working in a spiral.
- Closure (Optional): A small button, magnetic snap, or zipper if you want a secure closure for your bag.
- Strap (Optional): If you want a shoulder bag, you’ll need extra yarn in your stem or cap color for a strap, or a pre-made strap.
2. Basic Crochet Stitches You’ll Use
This pattern primarily uses fundamental stitches and working in the round to create the 3D mushroom shape.
- Magic Ring (MR) / Adjustable Ring: (Highly Recommended!) Creates a tight, hole-free start for the cap and stem.
- Chain (ch): Used for foundation, turning, and small elements.
- Slip Stitch (sl st): For joining rounds and neatening.
- Single Crochet (sc): Creates a dense, sturdy fabric, ideal for amigurumi-style shapes.
- Single Crochet Increase (inc): Work 2 sc into the same stitch.
- Single Crochet Decrease (sc2tog): Decreases the stitch count by working two single crochet stitches together.
- Working in Continuous Rounds (Spiral): Most of the mushroom will be worked in a spiral without joining, using a stitch marker to keep track.
- Fasten Off: Securely ending your work.
- Weaving in Ends: Hiding yarn tails for a neat finish.
Crochet Mushroom Bag Pattern (Medium Size)
This pattern creates a mushroom bag that’s roughly 6-8 inches (15-20 cm) tall and about 5-6 inches (12.5-15 cm) in diameter at the cap.
Abbreviations (US Crochet Terms):
- CC: Cap Color
- SC: Stem Color
- SpotC: Spot Color
- LC: Lining Color
- MR: Magic Ring
- Rnd: Round
- ch: chain
- sl st: slip stitch
- sc: single crochet
- inc: single crochet increase (2 sc in next st)
- sc2tog: single crochet 2 stitches together (decrease)
- st(s): stitch(es)
(...): work stitches into the same stitch or space[...]: repeat instructions in brackets- FO: Fasten off
Part 1: The Mushroom Cap (Cap Color – CC)
We’ll start at the very top of the cap and work outwards, creating a rounded shape. Work in continuous rounds (spiral).
- Rnd 1: With CC, create a MR. Work 6 sc into the MR. (6 sc)
- Place stitch marker in the first sc.
- Rnd 2: [Inc] in each st around. (12 sc)
- Rnd 3: [Sc 1, inc] 6 times. (18 sc)
- Rnd 4: [Sc 2, inc] 6 times. (24 sc)
- Rnd 5: [Sc 3, inc] 6 times. (30 sc)
- Rnd 6: [Sc 4, inc] 6 times. (36 sc)
- Rnd 7: [Sc 5, inc] 6 times. (42 sc)
- Rnd 8: [Sc 6, inc] 6 times. (48 sc)
- Rnd 9: [Sc 7, inc] 6 times. (54 sc)
- Rnd 10: [Sc 8, inc] 6 times. (60 sc)
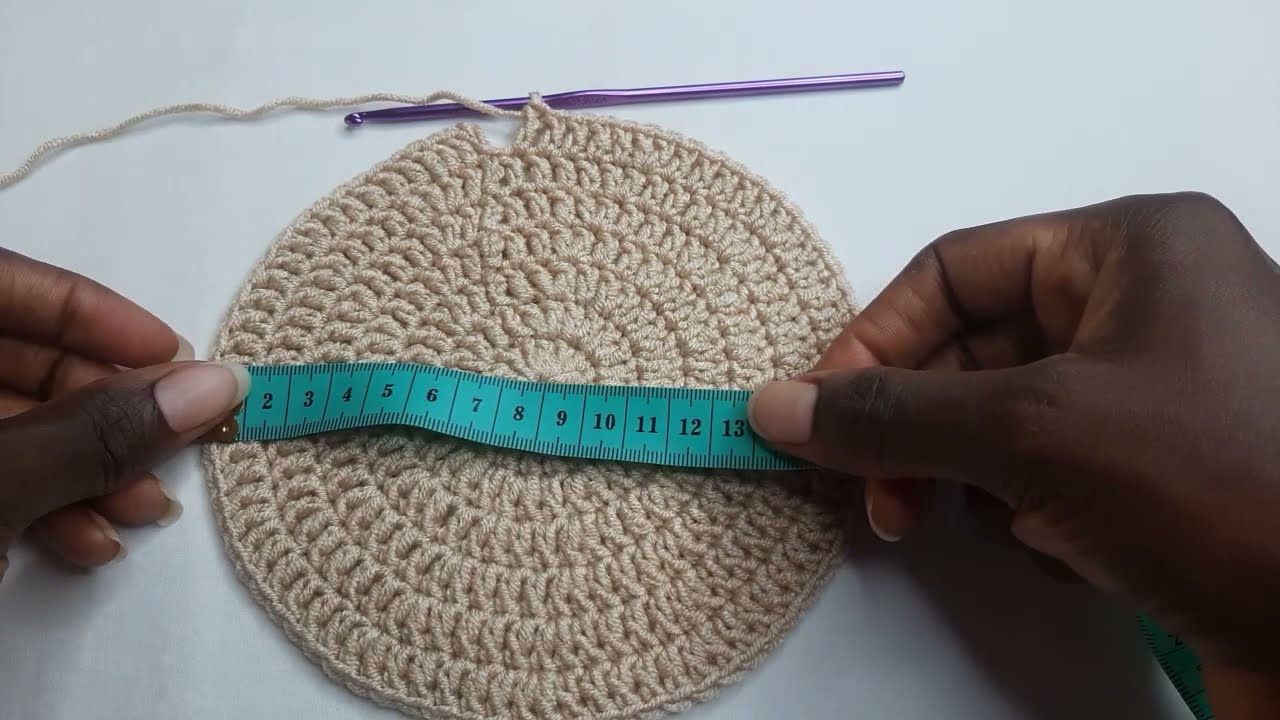
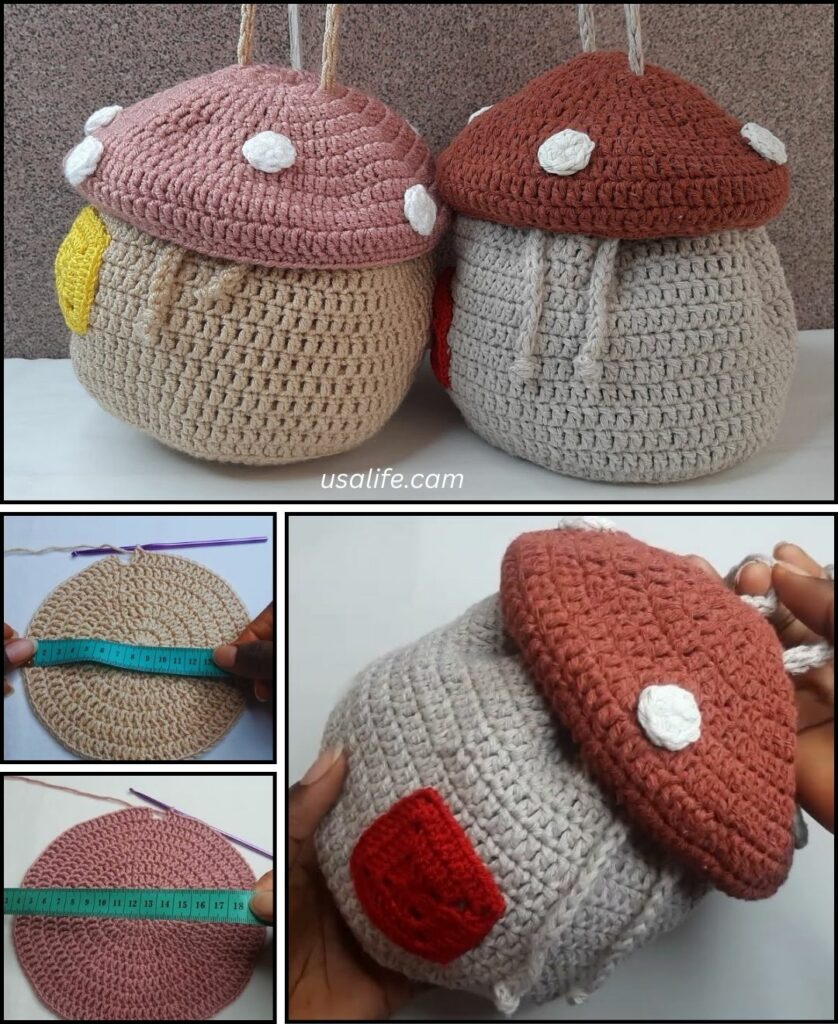
- You now have a flat circle. Adjust the number of increase rounds based on your desired cap diameter. Continue increasing until the circle is the width you want the base of the cap to be.
- Rnd 11-15 (Cap Height): Sc in each st around. (60 sc)
- Work these rounds without increases to create the depth of the cap. Adjust the number of rounds for a taller or shallower cap.
- Fasten off CC, leaving a long tail (approx. 18-24 inches / 45-60 cm) for attaching the cap to the stem.

Part 2: The Mushroom Cap “Gills” (Optional – Lining Color LC)
This creates a nice finished edge inside the cap and can represent the gills.
- Join LC: With your Lining Color (LC), join with a sl st to any stitch on the inside edge of the last round of your cap (the one you just fastened off).
- Round 1: Ch 1. Sc in each st around. (60 sc)
- Fasten off LC, weave in ends.
- This lining round will sit slightly inside the cap and give it a clean finish.
Part 3: The Mushroom Stem (Stem Color – SC)
This will form the body of your bag. Work in continuous rounds (spiral).
- Rnd 1: With SC, create a MR. Work 6 sc into the MR. (6 sc)
- Place stitch marker in the first sc.
- Rnd 2: [Inc] in each st around. (12 sc)
- Rnd 3: [Sc 1, inc] 6 times. (18 sc)
- Rnd 4: [Sc 2, inc] 6 times. (24 sc)
- Rnd 5: [Sc 3, inc] 6 times. (30 sc)
- Rnd 6: Sc in each st around. (30 sc)
- This will be the base of your stem.
- Rnd 7 (Defining Edge): Sc in back loop only (BLO) of each st around. (30 sc)
- This creates a neat ridge at the base of the stem.
- Rnd 8-18 (Stem Height): Sc in each st around (working through both loops now). (30 sc)
- Repeat this round until your stem reaches the desired height for your bag’s body. The number of rounds depends on how tall you want the usable “bag” portion to be.
- Fasten off SC, leaving a long tail (approx. 18-24 inches / 45-60 cm) for attaching the cap.
- The top opening of the stem will be the opening of your bag.

Part 4: Assembling the Mushroom Bag
- Attach Cap to Stem:
- Lay your crocheted cap upside down.
- Take your stem and place it inside the cap, aligning the top opening of the stem with the base of the cap (the last round of your CC section).
- Using the long tail from your Cap Color and your yarn needle, carefully sew the cap to the top edge of the stem. Stitch through both layers (the last round of the cap and the top round of the stem), going around the entire circumference. Make sure it’s securely attached. Weave in the remaining tail.
- Add Spots (Optional – Spot Color):
- With Spot Color yarn and your yarn needle, embroider small circles or French knots randomly across the top of the mushroom cap. Alternatively, you can crochet small flat circles (MR with 6-8 sc, sl st to join, FO) and sew them onto the cap.
- Weave in all ends for the spots.
Part 5: Adding the Strap (Optional)
You can crochet a simple strap or attach a pre-made one.
Option A: Simple Crocheted Strap
- With SC or CC yarn, ch 80-120 (adjust for desired length: longer for shoulder bag, shorter for wristlet).
- Row 1: Sc in the 2nd ch from hook and in each ch across.
- Rows 2-3 (for wider strap): Ch 1, turn. Sc in each sc across.
- Fasten off, leaving long tails on both ends.
- Attach Strap: Use your yarn needle to securely sew each end of the strap to opposite sides of the mushroom stem’s opening (the top edge of your bag). Stitch multiple times for durability. Weave in tails.
Option B: I-Cord Strap (Denser, Rounder)
(This is a slightly more advanced technique but creates a very neat cord.)
- Work a 3-stitch I-cord for your desired length.
- Attach as above.
Part 6: Adding a Closure (Optional)
- Button & Loop:
- Sew a decorative button to one side of the bag opening, about 1 inch (2.5 cm) down from the top edge.
- On the opposite side, attach yarn and ch 8-12 (or enough to loop over your button), then sl st back into the same stitch to form a loop. Weave in ends securely.
- Magnetic Snap: Sew a magnetic snap closure just inside the top opening of the bag.
- Zipper: For a more secure closure, you could sew in a fabric lining with a zipper (more advanced, requires basic sewing skills).
7. Finishing Touches
- Weave in All Remaining Ends NEATLY: This is crucial for a polished, professional-looking bag. Double-check every part of your mushroom for loose yarn tails. Weave them in thoroughly and securely into the stitches on the inside of your bag.
- Blocking (Optional): For a more structured and professional-looking bag, a gentle steam block can help even out stitches and define the shape. Stuff the bag lightly with towels or plastic bags to help it hold its shape while drying.
You’re now ready to crochet a charming and unique mushroom bag! What colors are you thinking for your whimsical creation?