 by
by It sounds like a super fun and creative idea to combine emoji beads with crochet! This allows you to create expressive, personalized, and very cute items. This isn’t a traditional “knitting” technique, but rather a specialized application of crochet where beads are incorporated into the stitches.
Here’s a detailed guide on how to approach emoji bead crochet, covering the ideas, techniques, and practical tips:

Emoji Bead Crochet Idea: A Detailed Guide
This unique craft involves stringing small emoji beads onto your yarn before you start crocheting, and then strategically crocheting around or over these beads to embed them into your fabric.
1. The Concept & Why It Works
- What it is: Instead of just yarn, your crochet fabric will have individual emoji beads visible on the surface, forming patterns or scattered designs.
- How it works: The fundamental principle is to slide a bead up to your hook just before completing a stitch, trapping the bead within or on the surface of that stitch.
- Why it’s cool:
- Personalization: Add character and expression to your crochet.
- Texture: The beads add a unique tactile element.
- Visual Interest: Create playful patterns, faces, or messages.
- Versatility: Applicable to many crochet projects.
2. Essential Materials You’ll Need
- Emoji Beads:
- Type: Look for acrylic, plastic, or wooden beads with pre-printed or molded emoji faces.
- Hole Size: This is CRITICAL. The hole in the bead MUST be large enough for your chosen yarn to pass through easily, preferably twice (once for the yarn itself, and then for the “loop” of the stitch). Standard worsted weight yarn often won’t fit through tiny bead holes. You might need to use finer yarn or beads with larger holes. Test this before you buy a large quantity!
- Quantity: Depends on your project. If you’re doing an all-over pattern, you’ll need many; for scattered accents, fewer.
- Yarn:
- Fiber: 100% Cotton Yarn is excellent. It has good stitch definition, minimal stretch (which helps beads sit well), and is durable. Acrylic can also work.
- Weight: Fingering (1), Sport (2), or DK (3) weight yarn are generally better choices than worsted weight (4) because their thinner strands are more likely to fit through bead holes. Match your yarn weight to the bead hole size.
- Color: Choose colors that complement or contrast with the emoji beads (e.g., black yarn for yellow emojis, or a pastel yarn for a softer look).
- Crochet Hook:
- Select a hook size appropriate for your yarn weight, but lean towards the smaller end of the recommended range. A slightly smaller hook helps create denser stitches that hold the beads more securely.
- Consider a steel crochet hook if working with very fine yarn and tiny beads, as they have sharper points.
- Beading Needle (Optional but Recommended): A very thin, long needle with a collapsible eye. This makes stringing beads onto yarn much easier, especially if the bead holes are tight.
- Scissors: For cutting yarn.
- Yarn Needle (Tapestry Needle): For weaving in ends.
3. Key Techniques for Bead Crochet
The core of emoji bead crochet lies in stringing the beads and then incorporating them.
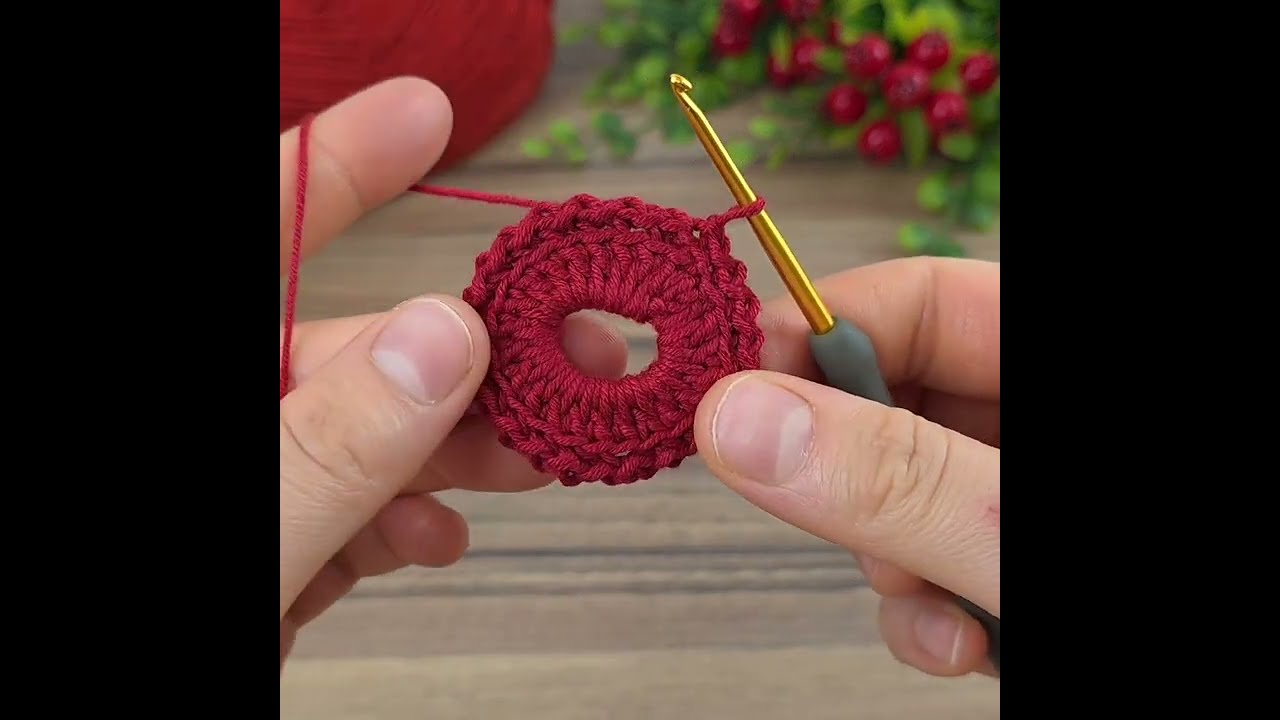
A. Pre-Stringing the Beads
This is the most important preparatory step.
- Plan your pattern: Decide where and how many emoji beads you want. If it’s a specific pattern (like a row of laughing faces), string them in that order. If random, string them randomly.
- Estimate Quantity: It’s always better to string more beads than you think you’ll need. Unstringing is tedious.
- Stringing:
- Take your yarn. If using a beading needle, thread the yarn through the needle’s eye.
- Thread the emoji beads onto the needle, then slide them down onto your yarn.
- Continue until you have all the beads you need for your project section. Push them far down the yarn, away from your working area, so they don’t get in the way while you’re crocheting regularly.
B. Incorporating Beads into Stitches (Common Methods)
The method depends on whether you want the bead to sit on top of the stitch or within it.

Method 1: Bead on Top (Most Common for Visual Impact)
This method is great for showing off the emoji face clearly. It works well with single crochet (sc) or slip stitch (sl st).
- Start your stitch normally: Insert hook into the next stitch, YO, pull up a loop. (You’ll have 2 loops on hook for an sc).
- Slide bead up: Slide one pre-strung emoji bead up the yarn until it rests right against your hook, at the base of the two loops.
- Complete the stitch: YO, pull yarn through both loops on your hook, going over or through the bead. The bead should now be snugly held on the front of your work.
- Important: When pulling through the loops, ensure the bead is directly against the hook to secure it tightly.
Method 2: Bead Within the Stitch (More Subtle, but can still show face)
This method often embeds the bead more securely but might partially obscure the emoji face, depending on bead size and stitch type. Works with various stitches.
- Work part of your stitch: For example, for a dc: YO, insert hook into stitch, YO, pull up loop (3 loops on hook). YO, pull through 2 loops (2 loops on hook).
- Slide bead up: Slide one pre-strung emoji bead up the yarn until it rests against your work, directly below the loops on your hook.
- Complete the stitch: YO, pull yarn through the remaining loops on your hook, trapping the bead at the base of the stitch.
Method 3: Bead Between Stitches (For spacing)
You might want emojis spaced out. You can simply crochet a regular stitch, then slide up a bead, then make another regular stitch. The bead will sit loosely between the two stitches.

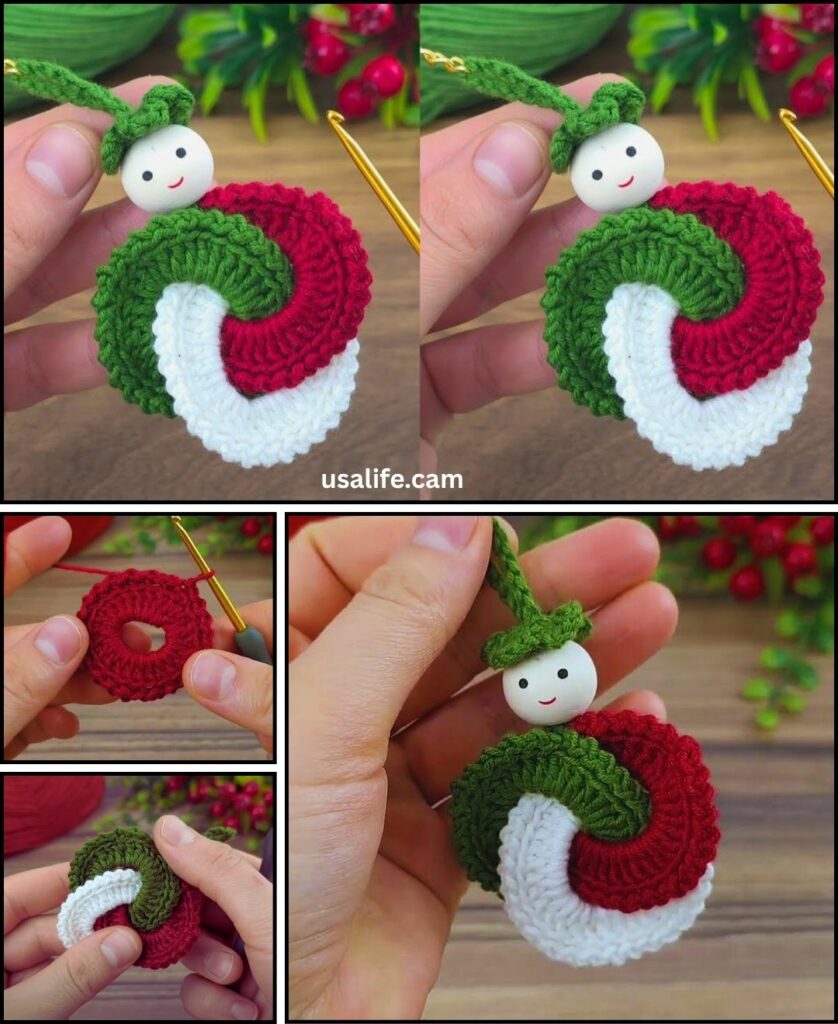
4. Project Ideas for Emoji Bead Crochet
The possibilities are endless!
- Headbands/Hair Accessories: A row of favorite emojis on a baby headband or a teen’s hair tie.
- Keychains/Bag Charms: A small crocheted circle or square with a prominent emoji, perhaps stuffed.
- Coasters: A round coaster with a smiley face in the center, or a border of tiny emojis.
- Pencil Cases/Pouches: A fun border or scattered emojis all over the fabric.
- Appliques: Create small crocheted shapes (stars, hearts) and add an emoji bead in the center, then sew onto other items.
- Jewelry: Simple bracelets or necklaces with small emoji beads integrated into a crocheted chain or cord.
- Baby Blankets/Loveys: Add a playful touch with scattered emojis.
- Bookmarks: A long, narrow strip with emojis peeking out.
- Decorative Garlands/Bunting: A string of small crocheted flags or shapes, each featuring an emoji.
5. Tips for Success with Emoji Bead Crochet
- Test Beads & Yarn: Before starting a large project, always do a small swatch to ensure your chosen yarn fits through the bead holes and that the beads sit nicely within the stitches.
- Yarn Tension: Maintain a consistent, even tension. Too loose, and the beads might wiggle excessively; too tight, and it will be difficult to pull the yarn through the bead holes.
- Hook Size: A slightly smaller hook than you might typically use can help create denser stitches that hug the beads securely.
- Push Beads Down: Remember to push unused beads far down the yarn strand as you work, so they don’t get in the way.
- Weaving in Ends: With beads, sometimes weaving in ends can be a little trickier. Be extra diligent to secure all tails so they don’t unravel, especially around bead areas.
- Design First: For specific patterns, sketch out your design on graph paper or a simple drawing to plan bead placement.
- Care for Finished Items: Be mindful of washing instructions, especially for plastic or painted beads, as some might not hold up well to harsh washing or drying cycles. Hand washing and air drying are generally safest.
- Safety: If making items for very young children, ensure beads are securely attached and large enough not to be a choking hazard. For babies, consider embroidering emoji faces instead of using loose beads.
Emoji bead crochet is a wonderful way to infuse personality and fun into your handmade items. Enjoy experimenting with different emojis and projects!