 by
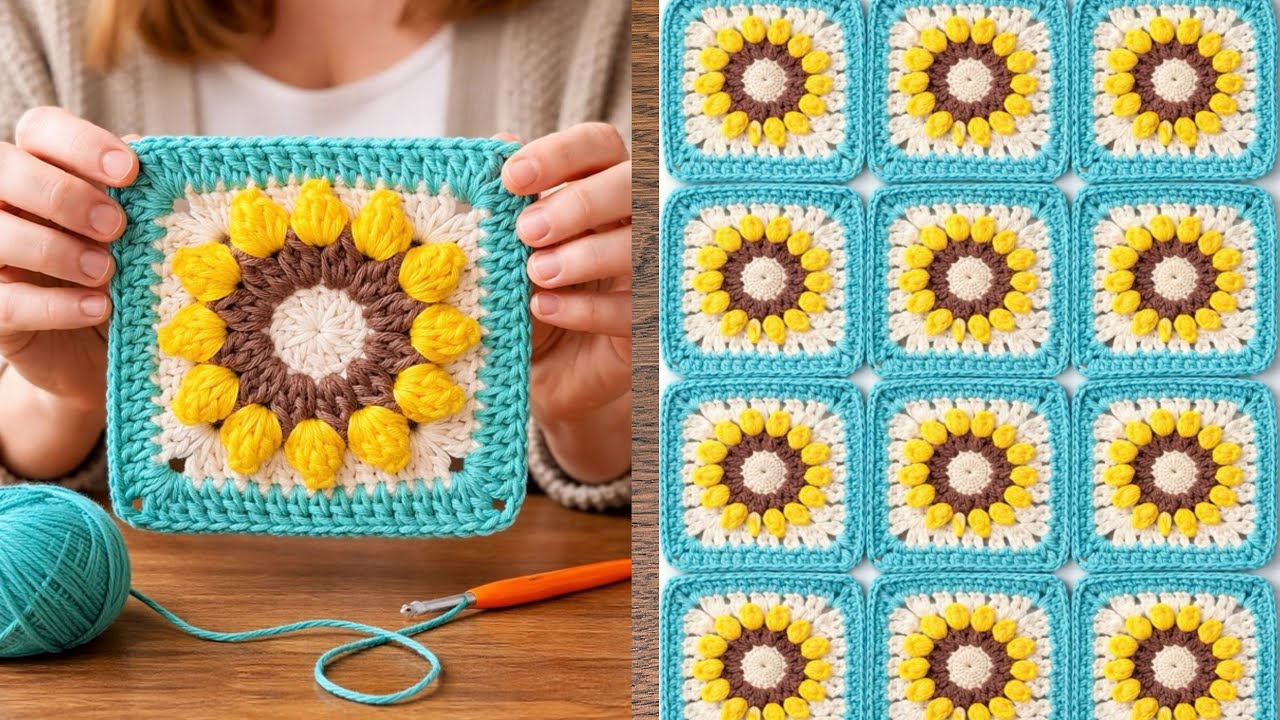
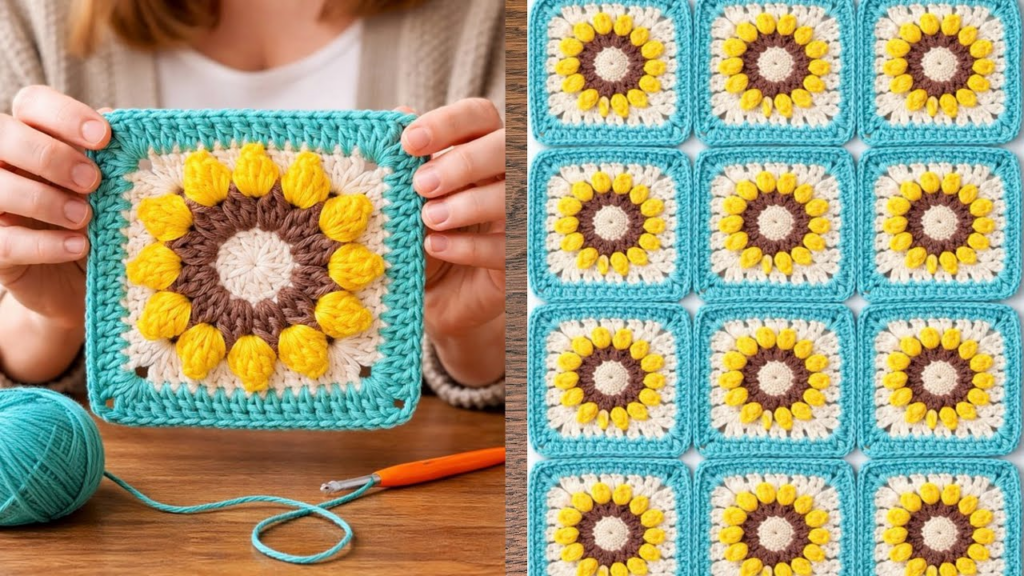
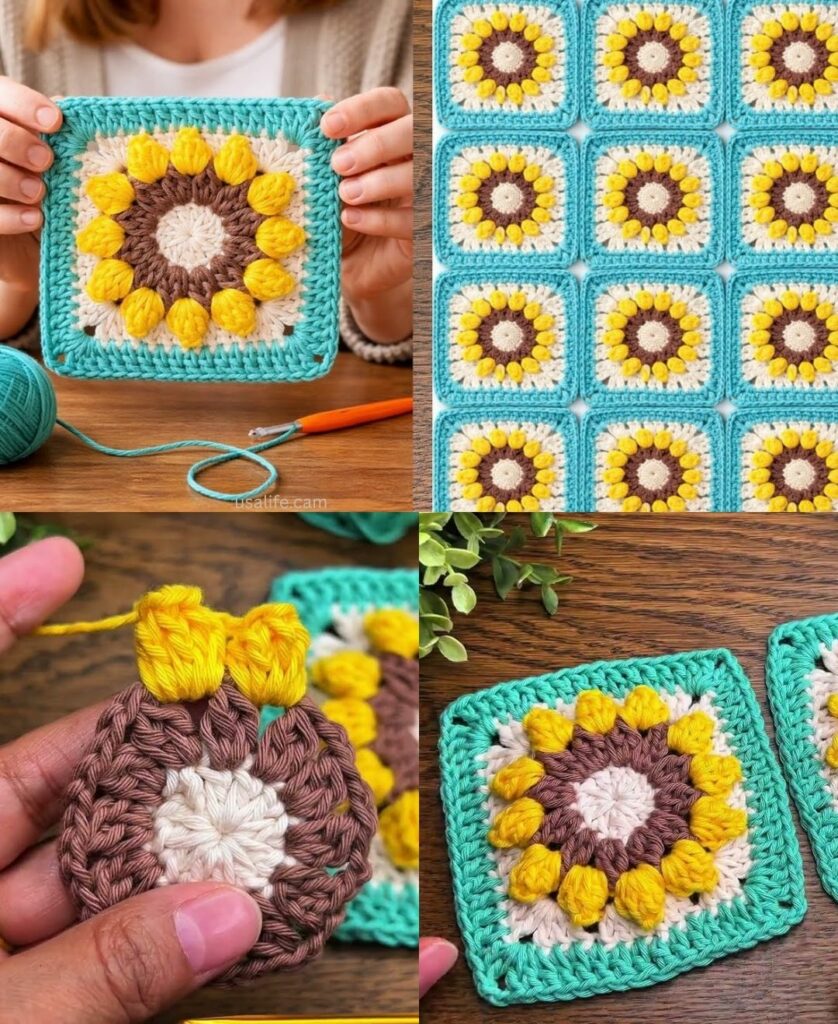
by The Sunflower Granny Square (often called the Sunburst Square) is a masterpiece of texture and color. Unlike a traditional square that starts with a simple cross, this design begins as a dense, 3D floral burst that is “squared off” in the final round.
It is the perfect project for someone who wants to transition from basic flat stitches to more advanced “textured” stitches like Puffs and Clusters.
🧶 The Sunflower Supplies
For a sunflower to look iconic, the color palette is non-negotiable. You want a “Deep Earth” brown for the center and a “Vibrant Golden” yellow for the petals.
| Item | Recommendation | Why? |
| Yarn (Color A) | Dark Brown (Worsted Weight) | The “seed” center. |
| Yarn (Color B) | Light Brown or Tan | The transition layer. |
| Yarn (Color C) | Golden Yellow | The petals. |
| Yarn (Color D) | Cream, Sage, or White | The “background” that makes it a square. |
| Hook | 5.0 mm (H/8) | Standard for worsted weight; keeps stitches defined. |
🛠 Stitch Guide (US Terms)
- Puff Stitch: [Yarn over, insert hook, pull up a loop] 3 times in the same stitch (7 loops on hook). Yarn over, pull through all 7 loops, ch 1 to close.
- Cluster (4-dc cl): [Yarn over, insert hook, pull up a loop, pull through 2] 4 times in same stitch (5 loops on hook). Yarn over, pull through all 5 loops.
- tr (Treble Crochet): Yarn over twice, insert hook, pull through 2 loops three times.

🚀 The Step-by-Step Tutorial
Round 1: The Dark Center (Color A)
- Start: Make a Magic Ring.
- Stitches: ch 3 (counts as dc). Work 15 dc into the ring.
- Join: sl st to the top of the ch 3 and fasten off.
Result: A solid circle of 16 stitches.
Round 2: The Inner Seeds (Color B)
- Join: Attach Color B in any dc stitch.
- Pattern: Work a Puff Stitch in every stitch around.
- Transition: ch 1 between every Puff.
- Join: sl st to the first Puff and fasten off. (16 Puffs total).

Round 3: The Golden Petals (Color C)
- Join: Attach Color C in any ch-1 space.
- Pattern: Work a 4-dc Cluster in every ch-1 space.
- Transition: ch 2 between every Cluster.
- Join: sl st to the first Cluster and fasten off.
Note: Your work might look like it’s “ruffling” slightly—this is normal! It will flatten out when we square it.
Round 4: Squaring the Flower (Color D)
- Join: Attach Color D in any ch-2 space.
- Corner 1: ch 4 (counts as tr). In the same space, work (2 tr, ch 2, 3 tr).
- Side:
- ch 1. In next space, work 3 dc.
- ch 1. In next space, work 3 hdc.
- ch 1. In next space, work 3 dc.
- Repeat: ch 1. Work the Corner in the next space. Repeat the “Side” pattern around.
- Join: sl st to the top of the ch 4.
📐 The Geometry of a Blanket
If you are joining these squares for a project, you can calculate your layout based on the size of your blocked square.
If $s$ is the side length of one square and $n$ is the number of squares per side, the total length ($L$) is:
$$L = n \times s$$

Common Sunflower Layouts:
- Tote Bag: 13 squares (arranged in a $U$-shape).
- Baby Blanket: 30 squares ($5 \times 6$ grid).
- Standard Throw: 80–100 squares.
💡 Gemini’s Peer-to-Peer Tips
- The “Gap” Fix: If your Round 4 corners look a bit “holy” or loose, try working your Treble Crochets with a slightly tighter tension than your Double Crochets. It keeps the corner sharp.
- Weave as You Go: I cannot stress this enough. A sunflower square has 4 color changes. If you make 20 squares, that is 160 ends to weave in. Do yourself a favor and weave them in as soon as you finish each round.
- Blocking is Magic: Sunflower centers are thick. They will naturally want to “pooch” out. Use a blocking board to pin those corners into a perfect 90-degree angle. It turns a “homemade” project into a “professional” one.
Would you like me to help you design a “Join-As-You-Go” plan for these squares so you don’t have to sew them together at the end?