by
by Creating a single square motif that works for a Table Runner, a Blouse, and a Shawl is a masterclass in versatile design. The key is to choose a pattern that is “semi-lacy”—dense enough to provide coverage for a garment, but open enough to drape beautifully for a wrap or sit elegantly on a table.
Below is the tutorial for the “Midnight Star Lace Square,” followed by a guide on how to adapt it for each of your three projects.
🧶 Choosing the Right Material
The “Multi-Purpose” aspect comes from your choice of yarn and hook:
| Project | Suggested Yarn | Hook Size |
| Table Runner | Size 10 or 3 Mercerized Cotton | 2.0 mm – 3.0 mm |
| Stylish Blouse | Bamboo, Silk, or Linen blend (DK) | 3.5 mm – 4.0 mm |
| Elegant Shawl | Lace-weight Mohair or Fingering Wool | 4.0 mm – 5.0 mm (for drape) |
🛠 Step-by-Step Tutorial: The Midnight Star Square
Key Abbreviations (US Terms)
- ch: Chain
- sl st: Slip stitch
- sc: Single crochet
- dc: Double crochet
- tr: Treble crochet
- sp: Space
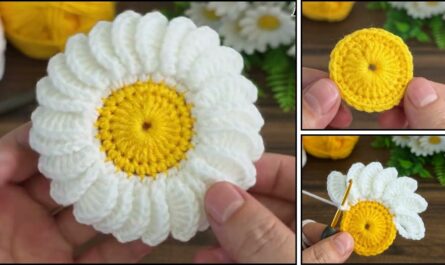
Round 1: The Foundation
- Start: Make a Magic Ring.
- Stitches: ch 3 (counts as dc). Work 15 dc into the ring.
- Join: sl st to the top of the ch 3. (12 dc total).

Round 2: The Eyelet Sunburst
- ch 4 (counts as 1 dc + ch 1).
- Repeat: [dc in the next stitch, ch 1] in every stitch around.
- Join: sl st to the 3rd chain of the starting ch 4. (16 dc and 16 ch-1 spaces).
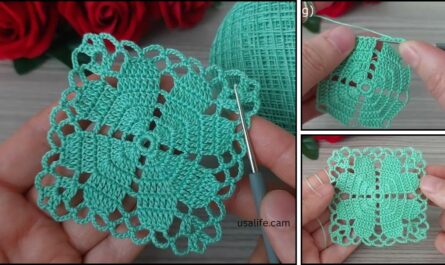
Round 3: Squaring the Design
- Move Hook: sl st into the first ch-1 space.
- First Corner: ch 4 (counts as tr). Work (2 tr, ch 3, 3 tr) in the same space.
- First Side:
- ch 1, skip 1 space.
- 3 dc in the next space.
- ch 1, skip 1 space.
- 3 dc in the next space.
- ch 1, skip 1 space.
- Repeat: Work a Corner (3 tr, ch 3, 3 tr) in the next space, then repeat the “Side” pattern around.
- Join: sl st to the top of the ch 4.
Round 4: The Finishing Lace Frame
- sl st across to the ch-3 corner space.
- Corner: ch 3, work (2 dc, ch 3, 3 dc) in the corner.
- Sides: [ch 2, skip to next ch-1 space, 3 dc in space] Repeat across the side.
- Join: Join with a sl st to the top of the ch 3. Fasten off.
📐 Project-Specific Assembly Guides
1. The Magnificent Table Runner
To make a runner, you are aiming for length and flatness.
- Layout: Join motifs in a $2 \times 8$ or $1 \times 10$ grid.
- Joining: Use the Whip Stitch through the back loops only. This makes the runner lay perfectly flat so glasses won’t tip over on the seams.
- Blocking: Pin the runner to its full length and steam it. This “opens” the lace so the star pattern is visible.

2. The Stylish Blouse
The square is designed to be joined into panels.
- Layout: Create two rectangular panels (Front and Back). A standard size medium is usually 4 motifs wide by 4 motifs high.
- Shaping: Join the shoulders, leaving the center 2 motifs open for a “Boat Neck” style. Join the sides, leaving the top 1.5 motifs open for armholes.
- Drape: Use a Bamboo yarn; it has a “heavy” drape that makes the squares hang gracefully rather than stiffly.
3. The Elegant Shawl
A shawl can be a rectangular wrap or a large triangle.
- Rectangular Wrap: Join motifs in a $3 \times 12$ grid. Use a larger hook than suggested for the yarn to make the lace “flowy.”
- The Triangle Trick: If you want a triangular shawl, you will need “Half-Squares.”
- To make a half-square: Work the pattern in rows instead of rounds, only completing 2 corners of the square.
- Edging: Add a 10 cm fringe or tassels to the corners for a dramatic finish.
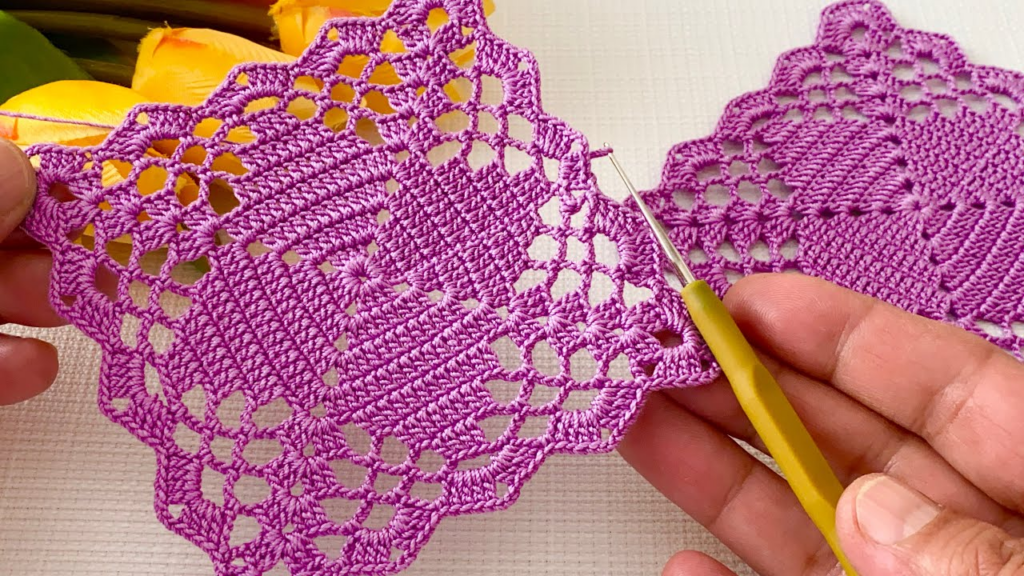
💡 Professional Tip: “Join-As-You-Go” (JAYG)
If you are making a large shawl or blouse, sewing 50 squares together can be tedious. You can join them during Round 4:
- When you reach the
ch 3of a corner, workch 1, sl stinto the corner of a finished square,ch 1. - This creates a seamless, mesh-like connection that is much stronger than sewing!

Would you like me to provide the specific pattern for the “Half-Square Triangle” to help you finish the edges of a triangular shawl?
Video tutorial: