by
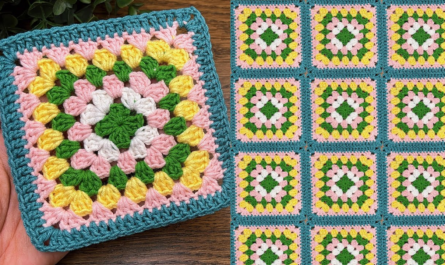
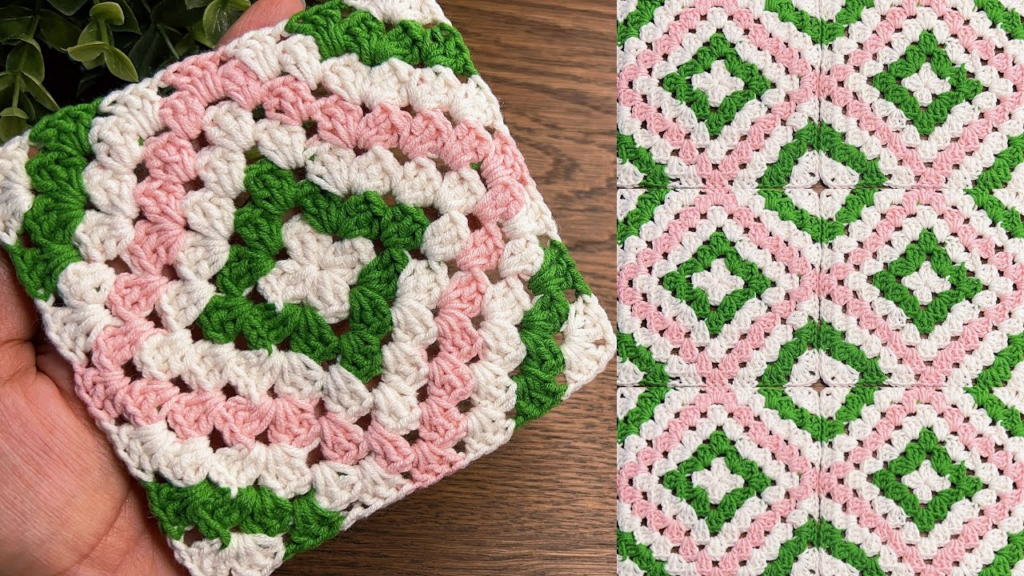
by Crocheting square motifs is a journey into the heart of “modular crochet.” These squares—often called motifs—are the building blocks of the crochet world. Mastering a beautiful, detailed square allows you to create everything from a delicate lace table runner to a heavy, high-fashion sweater.
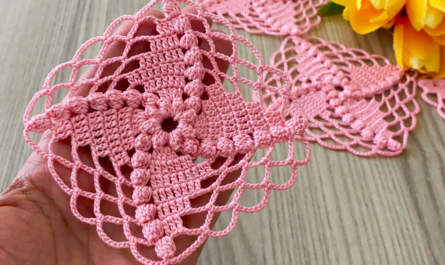
The pattern below is for the “Floral Lace Star Square.” It is designed to be visually striking with a 3D center that transitions into a flat, easy-to-join frame.
🧶 The Materials Toolkit
To ensure your squares look professional and uniform, choose your materials based on your final project:
| Project Type | Recommended Yarn | Hook Size |
| Lace Runners / Doilies | Size 10 Cotton Thread | 1.5 mm – 2.25 mm |
| Blouses / Summer Tops | Cotton or Bamboo Blend (DK) | 3.5 mm – 4.0 mm |
| Blankets / Warm Sweaters | Soft Acrylic or Wool (Worsted) | 5.0 mm – 5.5 mm |
Stitch Key (US Terms)
- ch: Chain
- sl st: Slip Stitch
- sc: Single Crochet
- dc: Double Crochet
- tr: Treble Crochet
- Cluster (cl): 3 dc worked into the same space and finished together at the top.
🛠 Step-by-Step Tutorial: The Floral Lace Star
Round 1: The Center Bud
- Start: Make a Magic Ring (or ch 4 and sl st to the first ch to form a ring).
- Stitches: ch 3 (counts as your first dc). Work 15 more dc into the ring.
- Join: sl st to the top of the ch 3.

Result: A solid circle of 16 dc.
Round 2: The Sunburst Petals
- ch 2. In the same stitch, work 2 dc but leave the last loop of each dc on your hook. Yarn over and pull through all 3 loops. (This is your first Cluster).
- ch 1.
- Repeat: [Cluster in the next stitch, ch 1] in every stitch around.
- Join: sl st to the top of the first cluster.
Result: You now have 16 small petals separated by tiny holes.
Round 3: Squaring the Shape
This is the “Magic Round” where the circle becomes a square by using different stitch heights.
- Move Hook: sl st into the first ch-1 space.
- First Corner: ch 4 (counts as tr). Work (2 tr, ch 3, 3 tr) all in the same space.
- The Side:
- ch 1, skip 1 space.
- Work 3 dc in the next space.
- ch 1, skip 1 space.
- Work 3 sc in the next space.
- ch 1, skip 1 space.
- Work 3 dc in the next space.
- ch 1, skip 1 space.
- Second Corner: Work (3 tr, ch 3, 3 tr) in the next space.
- Repeat: Continue this sequence around until you have 4 corners.
- Join: sl st to the top of the ch 4.

Round 4: The Finishing Frame
- sl st across to the corner ch-3 space.
- Corner: ch 3, work (2 dc, ch 2, 3 dc) in the corner.
- Sides: Work 3 dc in every ch-1 space along the sides, with a ch 1 between each cluster.
- Join: sl st to the top of the ch 3 and fasten off.
🌟 How to Make It “Magnificent”
1. The Color Palette
To highlight the “Star” in the center, use three colors:
- Color A (Round 1): Darkest shade (the heart).
- Color B (Round 2-3): Brightest shade (the petals).
- Color C (Round 4): Neutral shade like Cream or White (the frame).

2. Blocking (The Professional Secret)
Beautiful motifs often look “shriveled” when they come off the hook.
- Pin each square to a foam mat using rust-proof pins.
- Spray lightly with water and let dry for 24 hours.
- This “opens up” the lace and ensures every square is exactly the same size for joining.
3. Joining Techniques
- For a Flat Runner: Use the Whip Stitch through the back loops only for a seamless, invisible join.
- For a Textured Blouse: Use a Single Crochet Join on the outside of the work. This creates a raised decorative ridge between squares that looks very stylish.
💡 Quick Tips for Beginners
- Count Every Round: If you have 15 petals instead of 16 in Round 2, your corners won’t line up in Round 3.
- Check Your Corners: Ensure you use Treble Crochet (tr) for the corners. They need the extra height to make the square corners sharp rather than rounded.
Would you like me to suggest a layout plan for a summer blouse using these squares, including how to shape the neckline?
Video tutorial: