by
by That is a perfect project goal! Focusing on a versatile motif that is easy to master means you can create either a runner or a blouse using the same foundational block.
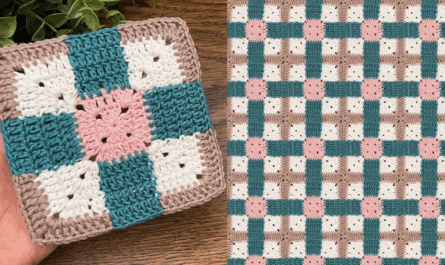
I will detail the pattern for the Simple Textured Popcorn-Corner Square Motif. This design is beginner-friendly, uses only basic stitches, and the popcorn stitches provide enough texture to make the finished item look more complex than it is.

🌟 Beginner’s Popcorn-Corner Square Motif Tutorial
This square uses the classic Granny Square structure but substitutes the corner double crochet clusters with dimensional popcorn stitches, making the motif easy to join but visually unique.
Materials You’ll Need
- Yarn: Medium-weight yarn (worsted/size 4) for ease of handling. Cotton or acrylic blends are great for beginners.
- Crochet Hook: The size appropriate for your yarn (e.g., 5.0 mm).
- Scissors, Tapestry Needle.
Key Crochet Terms
| Abbreviation | Stitch Name |
| ch | Chain |
| sl st | Slip Stitch |
| dc | Double Crochet |
| Cluster | 3 dc worked into the same space |
| Popcorn | Popcorn Stitch (Special Stitch) |
Special Stitch: Popcorn Stitch (The Unique Corner)
- Work 4 dc into the specified corner space.
- Drop the loop from the hook.
- Insert the hook into the top of the very first dc of the 4-dc group.
- Catch the dropped loop and pull it through the first dc stitch.
- ch 1 to close (this locks the stitch and creates the pop).

Part 1: Crocheting the Motif
Round 1: Foundation (The Center)
- Start: Make a Magic Ring. ch 3 (counts as dc). Work 11 dc into the ring.
- Finish: Pull the tail tight. Join with a sl st to the top of the ch 3. (12 sts).
Round 2: Setting the Sides and Corners
We will use the textured Popcorn Stitch to define the four corners.
- ch 3 (counts as dc). Work dc in the same st.
- Side: Work dc in the next 2 sts.
- First Corner: Work Popcorn in the next stitch. ch 2.
- Side: Work dc in the next 3 sts.
- Repeat: Continue the sequence [Popcorn in the next st, ch 2, dc in the next 3 sts] 3 more times.
- Finish: Join with a sl st to the top of the beginning ch 3.

Round 3: Building the Granny Frame
We now transition to the classic open-cluster Granny structure for easy expansion and joining.
- Move to Corner: sl st over the next 2 dc stitches and sl st into the ch-2 corner space.
- First Corner: ch 3 (counts as dc). Work (2 dc, ch 2, 3 dc) into the corner space.
- Side Space: ch 1. Work 3 dc into the next dc stitch (the central stitch of the 3-dc group from R2). ch 1.
- Repeat: Continue the sequence [Corner (3 dc, ch 2, 3 dc) in the next ch-2 space, ch 1, 3 dc into the central dc on the side, ch 1] 3 more times.
- Finish: Join with a sl st to the top of the beginning ch 3.
Round 4: Final Expansion
- Move to Corner: sl st to the ch-2 corner space. ch 3. Work (2 dc, ch 2, 3 dc) into the corner.
- Side: ch 1. Work 3 dc into the next ch-1 space. ch 1. Work 3 dc into the next ch-1 space.
- Repeat: Continue the sequence [Corner, (ch 1, 3 dc in next space) twice, ch 1] around the square.
- Finish: Join with a sl st to the top of the ch 3. Fasten off.

Part 2: Multipurpose Assembly Guide
1. Joining the Motifs
For both a runner and a blouse, the easiest and cleanest join is the Slip Stitch Join or Whipstitch Join worked through the back loops only of the final round stitches.
2. Project Layouts
| Project | Shape/Layout | Customization Tips |
| Table Runner | Shape: A long, narrow rectangle (e.g., 2 or 3 motifs wide by 8–10 motifs long). | Consistency: Block all motifs before joining to ensure they are the exact same size. Edging: Add a final row of Moss Stitch (sc, ch 1) or small scalloped edge to the perimeter. |
| Blouse | Construction: Two rectangular panels (Front/Back) joined at the shoulders and sides. | Sizing: Measure your bust circumference and divide by your motif width to determine how many motifs wide the panels should be. Armhole: Join the side seams, leaving a sufficient gap (usually 1.5–2 motif widths) at the top for the armhole. Drape: Use a yarn with good drape (like cotton or bamboo blend). |
Final Step: Blocking (Essential)
Blocking will define the popcorn corners and flatten the granny frame, making the finished piece look polished and professional. Wet the finished item, pin it to the correct shape/measurements (especially for the blouse), and let it dry completely.

Would you like to try a different color combination for your motif, or maybe try assembling a specific project first?
Video tutorial: