by
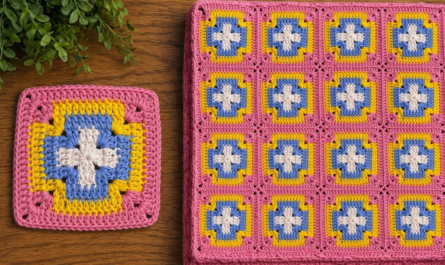
by That is a wonderful choice! The Classic Granny Square is the perfect motif for any beginner to start with. It is simple, uses only basic stitches, and its repetitive nature makes it easy to memorize and master.
Here is a detailed, step-by-step tutorial designed just for beginners!
🤩 Classic Granny Square Tutorial: Step-by-Step Guide
The Granny Square is built using groups of three double crochet (dc) stitches, called “clusters,” separated by chain spaces, worked outward in rounds.
Materials You’ll Need
- Yarn: Medium-weight yarn (worsted/size 4). This size is highly recommended as it’s the easiest to handle and see your stitches clearly.
- Crochet Hook: The size recommended for your yarn (usually 5.0 mm or H/8).
- Scissors
- Tapestry Needle (for weaving in ends).
Key Crochet Terms
| Abbreviation | Stitch Name |
| ch | Chain |
| sl st | Slip Stitch |
| dc | Double Crochet |
| Cluster | 3 dc worked into the same space |
| Corner | (Cluster, ch 2, Cluster) |
Round 1: Creating the Center
We establish the center ring and the first four sides and corners of the square.
- Start the Ring: Make a Magic Ring. (If the Magic Ring is too tricky, Chain 4 and slip stitch into the first chain to form a ring.)
- First Cluster (Side 1): ch 3 (This counts as your first dc). Work 2 dc into the center ring. (Total of 3 stitches).
- Corner Space: ch 2.
- Side 2: Work 3 dc into the ring.
- Corner Space: ch 2.
- Side 3 & 4: Repeat Steps 4 and 5 two more times. (You now have 4 clusters and 4 chain-2 spaces).
- Finish: Pull the yarn tail tight to close the center hole. Join the round with a sl st to the top of the beginning ch 3.

Round 2: Defining the Square
We only work into the chain spaces from the previous round. Do not work into the tops of the DC stitches.
- Move to Corner: You must move your hook to the first corner space. sl st into the next 2 dc stitches and then sl st into the ch-2 corner space (this puts you in the perfect starting position).
- First Corner: ch 3 (counts as dc). Work (2 dc, ch 2, 3 dc) into the same corner space. (This is a complete Corner).
- Side Separator: ch 1 (This chain separates the clusters along the side).
- Repeat: Work [Corner (3 dc, ch 2, 3 dc) in the next ch-2 space, ch 1 (Side Separator)] 3 more times.
- Finish: Join with a sl st to the top of the beginning ch 3.

Round 3: Expanding the Sides
The sides of the square now grow by adding a new cluster into the chain-1 side space created in Round 2.
- Move to Corner: sl st over the next 2 dc stitches and sl st into the ch-2 corner space.
- First Corner: ch 3. Work (2 dc, ch 2, 3 dc) into the corner space.
- First Side: ch 1. Work 3 dc into the next ch-1 side space.
- Repeat: Continue the sequence [ch 1, Corner (3 dc, ch 2, 3 dc) in the next ch-2 corner sp, ch 1, 3 dc in the next ch-1 side sp] 3 more times.
- Finish: Join with a sl st to the top of the beginning ch 3.

Continuing to Grow & Finishing
- Growing: To make the square larger, simply repeat Round 3.
- Corners: Always get a full (3 dc, ch 2, 3 dc).
- Sides: Always work (ch 1, 3 dc) into every chain-1 space.
- Finishing: Cut the yarn, leaving a tail. Pull the loop completely through the last stitch to knot it. Use your tapestry needle to weave the tails securely into the back of the work.
Your classic Granny Square Motif is complete! Would you like to know how to change colors on your squares, or how to join them together?

Video tutorial: