 by
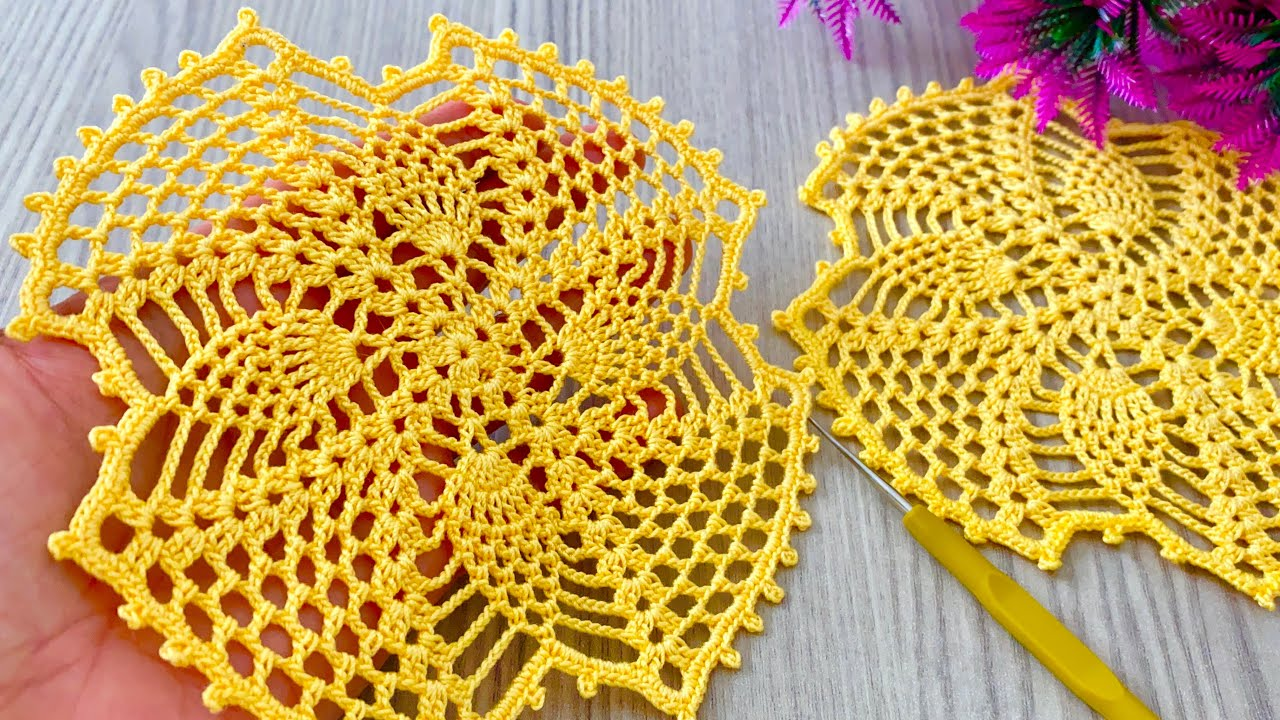
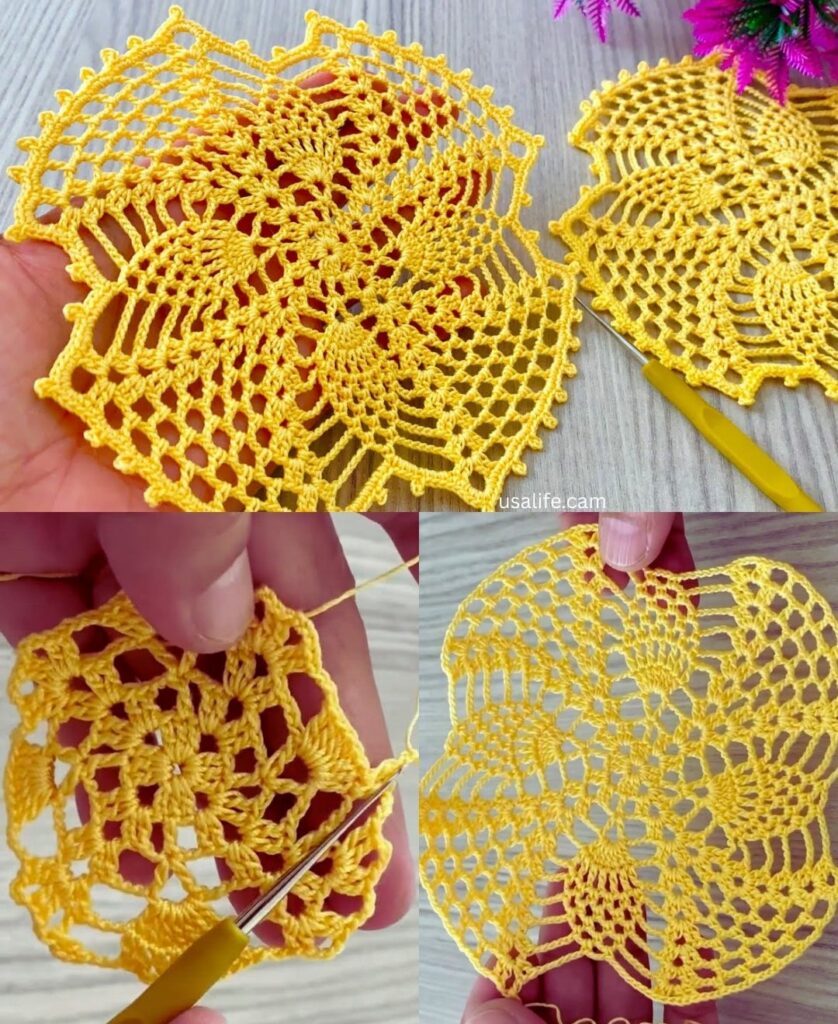
by The Pineapple Square Motif is a masterpiece of crochet lace. It combines the vintage elegance of the pineapple stitch with the structural utility of a square. This motif is particularly “stunning” because it features four pineapples pointing toward the corners, creating an intricate, star-like center.
Because the pineapple stitch is very “open,” it is perfect for the warm climate of Phnom Penh, making it ideal for a breathable blouse or a decorative table runner.

Phase 1: Preparation & Materials
- Yarn: Mercerized Cotton (Size 10 thread for a delicate lace runner, or Sport/DK weight for a blouse).
- Hook: 3.0mm (for DK yarn) or 1.5mm–2.0mm (for thread).
- Skill Level: Intermediate (You should be comfortable with “Shells” and “Chain Loops”).
Phase 2: The Pineapple Square Pattern Tutorial
Round 1: The Foundation
- Make a Magic Ring.
- Ch 3 (counts as 1 dc), work 15 dc into the ring.
- Join with a sl st to the top of the ch-3. (16 dc total).

Round 2: Setting the Base
- Ch 4 (counts as 1 dc + ch 1).
- [1 dc in next st, ch 1] repeat 15 times around.
- Join with a sl st in the 3rd chain of the starting ch-4. (16 spaces).
Round 3: Building the Fan Bases
- Sl st into the first ch-1 space. Ch 3, 1 dc, ch 2, 2 dc (this is your first Shell).
- Ch 3, skip one space. In the next space, work 8 tr (this is the base for your first pineapple).
- Ch 3, skip one space. In the next space, work a Shell (2 dc, ch 2, 2 dc).
- Repeat the pattern:
[Shell, ch 3, 8 tr fan, ch 3]three more times. - Join with a sl st. You now have 4 fan bases (the pineapples) and 4 shells (the dividers).
Round 4: Starting the Pineapple Mesh
- Sl st into the center of the first Shell. Work a Shell (2 dc, ch 2, 2 dc).
- Ch 3. Over the 8 tr of the fan, work [1 sc in tr, ch 3] 7 times. (This creates 7 small loops).
- Ch 3, work a Shell in the next shell.
- Repeat around. Join with a sl st.

Round 5–8: Shrinking the Pineapple
In each following round, your pineapple mesh will get smaller while your divider shells grow.
- Work a Shell in the Shell.
- Ch 3, [sc in next ch-3 loop, ch 3] repeat across the pineapple.
- Round 5 will have 6 loops.
- Round 6 will have 5 loops.
- Round 7 will have 4 loops.
- Ch 3, work a Shell in the next Shell.
- Join and repeat.
Round 9: Squaring Off
- When you reach the final point of the pineapple (1 loop remaining), you will work Double Shells (2 dc, ch 2, 2 dc, ch 2, 2 dc) in the corners to create a sharp square edge.
- Finish with a round of dc or sc around the entire edge to stabilize the motif for joining.
Phase 3: Project Application
| For a Table Runner | For a Blouse / Tunic |
| Joining: Use a Whip Stitch to join the motifs. The pineapples should touch at the corners to create a “diamond” lace effect between them. | Joining: Use the Join-As-You-Go (JAYG) method. Since the pineapple is a large motif, you only need about 4–6 squares for a front panel. |
| Visual: The runner will look best if you use a single color (like Cream or White) to highlight the lace. | Visual: Try a Variegated Yarn (multi-color) for the pineapples to give the blouse a vibrant, modern look. |

Phase 4: Pro-Tips for Pineapple Lace
- Count Your Loops: The most common mistake is losing a loop in the pineapple mesh. Always count (7, 6, 5, 4, 3, 2, 1) as you go.
- The “Pop” Effect: To make the pineapple stand out, work your chains with a relaxed tension. If they are too tight, the pineapple will look “squashed.”
- Steam Blocking: This is mandatory for pineapple squares. Once finished, they will look a bit bunched up. Use a steam iron (or a spray bottle) to flatten them out. This “opens” the lace and reveals the stunning pineapple shape.
Would you like me to help you calculate how many of these squares you need for a specific table size or blouse size?
Video tutorial: