by
by Gemini said
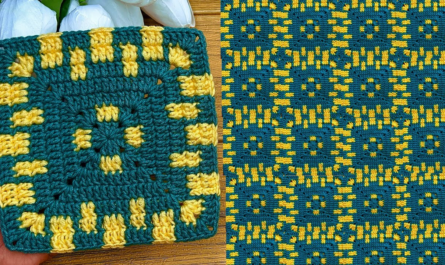
A Crochet Square Motif is the building block of the crochet world. Unlike a “Granny Square,” which has a specific “loopy” look, a Motif can be anything from a solid architectural tile to a delicate floral lace.
The beauty of a motif is its modularity. You can make one for a coaster, or make one hundred to join into a high-fashion “Patchwork” cardigan or a heritage bedspread.
🧶 The Motif Master’s Toolkit
For motifs, Stitch Definition is your goal. You want a yarn that shows off the intricate geometric patterns you’re about to create.
| Item | Recommendation | Why? |
| Yarn | Mercerized Cotton or Bamboo Blend | It has a slight sheen and won’t “pill” or get fuzzy over time. |
| Hook | 3.5 mm (E/4) or 4.0 mm (G/6) | A slightly smaller hook creates a “crisp” motif that holds its shape. |
| Notions | Stitch Markers & Tapestry Needle | Essential for marking corners and hiding ends. |
Stitch Key (US Terms)
- ch: Chain
- sl st: Slip Stitch
- sc: Single Crochet
- dc: Double Crochet
- tr: Treble Crochet (Yarn over twice)
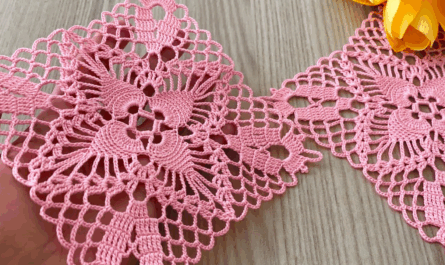
🛠 Step-by-Step Tutorial: The “Sunburst” Square Motif
This specific motif is “Modern-Vintage”—it features a circular floral center that “squares off” into a geometric frame.
Round 1: The Core (The Sun)
- Start: Make a Magic Ring (or ch 5 and sl st to form a ring).
- Stitches: ch 3 (counts as dc). Work 15 dc into the ring.
- Join: sl st to the top of the ch 3.
Result: A solid circle of 16 dc.
Round 2: The Petals (The Burst)
- Start: ch 2. In the same stitch, work 1 dc but leave the last loop on the hook. Work another dc in the same stitch, leaving the last loop on the hook (3 loops on hook). Pull through all 3. (This is a 2-dc Cluster).
- The Pattern: [ch 1, 2-dc Cluster in the next stitch]. Repeat 15 times.
- Join: sl st to the first cluster.
Result: 16 tiny “petals” radiating outward.
Round 3: Squaring the Circle (The Frame)
This is the “magic” round where the circle becomes a square using varying stitch heights.
- Move Hook: sl st into the first ch-1 space.
- Corner 1: ch 4 (counts as tr). In the same space, work (2 tr, ch 3, 3 tr).
- Side 1: * ch 1. In the next ch-1 space, work 3 dc.
- ch 1. In the next ch-1 space, work 3 hdc.
- ch 1. In the next ch-1 space, work 3 dc.
- Repeat: ch 1. Work the Corner (3 tr, ch 3, 3 tr) in the next space.
- Continue: Follow this pattern (Corner -> dc -> hdc -> dc) around the remaining sides.
- Join: sl st to the top of the ch 4.
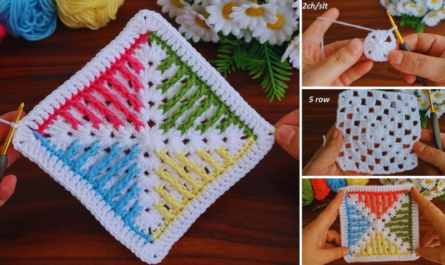
📐 Assembly & Planning
If you are making a project (like a Motif Blouse), you need to plan your joins.
- Join-As-You-Go (JAYG): While working Round 3 of your second motif, you slip stitch into the corner of the first motif. This saves you hours of sewing later.
- The “Invisible” Mattress Stitch: Lay two finished motifs side-by-side and sew through the back loops only with a tapestry needle. This creates a flat, seamless fabric.
💡 Gemini’s Professional Secrets
- The “Magic Ring” Fix: If you find Magic Rings intimidating, just use the “ch 4, sl st” method, but crochet over your starting tail for the first round. Then, you can still pull that tail to close the hole tight.
- Consistency is Queen: If you change your tension halfway through a project, your motifs will be different sizes. Check your gauge every 5 motifs to ensure they still measure the same (e.g., 10 cm x 10 cm).
- Steam Blocking: This is the most important step for motifs. Pin them to a blocking board so they are perfectly square. Use a steamer to relax the fibers. This makes the motifs look “store-bought” and professional.
✨ Style Tip
“If you’re making a summer top, use a white linen yarn. The open spaces in the Sunburst Motif provide amazing ventilation, and the structured ‘tr’ corners give the garment a high-fashion, architectural drape.”
Would you like me to help you calculate how many of these Sunburst Motifs you’d need for a standard-size throw pillow?