 by
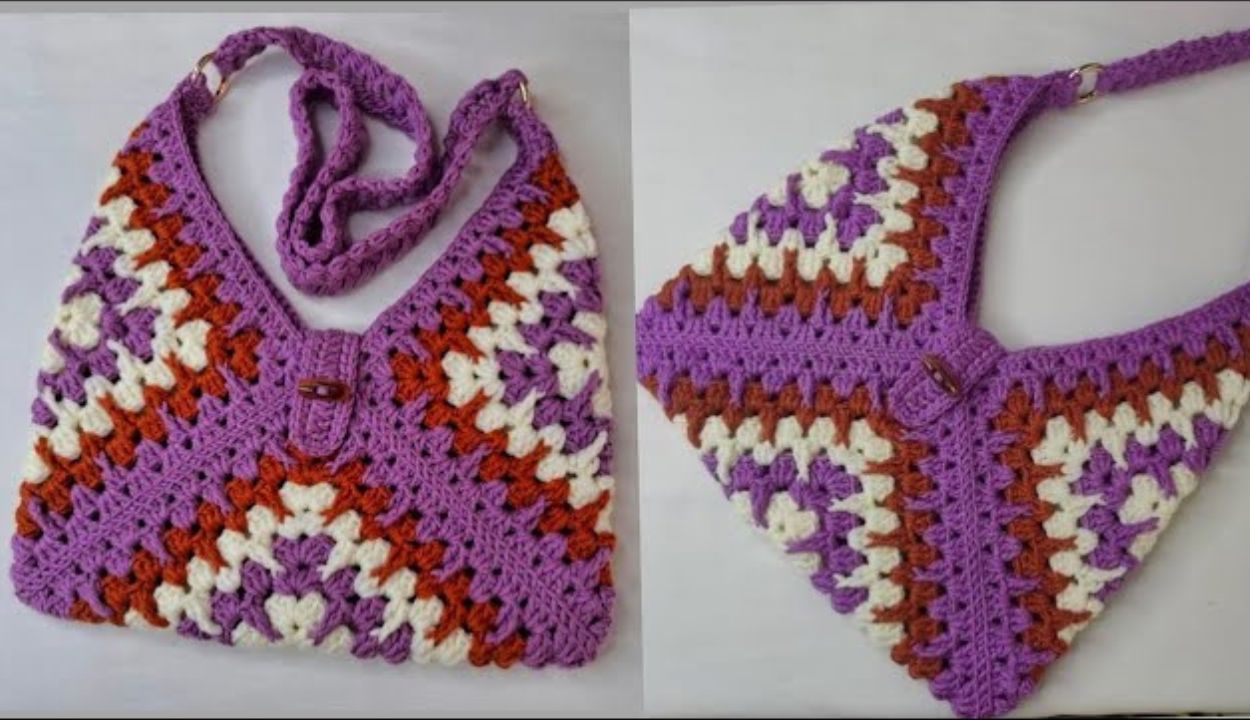
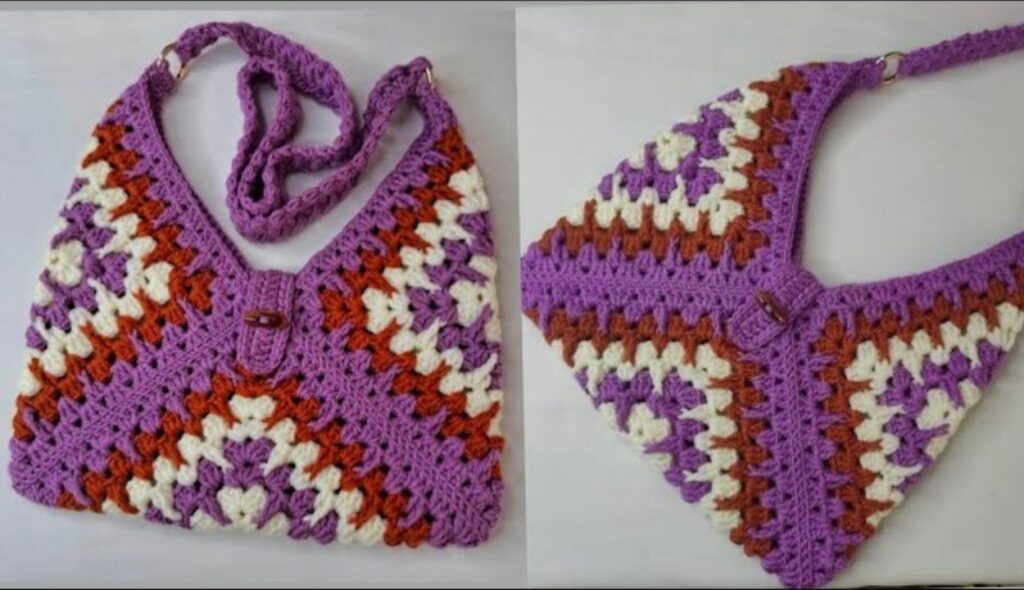
by You’ve asked about the Granny Square Bag again! This is a fantastic and versatile project, perfect for crocheters of all levels, especially beginners. It allows for incredible creativity with color combinations and results in a charming, often nostalgic, accessory.
Given that you’re in Phnom Penh, where it’s generally warm, 100% cotton yarn or a sturdy cotton blend is an excellent choice for your bag. Cotton is durable, holds its shape well (which is important for a bag), has great stitch definition, and is breathable. It’s also easy to wash, which is practical for a bag that will see a lot of use.
Let’s dive into the details of how to crochet a granny square bag. There are several ways to construct one, but the most common and beginner-friendly method involves creating several individual granny squares and then joining them.
How to Crochet a Granny Square Bag: A Detailed Guide
This tutorial will focus on creating a versatile, medium-sized tote bag composed of individual granny squares. You can easily adjust the size by changing the number of rounds in your squares, or by making more or fewer squares.
1. Essential Materials You’ll Need
- Yarn:
- Worsted Weight (Aran / Medium / Category 4) yarn is ideal for a sturdy bag.
- Colors: The beauty of a granny square bag is the ability to use multiple colors! Choose a few colors for your squares (e.g., one for the center, one for middle rounds, one for the outer round). You’ll also need a joining color (this can be one of your granny square colors or a contrasting one).
- Quantity: Approximately 200-300g total yarn for a medium-sized bag (this can vary greatly based on square size, number of squares, and bag dimensions). This is an excellent project for using up yarn scraps!
- Crochet Hook:
- A 4.0mm (US G/6) to 5.5mm (US I/9) hook. Choose a hook size that creates a fairly dense and firm fabric for your granny squares. This will ensure your bag holds its shape well and isn’t too flimsy.
- Scissors: For cutting yarn.
- Yarn Needle (Tapestry Needle): Absolutely essential for weaving in ends and seaming the squares together.
- Stitch Markers (Optional but helpful): To mark corners or the beginning of rounds when making your squares.
2. Basic Crochet Stitches You’ll Use
This project relies on the core stitches used in classic granny squares and simple joining techniques:
- Magic Ring (MR) / Adjustable Ring: (Highly Recommended!) Creates a tight, hole-free center for your first round. Alternatively, you can
ch 4, then sl st to joininto the first chain to form a ring. - Chain (ch): Used for foundation, spacing, and forming corner spaces within the granny squares.
- Slip Stitch (sl st): For joining rounds within the granny square.
- Double Crochet (dc): The main stitch for forming the “clusters” in a granny square.
- Single Crochet (sc): Often used for joining squares and for the bag’s top edging.
- Working in Rounds: You’ll build each granny square in circles from the center out.
- Fasten Off: Securely ending your work.
- Weaving in Ends: Hiding yarn tails for a neat and professional finish.

Crochet Granny Square Bag Pattern (Medium Tote Style)
This pattern typically uses 13 granny squares for a basic tote:
- 9 squares for the main body (3×3 grid).
- 4 squares (or longer strips of crochet) for the handles.
We’ll make 3-round granny squares for the main body of the bag. You can make them larger (4 or 5 rounds) if you want a bigger bag with fewer squares, or smaller if you want a more intricate design.
Abbreviations (US Crochet Terms):
- MR: Magic Ring
- ch: chain
- sl st: slip stitch
- dc: double crochet
- st(s): stitch(es)
(...): work stitches into the same stitch or space[...]: repeat instructions in brackets
Part 1: Making the Granny Squares (Make 13 total)
You’ll need 13 identical 3-round granny squares. Feel free to use different colors for each round or stick to one solid color. It’s often easiest to weave in the ends after finishing each square.
- Start (Color A): Create a Magic Ring (MR).
- (Alternatively: Ch 4, then sl st into the 1st ch to form a ring.)
- Round 1: Ch 3 (counts as 1st dc). Work 2 dc into the ring.
*Ch 2 (creates a corner space). Work 3 dc into the ring.*Repeat from*to*2 more times. Ch 2. Join with a sl st to the top of the beginning Ch 3. (You’ll have 4 clusters of 3 dc, separated by ch-2 corner spaces).- Fasten off Color A.
- Round 2 (Color B): Join Color B with a sl st into any ch-2 corner space. Ch 3 (counts as 1st dc). Work (2 dc, ch 2, 3 dc) all into the same ch-2 corner space.
*Ch 1 (creates a side space). In the next ch-2 corner space, work (3 dc, ch 2, 3 dc).*Repeat from*to*2 more times. Ch 1. Join with a sl st to the top of the beginning Ch 3.- Fasten off Color B.
- Round 3 (Color C): Join Color C with a sl st into any ch-2 corner space. Ch 3 (counts as 1st dc). Work (2 dc, ch 2, 3 dc) all into the same ch-2 corner space.
*Ch 1. Work 3 dc into the next ch-1 side space. Ch 1. In the next ch-2 corner space, work (3 dc, ch 2, 3 dc).*Repeat from*to*2 more times. Ch 1. Work 3 dc into the last ch-1 side space. Ch 1. Join with a sl st to the top of the beginning Ch 3.- Fasten off Color C.
- Weave in ALL yarn ends on each individual granny square as you complete them. This is crucial for a neat finish and to avoid a huge task at the end.

Part 2: Assembling the Bag Body (9 Squares)
You’ll use 9 squares to form the main body of the bag. The easiest way to join them for beginners is often with a single crochet (sc) join or a slip stitch (sl st) join using your hook, or a whip stitch using your yarn needle. Use your joining color for all seams.
Bag Layout (Front/Back/Bottom):
Arrange 9 squares in a 3×3 grid:
[ Sq 1 ] [ Sq 2 ] [ Sq 3 ]   <-- Top Row (One side of the bag)
[ Sq 4 ] [ Sq 5 ] [ Sq 6 ]   <-- Middle Row (The bottom of the bag)
[ Sq 7 ] [ Sq 8 ] [ Sq 9 ]   <-- Bottom Row (The other side of the bag)
Step-by-Step Joining:
- Join the Rows:
- Join Sq 1 to Sq 2: Place Sq 1 and Sq 2 with their wrong sides together. Insert your hook through both loops of the corresponding stitches on both squares (or into the chain spaces). Use your chosen joining method (e.g.,
sl stacross the edge, orscacross the edge, through both layers). - Join Sq 2 to Sq 3: Repeat the joining process to attach Sq 2 to Sq 3 along one edge.
- You now have a strip of 3 squares (Row 1). Fasten off your joining yarn and weave in ends neatly after each seam.
- Repeat this process to create Row 2 (Sq 4, Sq 5, Sq 6) and Row 3 (Sq 7, Sq 8, Sq 9).
- Join Sq 1 to Sq 2: Place Sq 1 and Sq 2 with their wrong sides together. Insert your hook through both loops of the corresponding stitches on both squares (or into the chain spaces). Use your chosen joining method (e.g.,
- Join the Columns:
- Now, join Row 1 to Row 2 along the long edge. Align Sq 1 with Sq 4, Sq 2 with Sq 5, and Sq 3 with Sq 6. Join across the entire length.
- Repeat to join Row 2 to Row 3.
- You now have a large flat piece of 9 joined squares. This will be the main body of your bag.
- Form the Bag Shape (Side Seams):
- Fold your 3×3 grid in half, so that Row 1 aligns with Row 3. Row 2 will form the bottom of the bag.
- Join the side edges: Using your joining method, join the side edge of Sq 1 to Sq 7.
- Repeat on the other side: Join the side edge of Sq 3 to Sq 9.
- You now have a 3D bag shape with an open top.
Part 3: Adding the Top Edging and Handles (Remaining 4 Squares or Crocheted Strips)
You can use the remaining 4 granny squares to form the handles, or you can crochet simple strips for handles. Crocheted strips are often more comfortable and adjustable.
Option A: Crocheted Strip Handles (Recommended for beginners)
- Top Edging (Optional but Recommended):
- Join your joining color yarn with a
sl stto any stitch along the top opening of your bag. - Ch 1. Work 1 sc evenly around the entire top opening of the bag. Aim for 1 sc per stitch or into chain-1 spaces, and 2-3 sc in corners of the squares for a neat transition. This creates a solid base for your handles.
- Join with a
sl stto the first sc. - Repeat this
scround for 1-2 more rounds for a sturdier top edge.
- Join your joining color yarn with a
- Make 2 Handles:
- With your joining color (or a new accent color), ch 50-70 (adjust for desired handle length and arm drop).
- Row 1: Sc in the 2nd ch from hook and in each ch back down the chain.
- Row 2-3 (for wider/sturdier handle): Ch 1, turn. Sc in each sc across.
- Fasten off, leaving a long tail (at least 12 inches / 30 cm) on both ends for sewing.
- Repeat to make the second handle.
- Attach Handles:
- Lay your bag flat. Determine where you want your handles to be (e.g., centered over the middle top square, or slightly wider).
- Using your yarn needle and the long tails, securely sew each end of one handle to the inside of the bag’s top opening. Stitch through multiple layers of stitches for durability.
- Repeat for the second handle on the opposite side of the bag.
- Weave in all remaining tails very securely.
Option B: Granny Square Handles (More complex joining)
- You’d make 4 more granny squares.
- Join 2 squares side-by-side to form a rectangle for one handle. Repeat for the second handle.
- Then, you’d carefully join the ends of these handle rectangles to the top opening of your bag. This method can sometimes result in bulkier handles.

4. Finishing Your Granny Square Bag
- Weave in ALL Remaining Ends NEATLY: This is the most crucial step for a polished and durable bag. Use your yarn needle to carefully weave in every single yarn tail securely into the stitches on the inside of your bag. Go back and forth through stitches several times.
- Blocking (Optional but Recommended): Blocking can significantly improve the shape and drape of your bag.
- Gently wet the entire bag (you can dunk it in cool water).
- Stuff the bag lightly with towels or plastic bags to help it hold its intended square shape. You can also pin it to shape on a blocking mat.
- Allow it to air dry completely. Blocking helps to even out your stitches and gives the bag a more professional, finished appearance.
5. Tips for a Charming & Durable Granny Square Bag
- Yarn Choice & Hook Size: For a truly sturdy bag that will hold its shape, use cotton or a cotton blend, and a hook on the smaller side of the recommended range for your yarn. A tighter gauge will prevent stretching and sagging.
- Consistent Tension: Maintain even tension throughout both your granny squares and your joining seams. This ensures your bag is symmetrical and looks neat.
- Seaming Method:
- Slip Stitch (sl st) Join: Creates a very flat and nearly invisible seam if you work into the back loops or only one loop of each square. It can be a bit tight, so don’t pull too hard.
- Single Crochet (sc) Join: Creates a slightly raised, visible ridge. This is a very strong and durable join, excellent for bags.
- Whip Stitch (Yarn Needle): Creates a neat, almost invisible seam if done carefully. It’s strong and gives a very clean finish.
- Personalize It:
- Color Changes: Use a different color for each round of your squares, or alternate colors between squares for a vibrant look.
- Lining (Advanced): For a truly professional and more durable bag (especially for small items that might slip through stitches), consider sewing a fabric lining inside. This requires basic sewing skills.
- Pockets: Crochet a separate flat rectangle and sew it to the inside of the bag for an interior pocket.
- Embellishments: Add tassels, pompoms, or even a contrasting crocheted charm.

You’re now ready to crochet a fantastic granny square bag! It’s a project that brings a lot of joy, both in the making and in the using. Happy crocheting!