 by
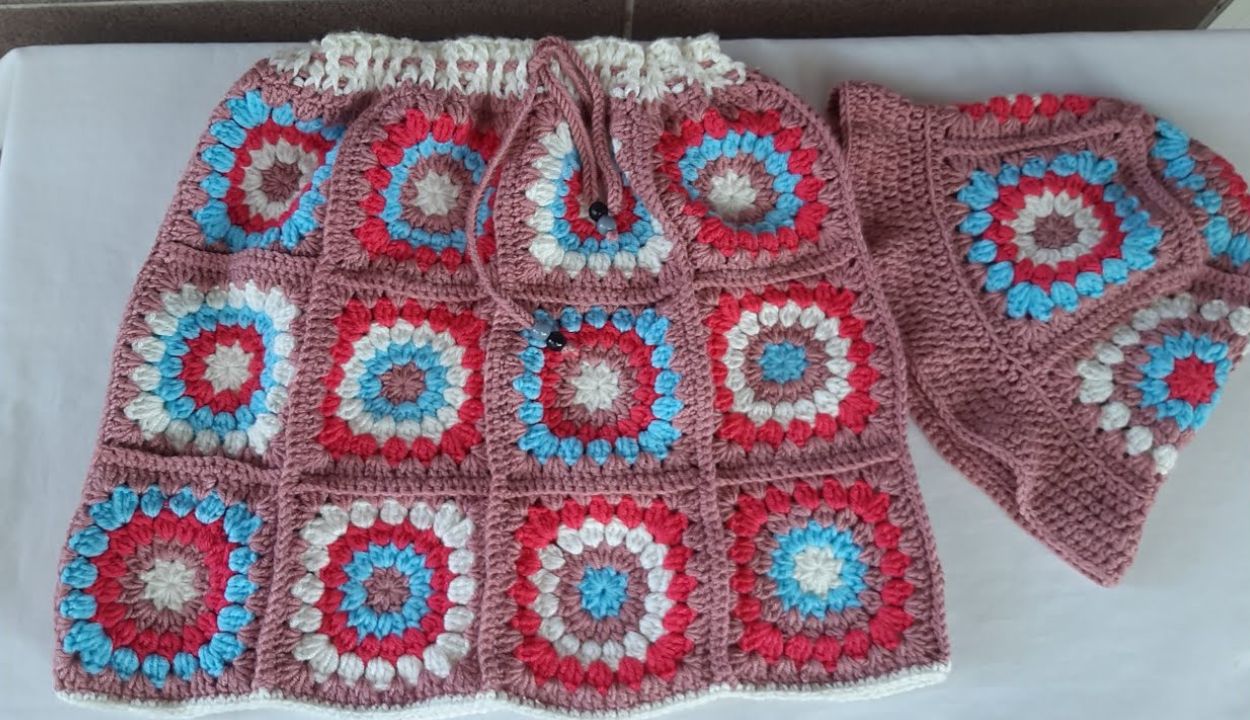
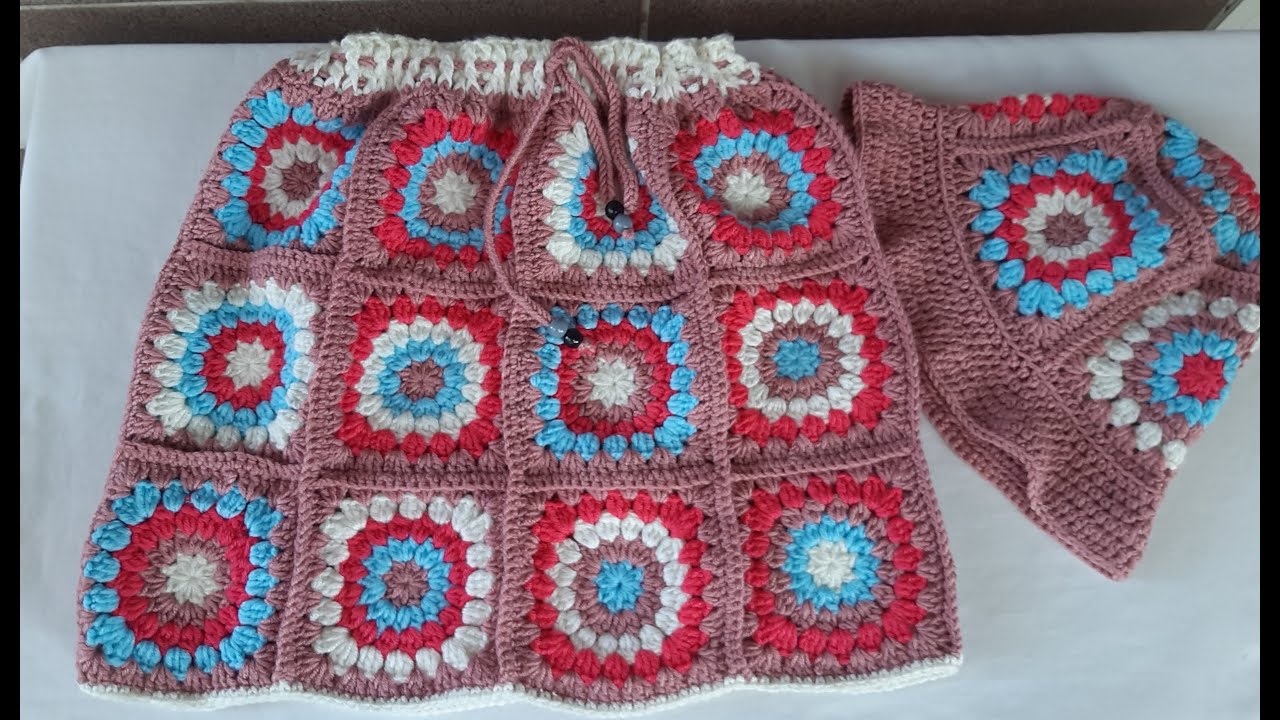
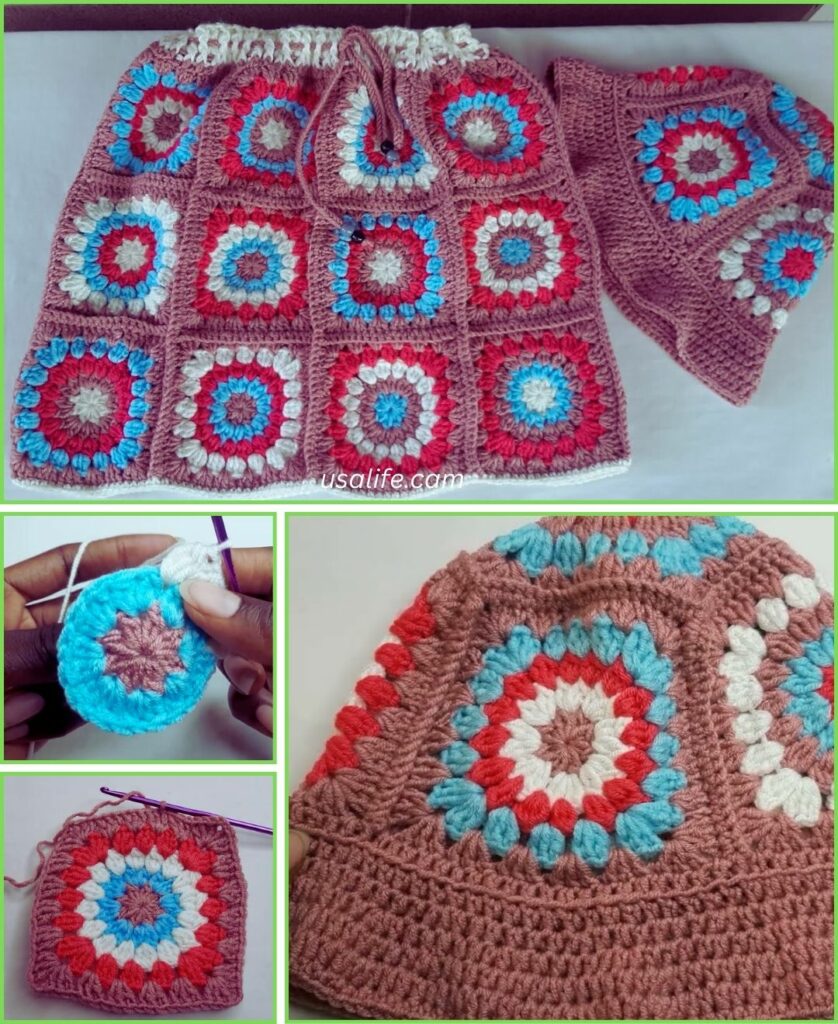
by A crochet granny square skirt is a fantastic project for beginners! It’s wonderfully customizable, allows for endless color creativity, and is a stylish way to showcase your newfound crochet skills. The construction is essentially making a bunch of individual granny squares and then joining them together, which is super satisfying.
Since you’re in Phnom Penh, where it’s generally warm, 100% cotton yarn or a sturdy cotton blend is an excellent choice for a skirt. Cotton is breathable, comfortable against the skin, durable, and holds its shape well. It also has great stitch definition, which is perfect for showing off those granny square patterns. Avoid acrylics if possible for a skirt, as they can stretch out and feel less comfortable in warm weather.
How to Crochet a Granny Square Skirt: A Detailed Guide for Beginners
This tutorial will guide you through creating a simple, knee-length (or midi-length, depending on your preference) granny square skirt. We’ll focus on making several standard granny squares and joining them to form a tube, then adding a waistband.
1. Essential Materials You’ll Need
- Yarn:
- Worsted Weight (Aran / Medium / Category 4) yarn is generally ideal. Using a slightly lighter weight yarn like DK (Light Worsted / Category 3) would also work for a lighter, drapier skirt, but will require more squares or more rounds per square.
- Colors: This is where the fun begins! You’ll need at least 2-3 colors per granny square (e.g., one for the center, one for middle rounds, one for the outer round). You’ll also need a joining color (this can be one of your granny square colors or a contrasting one) and a color for the waistband. This is an excellent project for using up yarn scraps!
- Quantity: This varies greatly depending on the size of the skirt and the size of your squares. For an adult S/M knee-length skirt, estimate 400-800g of yarn.
- Crochet Hook:
- A 4.0mm (US G/6) or 4.5mm (US 7) hook. Choose a hook size that creates a fabric that is firm enough to hold its shape but still has a nice drape. Avoid a hook that makes your stitches too loose, as the skirt might stretch out of shape easily.
- Scissors: For cutting yarn.
- Yarn Needle (Tapestry Needle): Absolutely essential for weaving in all those ends (and there will be many!) and seaming the squares together.
- Stitch Markers (Optional but helpful): To mark the beginning of rounds or corners when making your squares.
- Elastic (Optional but Recommended): About 1 inch (2.5 cm) wide, non-roll elastic for the waistband. Measure around your natural waist. This helps the skirt stay up and fit comfortably.
2. Basic Crochet Stitches You’ll Use
This project relies on the core stitches used in classic granny squares and simple joining techniques:
- Magic Ring (MR) / Adjustable Ring: (Highly Recommended!) Creates a tight, hole-free center for your first round. Alternatively, you can
ch 4, then sl st to joininto the first chain to form a ring. - Chain (ch): Used for foundation, spacing, and forming corner spaces within the granny squares.
- Slip Stitch (sl st): For joining rounds within the granny square.
- Double Crochet (dc): The main stitch for forming the “clusters” in a granny square.
- Single Crochet (sc): Often used for joining squares and for the waistband.
- Working in Rounds: You’ll build each granny square in circles from the center out.
- Fasten Off: Securely ending your work.
- Weaving in Ends: Hiding yarn tails for a neat and professional finish.

Crochet Granny Square Skirt Pattern (Beginner-Friendly)
This pattern focuses on making a skirt by joining granny squares horizontally into strips, then joining those strips to create the skirt. We’ll use 4-round granny squares. You can adjust the skirt’s size and length by:
- Number of rounds per square: More rounds make larger squares, meaning you need fewer squares. Fewer rounds make smaller squares, meaning you need more squares.
- Number of squares per row: This determines the hip/waist circumference.
- Number of rows of squares: This determines the length of the skirt.
Example Sizing Guideline (Adjust for your specific measurements):
- Measure your hips: This is the widest part the skirt needs to fit over.
- Make one sample granny square.
- Calculate: Divide your hip measurement by the width of one granny square to determine how many squares you need per row. (e.g., if your hips are 36 inches and your square is 6 inches wide, you need 36 / 6 = 6 squares per row).
- Determine Rows: Decide on your desired skirt length. Divide that by the height of one granny square to see how many rows you need.
Abbreviations (US Crochet Terms):
- MR: Magic Ring
- ch: chain
- sl st: slip stitch
- dc: double crochet
- st(s): stitch(es)
(...): work stitches into the same stitch or space[...]: repeat instructions in brackets- FO: Fasten off

Part 1: Making the Granny Squares
You’ll make identical 4-round granny squares. Weave in ends as you go!
- Start (Color A): Create a Magic Ring (MR).
- (Alternatively: Ch 4, then sl st into the 1st ch to form a ring.)
- Round 1: Ch 3 (counts as 1st dc). Work 2 dc into the ring.
*Ch 2 (creates a corner space). Work 3 dc into the ring.*Repeat from*to*2 more times. Ch 2. Join with a sl st to the top of the beginning Ch 3. (4 clusters of 3 dc, 4 ch-2 spaces).- Fasten off Color A.
- Round 2 (Color B): Join Color B with a sl st into any ch-2 corner space. Ch 3 (counts as 1st dc). Work (2 dc, ch 2, 3 dc) all into the same ch-2 corner space.
*Ch 1 (creates a side space). In the next ch-2 corner space, work (3 dc, ch 2, 3 dc).*Repeat from*to*2 more times. Ch 1. Join with a sl st to the top of the beginning Ch 3.- Fasten off Color B.
- Round 3 (Color C): Join Color C with a sl st into any ch-2 corner space. Ch 3 (counts as 1st dc). Work (2 dc, ch 2, 3 dc) all into the same ch-2 corner space.
*Ch 1. Work 3 dc into the next ch-1 side space. Ch 1. In the next ch-2 corner space, work (3 dc, ch 2, 3 dc).*Repeat from*to*2 more times. Ch 1. Work 3 dc into the last ch-1 side space. Ch 1. Join with a sl st to the top of the beginning Ch 3.- Fasten off Color C.
- Round 4 (Color D or repeat C): Join Color D (or continue with Color C) with a sl st into any ch-2 corner space. Ch 3 (counts as 1st dc). Work (2 dc, ch 2, 3 dc) all into the same ch-2 corner space.
*Ch 1. Work 3 dc into the next ch-1 side space. Ch 1. Work 3 dc into the next ch-1 side space. Ch 1. In the next ch-2 corner space, work (3 dc, ch 2, 3 dc).*Repeat from*to*2 more times. Ch 1. Work 3 dc into the next ch-1 side space. Ch 1. Work 3 dc into the last ch-1 side space. Ch 1. Join with a sl st to the top of the beginning Ch 3.- Fasten off Color D.
- Weave in ALL yarn ends on each individual granny square as you complete them. This is absolutely crucial for a neat finish and to avoid a monumental task at the end.

Part 2: Assembling the Skirt Body
You’ll use your joining color for all seams. A single crochet (sc) join creates a sturdy, slightly raised seam, which is good for a skirt. A slip stitch (sl st) join creates a flatter, less visible seam. Choose what you prefer!
- Create Horizontal Strips:
- Based on your hip measurement calculation, decide how many squares you need for your first row. For example, let’s say you need 6 squares.
- Take Square 1 and Square 2. Place them with their wrong sides together.
- Join your joining color yarn with a sl st into the corner space of both squares (going through both layers).
- Ch 1. Work single crochet (sc) evenly along the edge, through both layers, to join the squares. Work 1 sc into each dc stitch and 1 sc into each ch-1 space.
- When you reach the next corner of the joined squares, work 1 sc into that corner (through both layers).
- Fasten off joining yarn, leaving a tail to weave in.
- Repeat this process until you have a long strip of joined squares (e.g., 6 squares wide).
- Make enough strips to achieve your desired skirt length. For example, for a knee-length skirt, you might need 2 or 3 rows of squares.
- Join the Strips Together:
- Place your first completed strip and your second completed strip with wrong sides together.
- Align them carefully.
- Using your joining method (sc or sl st), join the long edges of the strips together. Work evenly across, making sure your corners and stitch clusters align.
- Fasten off joining yarn and weave in ends after each seam.
- Repeat until all your strips are joined into one large flat piece.
- Form the Skirt Tube:
- Take your large flat piece of joined squares.
- Bring the two short ends together (the first and last squares in your horizontal rows).
- Using your joining method, seam these two ends together to form a tube. This is the main body of your skirt.
- Fasten off and weave in ends.
Part 3: Adding the Waistband
The waistband is crucial for the fit and comfort of your skirt.
- Initial Sc Round:
- Join your waistband color yarn (can be your joining color or a new one) with a sl st to any stitch along the top raw edge of your skirt tube.
- Ch 1. Work single crochet (sc) evenly around the entire top opening of the skirt. Aim for 1 sc in each dc stitch and 1 sc in each ch-1 space. Work 1 sc into each corner stitch for neat transitions.
- Join with a sl st to the first sc.
- Ribbed Waistband (Optional but Recommended for good fit):
- Round 1 (Waistband Body): Ch 1. Sc in each sc around. Join with a sl st to the first sc.
- Repeat this sc round for about 3-5 more rounds, or until your waistband is about 1 inch (2.5 cm) deep.
- Fold the waistband: Fold the crocheted waistband over to the inside of the skirt. This creates a casing for the elastic.
- Sew the casing (optional): Using your yarn needle and waistband yarn, whip stitch the folded edge of the waistband to the inside of the skirt. Leave a small opening (about 1 inch / 2.5 cm) at the back.
- Insert Elastic:
- Measure a piece of non-roll elastic around your natural waist (or the child’s waist), stretching it slightly for comfort, but not too tightly. Cut the elastic to this length, adding about 1 inch (2.5 cm) for overlap.
- Attach a safety pin to one end of the elastic.
- Thread the elastic through the opening in your waistband casing. Guide it all the way around until both ends emerge.
- Overlap the ends of the elastic by 1 inch (2.5 cm) and securely sew them together (by hand or machine).
- Gently pull the elastic so it retracts fully into the casing.
- Close the small opening in the casing with a few stitches using your yarn needle.
- Fasten off and weave in any remaining tails.
Part 4: Finishing the Skirt
- Weave in ALL Remaining Ends NEATLY: This is the most crucial step for a polished and durable skirt. You’ll have many ends from the granny squares and joining. Take your time with your yarn needle to carefully weave in every single yarn tail securely into the stitches. Go back and forth through stitches several times to ensure they’re hidden and won’t unravel with wear.
- Blocking (Optional but Recommended): Blocking can significantly improve the drape and finished look of your skirt.
- Gently wet the entire skirt (you can immerse it in cool water and gently squeeze out excess).
- Lay it flat on a clean towel or blocking mat, gently shaping it to its desired dimensions. Pin the edges if necessary.
- Allow it to air dry completely. Blocking helps to even out your stitches and gives the skirt a more professional appearance.
5. Tips for a Charming & Comfortable Granny Square Skirt
- Yarn Choice & Hook Size are Key: Cotton or a cotton blend is highly recommended. A hook that produces a fabric that’s neither too stiff nor too loose will give you the best result for a wearable skirt.
- Consistent Tension: Maintaining even tension throughout all your granny squares and joining seams is vital for a symmetrical and well-fitting skirt.
- Seaming Method: While single crochet joining is sturdy, a slip stitch join or whip stitch (using a yarn needle) can create a flatter, less visible seam, allowing the individual granny squares to stand out more. Experiment with a small sample to see what you prefer.
- Customization:
- A-line Shape: If you want an A-line flare, you can either:
- Make the bottom row(s) of squares slightly larger (e.g., add an extra round to those squares only).
- Alternatively, use a larger hook size for the bottom rows.
- Length: Simply add or remove rows of squares to adjust the length.
- Color Play: Go wild with color! Use a different color for each round, or create a specific color palette for a cohesive look.
- Border: Add a decorative border of shells or picots to the bottom hem of the skirt for a pretty finish.
- Lining (Advanced): For true modesty and a smoother feel, you can sew a fabric lining inside your crocheted skirt. This requires basic sewing skills.
- A-line Shape: If you want an A-line flare, you can either:
You’re now ready to crochet a beautiful and unique granny square skirt! It’s a fantastic project that’s both fun to make and wonderful to wear. What colors are you dreaming up for your skirt?