 by
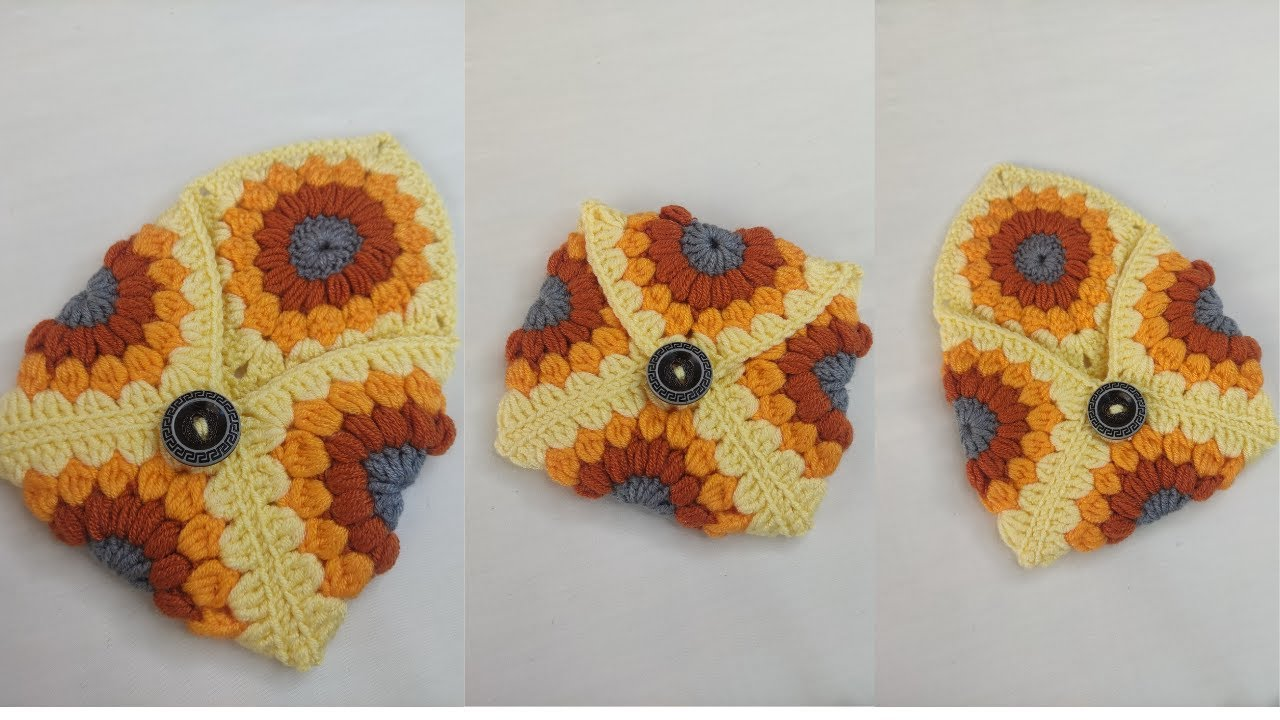
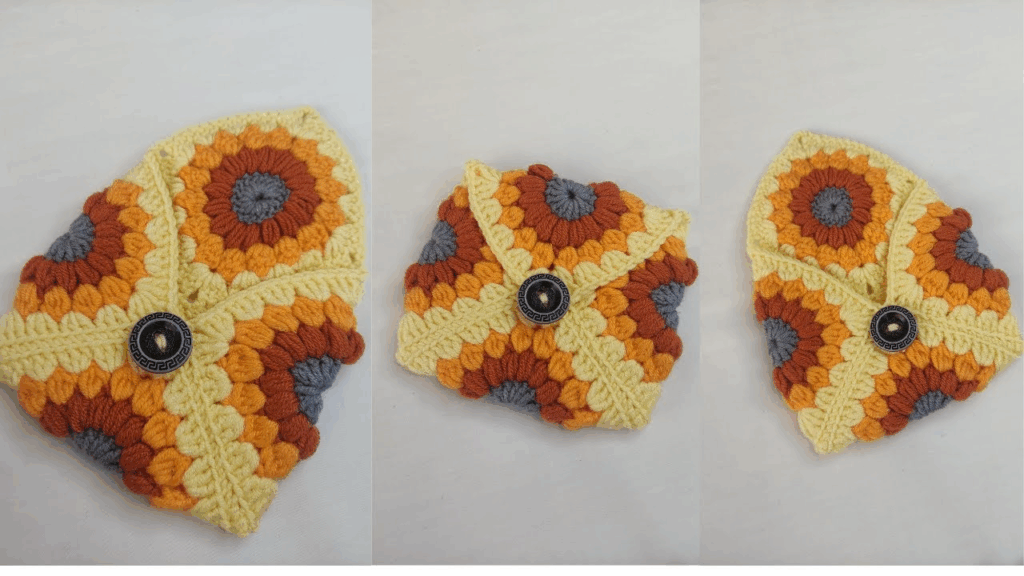
by A crochet granny square pouch bag is a delightful and quick project, perfect for organizing small items, holding cosmetics, or even as a cute coin purse. It’s an excellent way to practice making granny squares and joining them, and it offers endless possibilities for color combinations.
Given that you’re in Phnom Penh, where it’s generally warm, 100% cotton yarn or a sturdy cotton blend is an excellent choice for your pouch bag. Cotton is durable, holds its shape well (important for a small bag), has great stitch definition, and is breathable. It’s also easy to wash, which is practical for an item that might see frequent use.
How to Crochet a Granny Square Pouch Bag: A Detailed Tutorial
This tutorial will guide you through creating a simple pouch bag using two identical granny squares. We’ll then join them and add a top border and an optional drawstring or zipper closure.
1. Essential Materials You’ll Need
- Yarn:
- Worsted Weight (Aran / Medium / Category 4) yarn.
- Colors: You’ll need at least 2-3 colors for your granny squares (e.g., one for the center, one for the middle rounds, one for the outer round). You’ll also need a joining color (this can be one of your granny square colors or a contrasting one) and a color for the drawstring, if desired.
- Quantity: Very small amounts – approximately 30-50g total yarn for a small pouch. This is a perfect project for using up yarn scraps!
- Crochet Hook:
- A 4.0mm (US G/6) or 4.5mm (US 7) hook. Choose a hook size that makes a nice, firm fabric for your granny squares so the pouch holds its shape.
- Scissors: For cutting yarn.
- Yarn Needle (Tapestry Needle): Absolutely essential for weaving in ends, seaming the squares together, and adding a drawstring.
- Optional:
- Zipper: A zipper (approx. 6-8 inches / 15-20 cm, depending on your pouch size) if you prefer a zippered closure.
- Beads: Two beads for the ends of your drawstring, if using one.
2. Basic Crochet Stitches You’ll Use
This project relies on the core stitches used in classic granny squares and simple joining techniques:
- Magic Ring (MR) / Adjustable Ring: (Highly Recommended!) Creates a tight, hole-free center for your first round. Alternatively,
ch 4, then sl st to joininto the first chain to form a ring. - Chain (ch): Used for foundation, spacing, and forming corner spaces.
- Slip Stitch (sl st): For joining rounds and neatening.
- Double Crochet (dc): The main stitch for granny square clusters.
- Single Crochet (sc): Often used for joining squares and for the top edging.
- Working in Rounds: You’ll build the granny squares in circles from the center out.
- Fasten Off: Securely ending your work.
- Weaving in Ends: Hiding yarn tails for a neat finish.

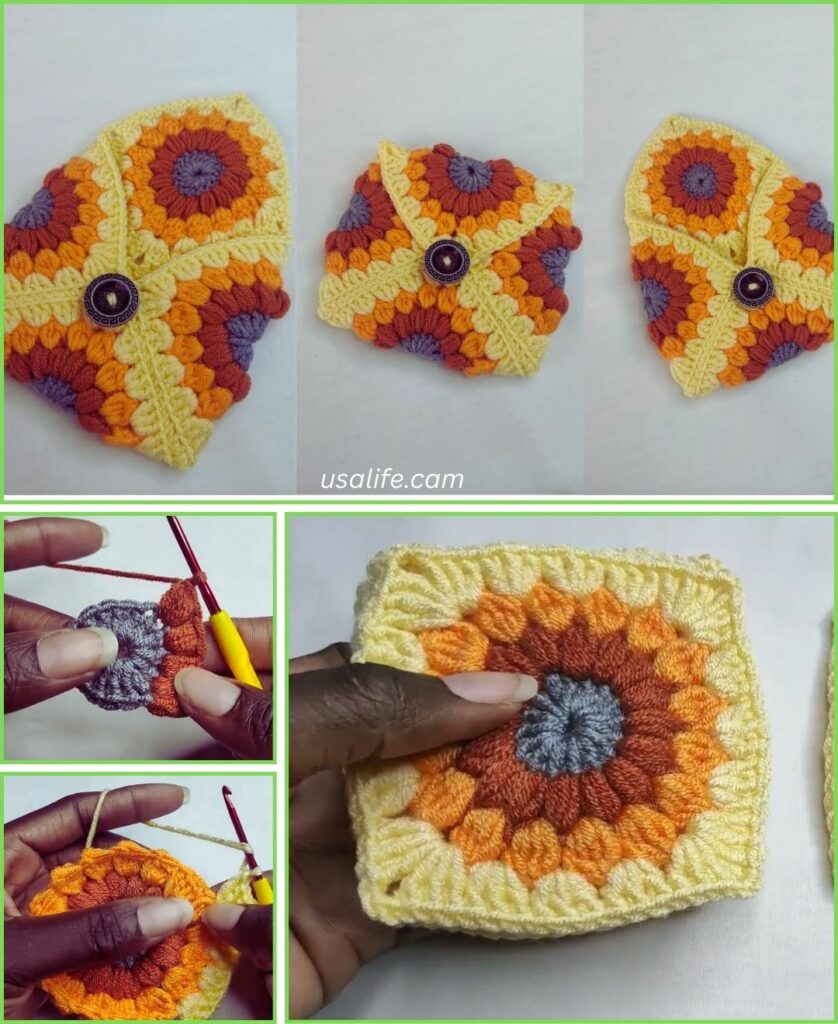
Crochet Granny Square Pouch Bag Pattern
This pattern will guide you through making a pouch using two 4-round granny squares. You can make them larger (5 rounds) for a bigger pouch or smaller (3 rounds) for a tiny coin purse.
Abbreviations (US Crochet Terms):
- MR: Magic Ring
- ch: chain
- sl st: slip stitch
- dc: double crochet
- st(s): stitch(es)
(...): work stitches into the same stitch/space[...]: repeat instructions in brackets- FO: Fasten off
Part 1: Making the Granny Squares (Make 2 total)
You’ll make 2 identical 4-round granny squares. Feel free to use different colors for each round or stick to one solid color. It’s often easiest to weave in the ends after finishing each square.
- Start (Color A): Create a Magic Ring (MR).
- (Alternatively: Ch 4, then sl st into the 1st ch to form a ring.)
- Round 1: Ch 3 (counts as 1st dc). Work 2 dc into the ring.
*Ch 2 (creates a corner space). Work 3 dc into the ring.*Repeat from*to*2 more times. Ch 2. Join with a sl st to the top of the beginning Ch 3. (You’ll have 4 clusters of 3 dc, separated by ch-2 corner spaces).- Fasten off Color A.
- Round 2 (Color B): Join Color B with a sl st into any ch-2 corner space. Ch 3 (counts as 1st dc). Work (2 dc, ch 2, 3 dc) all into the same ch-2 corner space.
*Ch 1 (creates a side space). In the next ch-2 corner space, work (3 dc, ch 2, 3 dc).*Repeat from*to*2 more times. Ch 1. Join with a sl st to the top of the beginning Ch 3.- Fasten off Color B.
- Round 3 (Color C): Join Color C with a sl st into any ch-2 corner space. Ch 3 (counts as 1st dc). Work (2 dc, ch 2, 3 dc) all into the same ch-2 corner space.
*Ch 1. Work 3 dc into the next ch-1 side space. Ch 1. In the next ch-2 corner space, work (3 dc, ch 2, 3 dc).*Repeat from*to*2 more times. Ch 1. Work 3 dc into the last ch-1 side space. Ch 1. Join with a sl st to the top of the beginning Ch 3.- Fasten off Color C.
- Round 4 (Color D or repeat C): Join Color D (or continue with Color C if you prefer) with a sl st into any ch-2 corner space. Ch 3 (counts as 1st dc). Work (2 dc, ch 2, 3 dc) all into the same ch-2 corner space.
*Ch 1. Work 3 dc into the next ch-1 side space. Ch 1. Work 3 dc into the next ch-1 side space. Ch 1. In the next ch-2 corner space, work (3 dc, ch 2, 3 dc).*Repeat from*to*2 more times. Ch 1. Work 3 dc into the next ch-1 side space. Ch 1. Work 3 dc into the last ch-1 side space. Ch 1. Join with a sl st to the top of the beginning Ch 3.- Fasten off Color D.
- Weave in ALL yarn ends on each individual granny square as you complete them. This is crucial for a neat finish and to avoid a huge task at the end.

Part 2: Assembling the Pouch
You’ll use your joining color for all seams. The easiest way to join them is often with a single crochet (sc) join or a slip stitch (sl st) join using your hook.
- Join the Squares:
- Place your two finished granny squares one on top of the other, with their wrong sides together.
- Join your joining color yarn with a sl st into the corner space of both squares (going through both layers).
- Ch 1. Now, you will single crochet (sc) along three sides of the squares, crocheting through both layers as you go.
- When you reach a ch-1 space on the side of a granny square, work 1 sc into that space. When you reach a cluster of 3 dc, work 1 sc into each dc.
- When you reach the next corner space, work 3 sc into that corner (through both layers). This helps to shape the corner of the pouch.
- Continue sc-joining along the bottom edge, then up the third side.
- When you reach the third corner, work 3 sc into that corner (through both layers).
- Fasten off, leaving a small tail to weave in.
- You now have a pouch that is joined on three sides, with one side open at the top.
Part 3: Adding the Top Edging & Drawstring/Zipper
Option A: Drawstring Closure (Recommended for beginners)
- Top Edging:
- Join your joining color yarn with a sl st into any stitch along the top opening of your pouch.
- Round 1 (Sc Round): Ch 1. Sc in each st evenly around the top opening. When you come to the corners of the original granny squares, work 1 sc into the corner stitch for a smooth transition.
- Join with a sl st to the first sc.
- Round 2 (Drawstring Eyelets): Ch 1. Sc in the first st.
*Ch 1, skip next st, sc in next st.*Repeat from*to*around. This creates small holes for the drawstring. Adjust the pattern if needed to ensure you end with an even number of holes. - Join with a sl st to the first sc.
- Round 3 (Final Sc Round): Ch 1. Sc in each sc and each ch-1 space around. This secures the eyelets.
- Join with a sl st to the first sc.
- Fasten off, weave in end.
- Make the Drawstring:
- With a contrasting color or one of your main colors, ch 60-80 (adjust for desired drawstring length, long enough to tie a bow).
- Row 1: Sc in the 2nd ch from hook and in each ch across. (This creates a flat, sturdy cord).
- Fasten off, leaving a short tail.
- Alternatively, you can make an I-cord for a rounder, denser drawstring.
- Insert Drawstring:
- Using your yarn needle, weave the crocheted drawstring through the eyelet holes you created in Round 2 of the top edging. Start and end at the same point, leaving equal lengths on both sides for tying.
- Optional: Thread a bead onto each end of the drawstring and knot it to secure.

Option B: Zipper Closure (More Advanced)
- Top Edging:
- Join your joining color yarn with a sl st into any stitch along the top opening of your pouch.
- Round 1 (Sc Round): Ch 1. Sc in each st evenly around the top opening. Ensure your stitch count is roughly the length of your zipper.
- Join with a sl st to the first sc.
- Repeat Round 1 for 1-2 more rounds if you want a thicker edge to sew the zipper to.
- Fasten off, leave a tail for weaving in.
- Attach Zipper:
- Pin the zipper to the inside of the crocheted opening. Make sure the zipper pull is at one end.
- Using a sewing needle and matching thread (or your yarn needle and thin yarn), carefully hand-sew the zipper to the crocheted edge. Stitch neatly and securely.
Part 4: Finishing Touches
- Weave in ALL Remaining Ends NEATLY: This is absolutely crucial for a polished, professional-looking pouch. Use your yarn needle to carefully weave in every single yarn tail securely into the stitches on the inside of your pouch. Take your time to hide them well.
- Blocking (Optional): For cotton items, a gentle wet block can help even out stitches and improve the pouch’s shape.
- Gently wet the entire pouch.
- Stuff it lightly with tissue paper or plastic bags to help it hold its square shape.
- Allow it to air dry completely. Blocking helps even out your stitches and gives the pouch a more finished look.
5. Tips for Customizing Your Granny Square Pouch Bag
- Size Adjustment:
- Larger Pouch: Make your granny squares with more rounds (e.g., 5 or 6 rounds).
- Smaller Pouch: Make your granny squares with fewer rounds (e.g., 3 rounds).
- Stitch Variety for Edging: Instead of
sc, you could usehdcfor a slightly thicker top edge, or add a decorative picot border. - Lining (Advanced): For a truly professional finish and to prevent small items from slipping through stitches, you can sew a fabric lining inside your crocheted pouch. This requires basic sewing skills.
- Embellishments: Sew on a small crocheted flower, a charm, or a tassel for extra flair.
- Different Joining Methods: You could use a decorative joining method like “join as you go” if you’re feeling adventurous, or a whip stitch for a less visible seam.
You’re now ready to crochet a charming and unique granny square pouch bag! What colors are you thinking for your first one?