by
by That sounds like a wonderfully versatile and creative crochet project! Creating a 3-in-1 crochet rose pot, coaster, and heart is ingenious, as it likely involves a modular design where a central piece can be folded, shaped, or embellished to serve different functions. This project would be perfect for using up yarn scraps and making unique gifts or charming home decor.
Given that it’s warm in Phnom Penh, 100% cotton yarn would be an excellent choice for this project. Cotton provides good stitch definition, holds its shape well (crucial for a pot or coaster), and is durable and washable. It’s also breathable and not too heavy for decorative items in a warm climate.
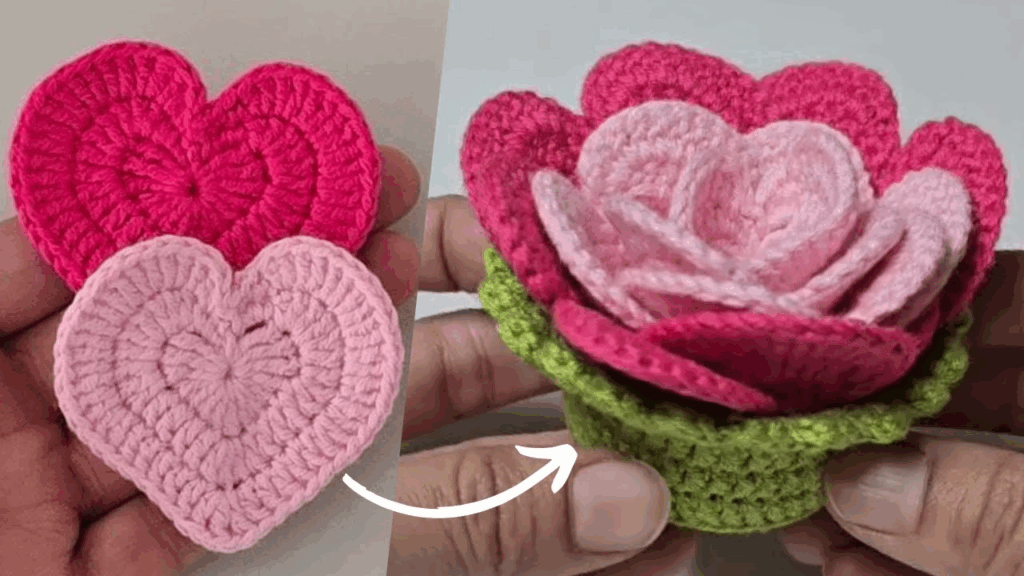
How to Crochet The BEST 3-in-1 Crochet Rose Pot, Coaster, Heart
The “3-in-1” concept suggests a base piece that can transform. The most common way to achieve this versatility is by crocheting a flat, circular or square piece that serves as the coaster or heart, and then adding elements or shaping that allow it to be folded or manipulated into a pot (like a small succulent cover) or have a rose attached.
Let’s break down a potential approach that allows for this versatility. This design will focus on a central circular piece, which can function as a coaster or a base for the pot, and then details that allow for the rose and heart transformations.
1. Essential Materials You’ll Need
- Yarn:
- Main Color (for Coaster/Pot): Choose a solid color like green, brown, or a neutral. Worsted Weight (Aran / Medium / Category 4) Cotton Yarn.
- Rose Color: Red, pink, yellow, or white. Worsted Weight Cotton Yarn.
- Small amounts of each color are sufficient.
- Crochet Hook: A 3.5mm (US E/4) or 4.0mm (US G/6) hook. You want a hook size that creates a firm, dense fabric for the coaster and pot to hold their shape.
- Scissors: For cutting yarn.
- Yarn Needle (Tapestry Needle): Absolutely essential for weaving in ends and assembling parts.
- Optional: Small plant pot or tea light candle to test the “pot” function.
2. Basic Crochet Stitches You’ll Use
This project primarily uses common stitches:
- Magic Ring (MR) / Adjustable Ring: Creates a tight, hole-free center.
- Chain (ch): For starting, spacing, and rose shaping.
- Slip Stitch (sl st): For joining rounds and neatening.
- Single Crochet (sc): Creates a dense fabric, ideal for the base.
- Half Double Crochet (hdc): A versatile stitch.
- Double Crochet (dc): A taller stitch, good for expanding circles and rose petals.
- Treble Crochet (tr) / Triple Crochet: An even taller stitch (for the rose, optionally).
- Working in Rounds (Joined): You’ll join each round with a slip stitch.
- Working in Rows (for Rose): You’ll create a flat strip for the rose.
- Fasten Off: To securely end your work.
- Weaving in Ends: Hiding yarn tails for a neat finish.

Crochet 3-in-1 Pattern
This pattern will create a central piece that’s roughly 4-5 inches (10-12.5 cm) in diameter as a coaster.
Abbreviations (US Crochet Terms):
- MC: Main Color (for Coaster/Pot)
- RC: Rose Color
- MR: Magic Ring
- ch: chain
- sl st: slip stitch
- sc: single crochet
- hdc: half double crochet
- dc: double crochet
- tr: treble crochet
- st(s): stitch(es)
- ch-sp: chain space
(...): work stitches into the same stitch or space[...]: repeat instructions in brackets- FO: Fasten off
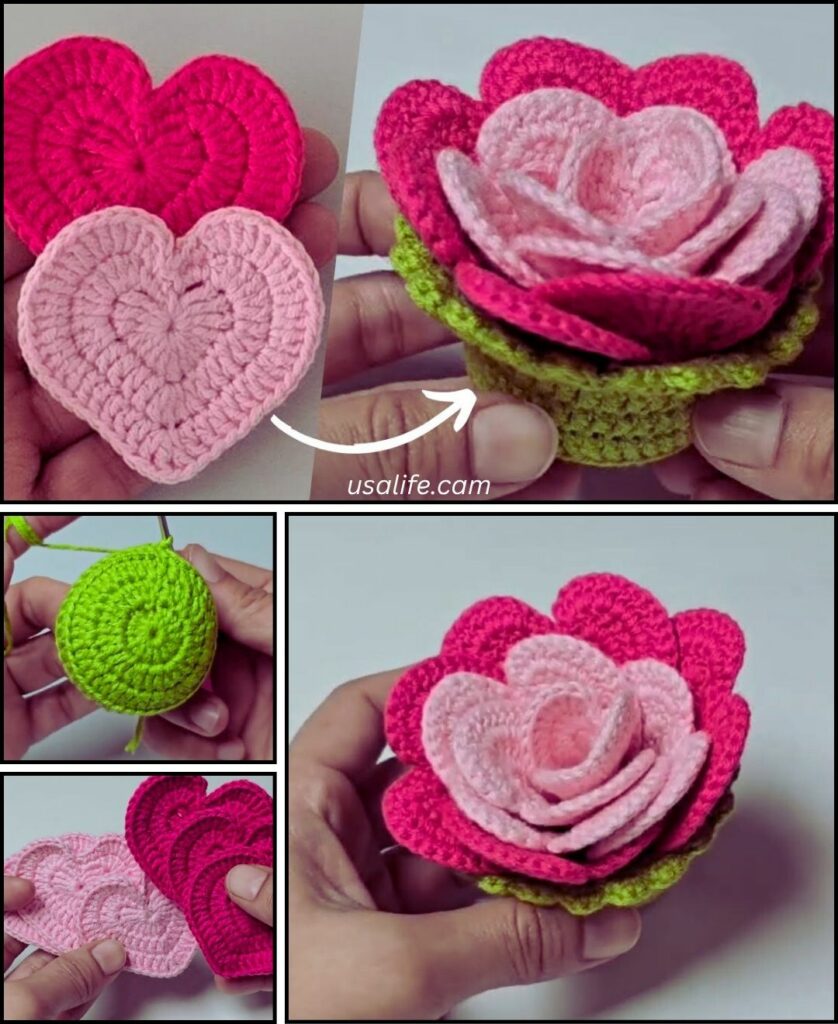
Part 1: The Base (Coaster/Pot Base)
This forms the flat round piece. Use your Main Color (MC).
- Round 1: Create a MR. Ch 2 (counts as 1st hdc). Work 11 hdc into the MR. Join with a sl st to the top of the beginning ch 2. (12 hdc)
- Gently pull the MR closed to tighten.
- Round 2: Ch 2. Inc hdc in the same st (base of ch 2). Inc hdc in each st around. Join with a sl st to the top of the beginning ch 2. (24 hdc)
- Round 3: Ch 2. Hdc in the same st.
*Hdc in the next st, inc hdc in the next st.*Repeat from*to*11 times. Join with a sl st to the top of the beginning ch 2. (36 hdc) - Round 4: Ch 2. Hdc in the same st.
*Hdc in the next 2 sts, inc hdc in the next st.*Repeat from*to*11 times. Join with a sl st to the top of the beginning ch 2. (48 hdc)- Fasten off MC, leaving a medium-length tail for weaving in.
- Check Size: This completed flat circle should be a good size for a coaster (approx. 4-5 inches / 10-12.5 cm). If you want it larger, add more increase rounds following the pattern (e.g., Round 5:
*Hdc in next 3 sts, inc hdc*).

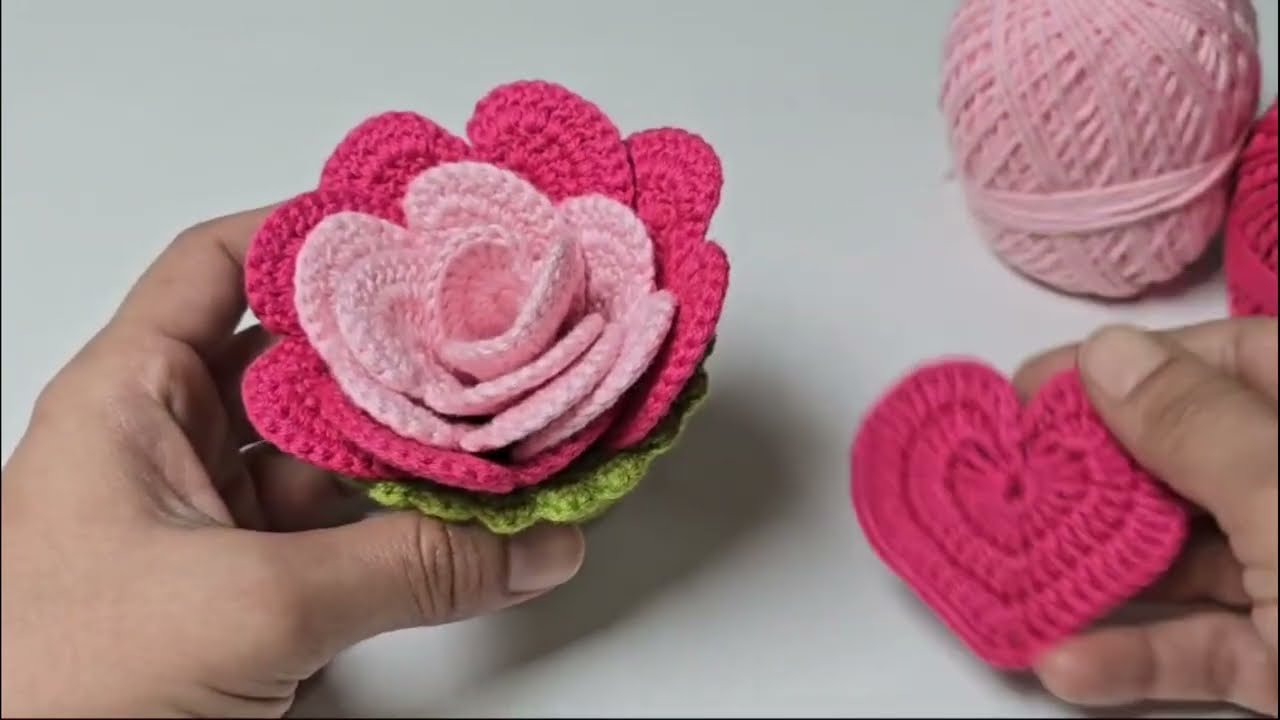
Part 2: The Crochet Rose (Make 1)
This will be a separate piece that can be attached. Use your Rose Color (RC).
- Ch 31. (For a smaller rose, chain fewer stitches, always an odd number. For a larger rose, chain more).
- Row 1: Dc in the 4th ch from the hook.
*Ch 1, skip 1 ch, dc in the next ch.*Repeat from*to*across the chain until you reach the end. (You’ve created a row of dc stitches separated by ch-1 spaces).- Ch 3 (counts as 1 dc). Turn your work.
- Row 2 (Petals):
- In the first ch-1 space: Work (3 dc) into this space.
- In the next ch-1 space: Work (4 dc) into this space.
- Repeat, working (4 dc) into each remaining ch-1 space across the entire row.
- After working into the very last ch-1 space, you’ll have a dc from the beginning of the previous row. Work 1 dc into the top of this last dc.
- Fasten off RC, leaving a very long tail (at least 15-20 inches / 38-50 cm). This tail is crucial for sewing the rose together and attaching it.
- Weave in the starting tail of the rose.
Part 3: Assembly & The 3-in-1 Transformation
Now, let’s bring it all together and understand the transformations!
Option A: As a Coaster (Default State)
- Simply leave the Round 4 piece flat.
- Weave in all ends from the base piece neatly.
- Your beautiful crocheted circle is now a functional coaster! For a more defined coaster, proceed to Blocking below.
Option B: As a Rose Pot (Small Plant/Tea Light Holder)
This requires adding a “wall” to your coaster base.
- Rejoin MC (Main Color) yarn with a sl st into any stitch of Round 4 of your base.
- Round 5 (Creating the “Wall”): Ch 1 (does not count as st).
- Sc in each st around, working into the Back Loop Only (BLO) of each stitch. This creates a neat ridge that makes the base stand up.
- Join with a sl st to the first sc. (48 sc)
- Round 6: Ch 1. Sc in each st around, working through both loops. Join with a sl st to the first sc. (48 sc)
- Round 7: Ch 1. Sc in each st around. Join with a sl st to the first sc. (48 sc)
- Fasten off MC, weave in all ends neatly.
- Adding the Rose (Optional):
- Take your crocheted rose strip. Begin to tightly roll the very first few stitches into a small, tight spiral (the center bud).
- Continue to roll the strip, allowing the wavy petal edge to naturally form around the center.
- Once rolled into a rose shape, hold it firmly. Thread the long sewing tail from the rose onto your yarn needle.
- Sew through all layers of the rolled rose from the bottom to securely hold it together.
- Now, position the finished rose on the side of your newly formed pot. Use the remaining long tail to sew the rose securely to the “wall” of the pot. Aim for discreet stitches.
- Weave in any remaining tail.
- Your piece is now a rose pot, ready to hold a small succulent, a tea light, or other small decorative items.
Option C: As a Heart (Decorative Embellishment)
This option uses the original flat coaster shape, but folds and secures it.
- Start with your flat, Round 4 base (the coaster). Do not proceed to the “Pot” section if you want just a heart.
- Weave in all ends from the base piece neatly.
- Fold the Coaster: Lay the circular coaster flat.
- Fold it in half to create a semi-circle.
- Now, take the two points of the semi-circle (the corners of the folded edge) and fold them inwards towards the center top, creating the two “bumps” of the heart shape. (Imagine folding the top edges of the semicircle down to meet at the center top).
- Secure the Shape: Using your yarn needle and a length of MC yarn (or matching sewing thread), take a few small stitches through the layers where the points meet the center to secure the heart shape. You can also take a few stitches through the middle bottom to keep the two bottom halves together.
- Adding the Rose (Optional): Sew the pre-rolled rose (from Part 2) onto the center of the heart.
- Your piece is now a lovely heart decoration! You could add a loop to the top to hang it.

4. General Finishing & Blocking
- Weave in ALL Ends: This is paramount for a professional and durable finish. Take your time to hide every single yarn tail securely.
- Blocking (Highly Recommended): Blocking makes a huge difference, especially for items that need to hold shape.
- For the Coaster/Heart: Gently wet the piece, pin it to the desired flat shape on a blocking mat or towel, and let it air dry completely.
- For the Pot: Gently wet the piece, then place it around an appropriately sized and shaped object (like a small glass jar or a clean, empty pot) to help it hold its cylindrical shape as it dries.
Tips for Success
- Tension: Consistent tension is crucial for all three variations to ensure the piece holds its shape well.
- Yarn Choice: Cotton is ideal for its stiffness and absorbency, making it perfect for coasters and standing pots.
- Experimentation: Feel free to adjust the size of the initial circle or the rose. You can also try adding different decorative stitches to the coaster or pot.
- Secure Attachments: When sewing on the rose or shaping the heart, use strong, hidden stitches to ensure durability.
This 3-in-1 project offers a delightful way to explore crochet versatility. Which function will you try first for your beautiful creation?