 by
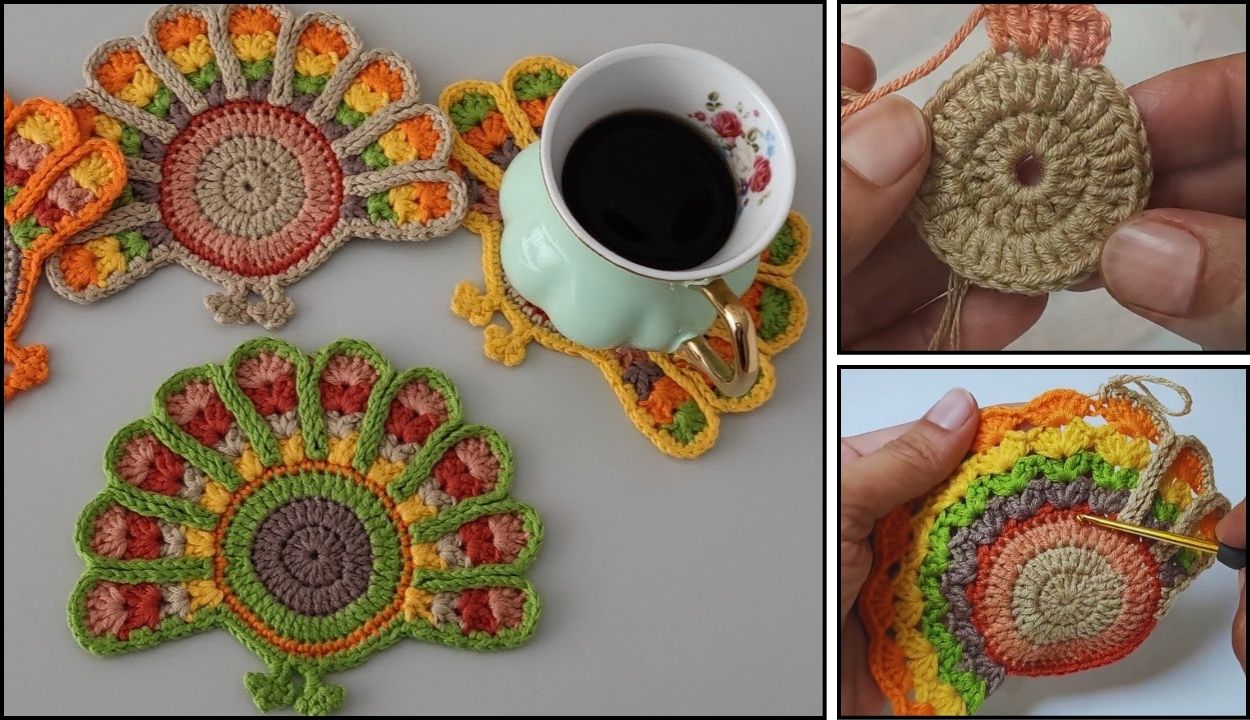
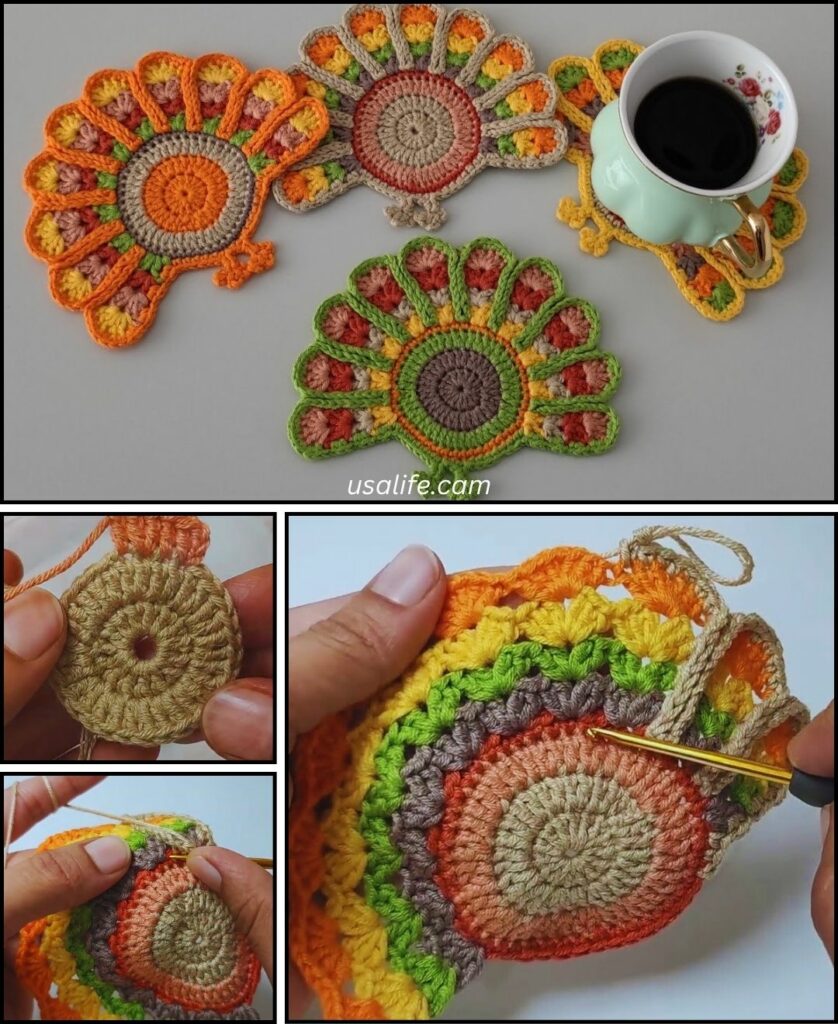
by That’s a fantastic idea! A crochet peacock coaster is a beautiful and unique project that combines practical use with intricate, eye-catching design. It’s a great way to showcase color work and achieve a lovely texture. While it might look complex, it primarily uses common stitches and clever shaping, making it a rewarding challenge for an intermediate crocheter or an adventurous beginner ready to learn a few new techniques.
Since you’re in Phnom Penh, where it’s warm, 100% cotton yarn is an excellent choice for a coaster. Cotton is absorbent, durable, and holds its shape well when wet, which is essential for a coaster. It also provides great stitch definition, allowing the details of your peacock design to truly shine.

How to Crochet a Peacock Coaster: A Detailed Tutorial
This tutorial will guide you through creating a flat, round coaster that incorporates the vibrant colors and feather-like texture of a peacock. We’ll build the coaster in rounds, focusing on color changes and specific stitch placement to achieve the effect.
1. Essential Materials You’ll Need
- Yarn:
- Main Color (MC): Dark Blue, Teal, or Deep Green (for the body of the coaster). Worsted Weight (Aran / Medium / Category 4) Cotton Yarn.
- Accent Color 1 (AC1): Bright Blue or Turquoise (for the peacock “eye” ring). Worsted Weight Cotton Yarn.
- Accent Color 2 (AC2): Bright Green or Lime Green (for another “eye” ring). Worsted Weight Cotton Yarn.
- Accent Color 3 (AC3): Gold or Yellow (for the center of the “eye”). Worsted Weight Cotton Yarn.
- You’ll need small amounts of each color.
- Crochet Hook: A 3.5mm (US E/4) or 4.0mm (US G/6) hook. You want a hook size that creates a dense, firm fabric for your coaster, as it needs to withstand condensation from drinks.
- Scissors: For cutting yarn.
- Yarn Needle (Tapestry Needle): Essential for weaving in ends and securing stitches.
- Stitch Marker (Optional but helpful): To mark the beginning of rounds.
2. Basic Crochet Stitches You’ll Use
This pattern uses common stitches, but the combination and placement are key:
- Magic Ring (MR) / Adjustable Ring: (Highly Recommended!) Creates a tight, hole-free center. Alternatively, you can
ch 2, then work all stitches of Round 1 into the 2nd ch from the hook. - Chain (ch): For turning, spacing, and starting.
- Slip Stitch (sl st): For joining rounds and neatening.
- Single Crochet (sc): Creates a dense fabric, good for securing stitches.
- Half Double Crochet (hdc): A versatile stitch.
- Double Crochet (dc): A taller stitch, used for the main body and feather texture.
- Treble Crochet (tr) / Triple Crochet: An even taller stitch, used for creating longer “feather” strands.
- Working in Rounds (Joined): You’ll join each round with a slip stitch.
- Color Changes: Frequent color changes are part of the peacock effect.
- Working into Chain Spaces: You’ll work groups of stitches into chain spaces from previous rounds.
- Fasten Off: To securely end your work.
- Weaving in Ends: Hiding yarn tails for a neat and professional finish.
Crochet Peacock Coaster Pattern
This pattern creates a coaster approximately 4-5 inches (10-12.5 cm) in diameter.
Abbreviations (US Crochet Terms):
- MC: Main Color (Dark Blue/Teal)
- AC1: Accent Color 1 (Bright Blue/Turquoise)
- AC2: Accent Color 2 (Bright Green/Lime Green)
- AC3: Accent Color 3 (Gold/Yellow)
- MR: Magic Ring
- ch: chain
- sl st: slip stitch
- sc: single crochet
- hdc: half double crochet
- dc: double crochet
- tr: treble crochet
- st(s): stitch(es)
- ch-sp: chain space
(...): work stitches into the same stitch or space[...]: repeat instructions in brackets- FO: Fasten off
Understanding Color Changes in Joined Rounds
When changing colors at the end of a joined round:
- Work the last stitch of the round up to the last yarn over. You should have 2 loops on your hook.
- Drop the current color. Pick up your new color.
- Yarn over with the new color and pull through both loops on your hook to complete the stitch.
- Now, with the new color, make your sl st to join the round and then chain up for the next round.
- Cut the old color yarn, leaving a 4-6 inch tail to weave in later.
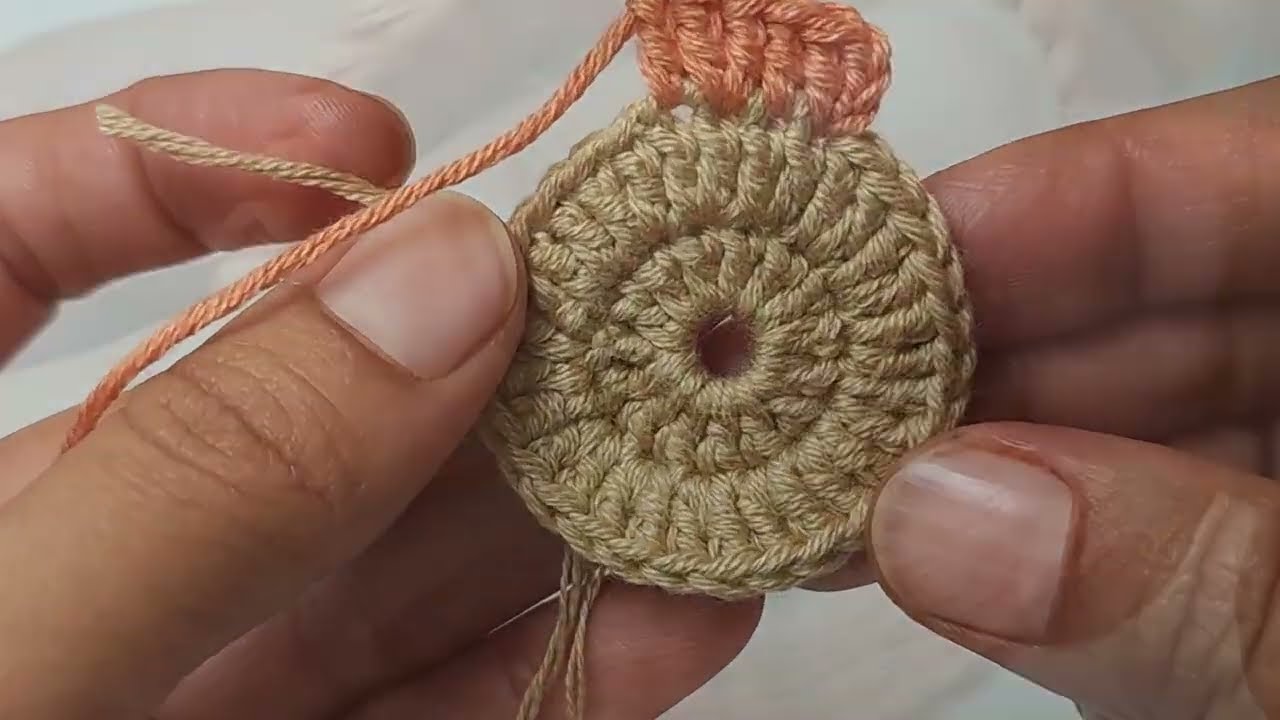
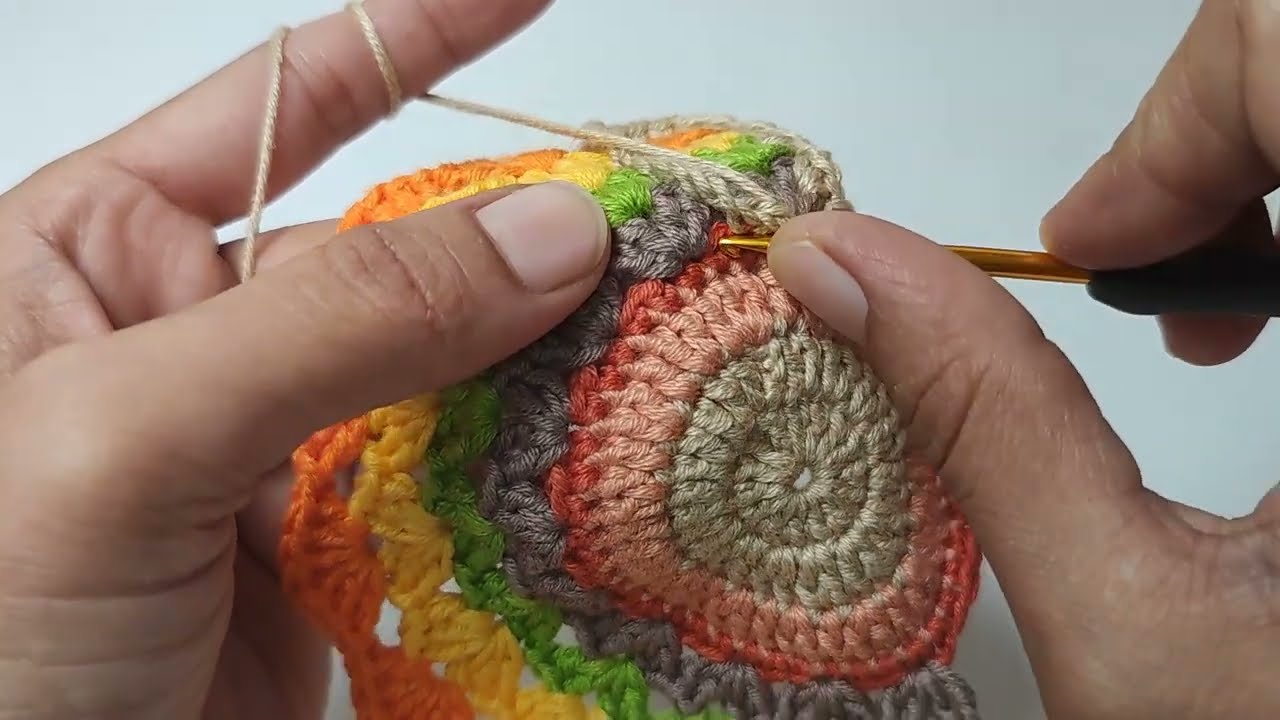
Part 1: The Inner “Eye” (Center)
Start with AC3 (Gold/Yellow) yarn.
- Round 1: Create a MR. Ch 2 (counts as 1st hdc). Work 11 hdc into the MR. Join with a sl st to the top of the beginning ch 2. (12 hdc)
- Gently pull the MR closed to tighten.
- Change Color to AC1 (Bright Blue/Turquoise) as you make the last sl st to join. FO AC3.
- Round 2 (AC1): Ch 2 (counts as 1st hdc). Inc hdc in the same st (the base of ch 2).
*Hdc in the next st, inc hdc in the next st.*Repeat from*to*5 times. Join with a sl st to the top of the beginning ch 2. (18 hdc)- Change Color to AC2 (Bright Green/Lime Green) as you make the last sl st to join. FO AC1.
- Round 3 (AC2): Ch 2 (counts as 1st hdc). Hdc in the same st.
*Inc hdc in the next st. Hdc in the next st.*Repeat from*to*8 times. Join with a sl st to the top of the beginning ch 2. (27 hdc)- Change Color to MC (Dark Blue/Teal) as you make the last sl st to join. FO AC2.

Part 2: The Peacock Feather “Petals” (Outer Rounds)
Now we build the distinctive feather-like outer edge.
- Round 4 (MC): Ch 1 (does not count as a st). Sc in the same st where you joined.
*Ch 3, skip 2 sts, sc in the next st.*Repeat from*to*around. You should have 9 ch-3 spaces. Join with a sl st to the first sc. (9 sc, 9 ch-3 sps)- Sl st into the first ch-3 space to position your hook.
- Round 5 (MC – Feather Points): Ch 1 (does not count as a st).
- In the first ch-3 space: Work (sc, hdc, dc, tr, dc, hdc, sc). (This forms a pointed “feather” shape).
*Sl st into the next sc (the sc between the ch-3 spaces).- In the next ch-3 space: Work (sc, hdc, dc, tr, dc, hdc, sc).
* - Repeat from
*to*around until all 9 ch-3 spaces have a feather point. - Join with a sl st to the very first sc you made (at the base of the first feather point).
- Fasten off MC, leaving a long tail for weaving in.

Part 3: Finishing and Weaving in Ends
- Weave in ALL Ends NEATLY: This is the most crucial step for a professional-looking coaster, especially with all the color changes.
- Use your yarn needle to carefully weave in every single yarn tail. Go back and forth through stitches on the back side of your coaster several times to ensure they are hidden and secure.
- Pay special attention to the center, making sure the Magic Ring is pulled tightly closed.
- Blocking (Highly Recommended!): Blocking will really make your peacock coaster shine! It helps to:
- Even out your stitches.
- Flatten the coaster so it sits nicely.
- Make the “feather” points more defined.
- Method:
- Gently wet your coaster (you can submerge it in cool water with a tiny bit of mild soap, then gently squeeze out excess water, or simply mist it thoroughly with a spray bottle).
- Lay it flat on a blocking mat or a clean towel.
- Gently stretch and shape the coaster into a perfect circle, making sure each feather point is distinct. Use rust-proof pins to hold it in place if you have them.
- Allow it to air dry completely. This might take several hours or even overnight. Do not use heat (like a hairdryer) as it can distort the yarn.
Tips for a Beautiful Peacock Coaster
- Tension: Try to maintain consistent tension throughout your work. This helps keep the coaster flat and prevents it from curling.
- Color Choice: Experiment with different shades of blues, greens, and purples to find your favorite peacock palette. A deep burgundy or plum could also work for the MC.
- Stitch Count: Double-check your stitch counts at the end of each round. Missing a stitch or adding an extra one can cause your coaster to warp.
- Practice Color Changes: Practice changing colors neatly. The goal is to make the transition as seamless as possible.
- Yarn Definition: Cotton yarn’s excellent stitch definition is a big plus for this project, as it really highlights the intricate design of the feather stitches.
- Gift Idea: Make a set of these peacock coasters for a unique and thoughtful housewarming or birthday gift!
You’ve now got the detailed instructions to crochet a beautiful and functional peacock coaster. Enjoy adding this vibrant touch to your home!