by
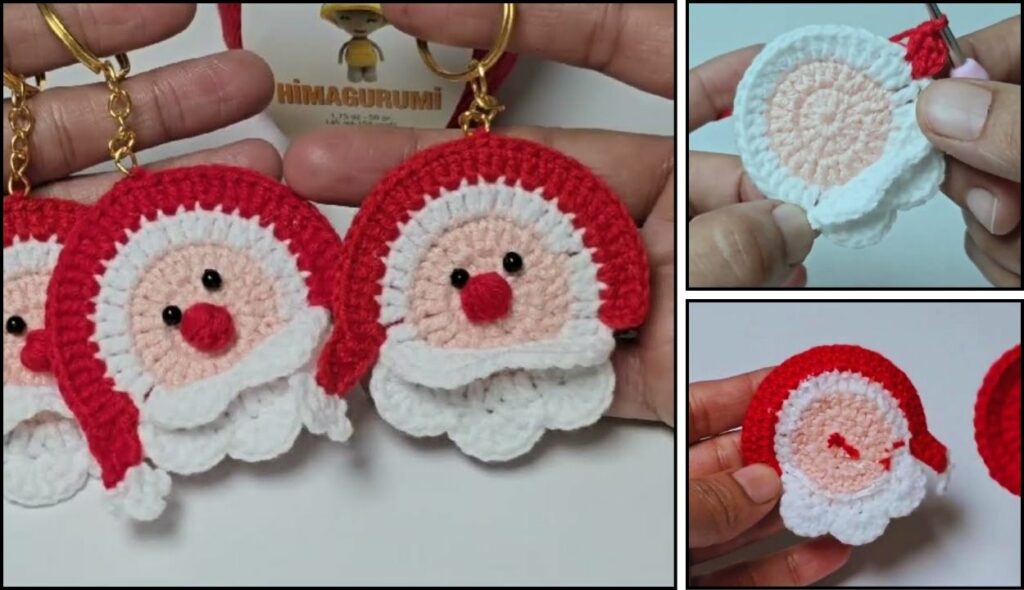
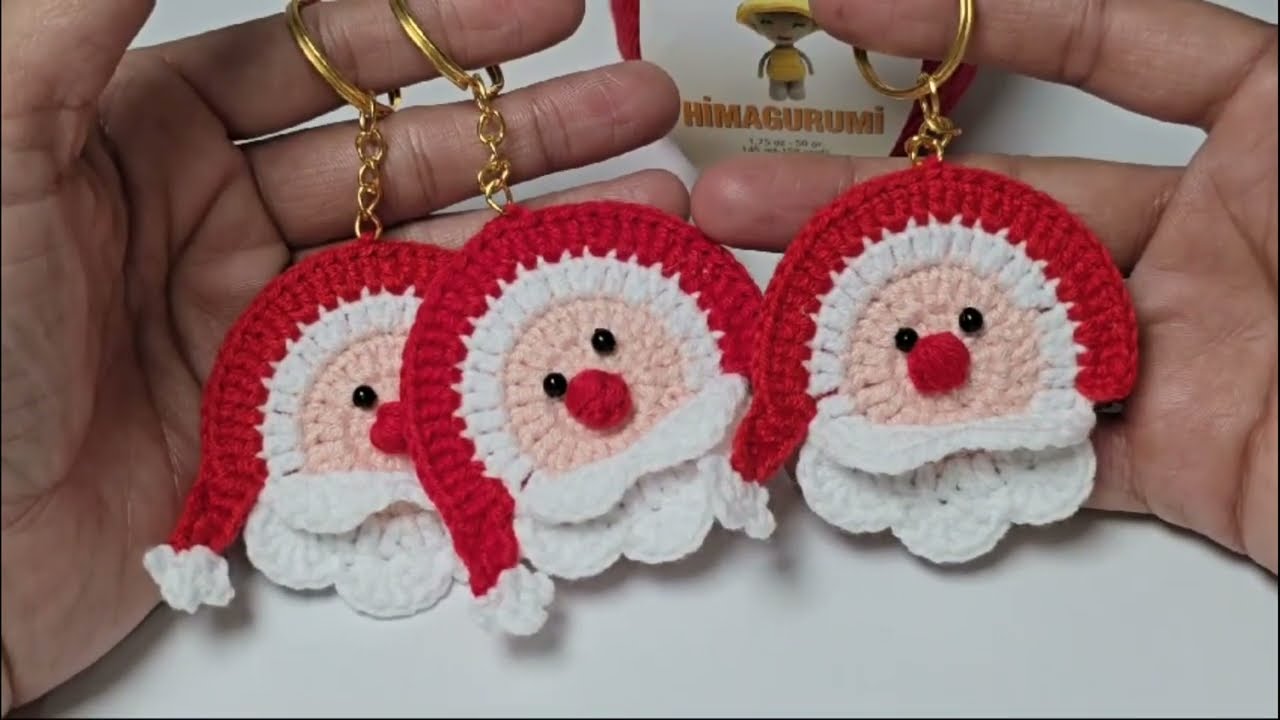
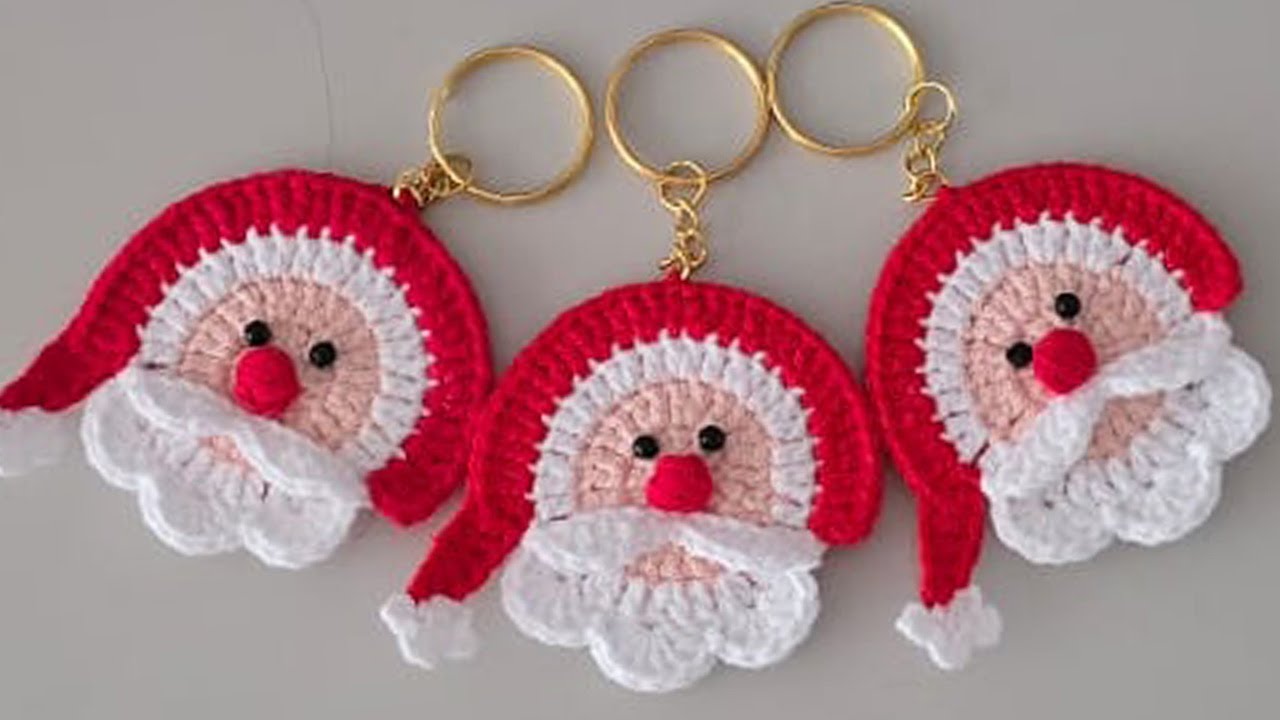
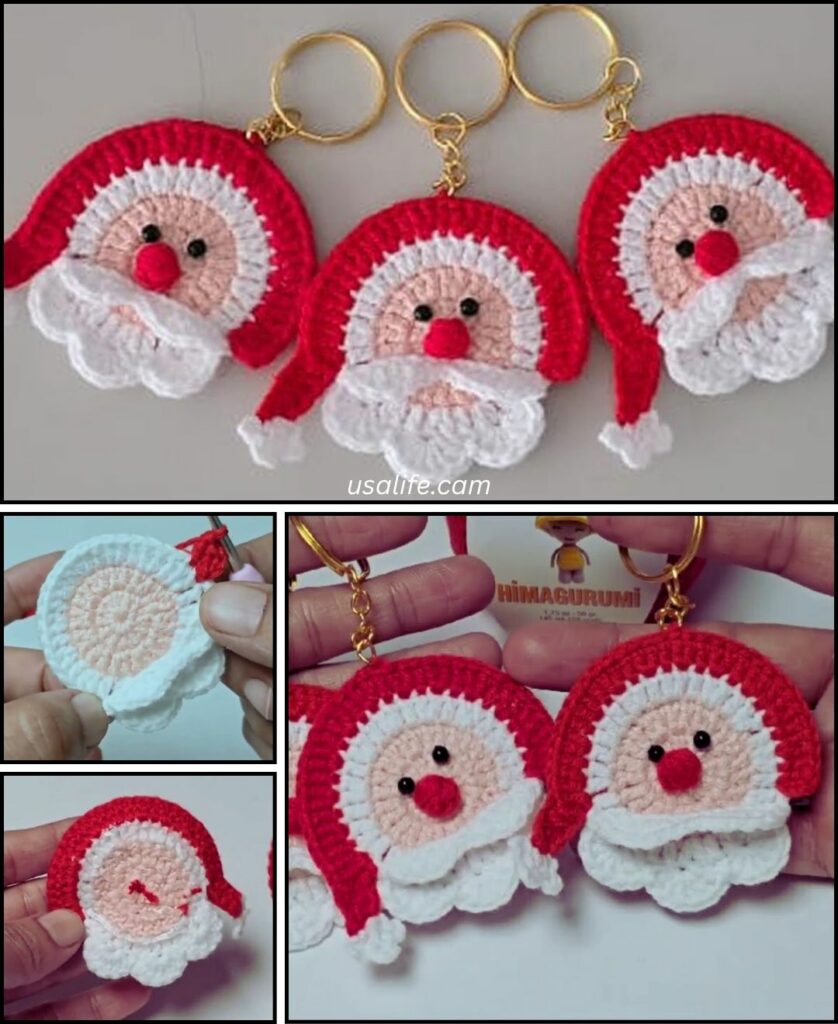
by Crocheting a Santa keychain is a super fun and festive project, perfect for getting into the holiday spirit, even in warm Phnom Penh! These little Santas make adorable keychains, backpack charms, or small gifts and are a fantastic way to practice basic amigurumi techniques.
For a small project like a keychain, acrylic yarn is a great choice as it’s widely available in all the classic Santa colors (red, white, black, gold/yellow), affordable, and durable. Cotton yarn would also work well if you prefer a natural fiber, offering good stitch definition and a slightly firmer finish.
How to Crochet a Santa Keychain: A Detailed Tutorial
This tutorial will guide you through creating a cute, miniature Santa, complete with a tiny hat, beard, and belt.
1. Essential Materials You’ll Need
- Yarn:
- Red Yarn: For Santa’s suit and hat. Worsted Weight (Aran / Medium / Category 4).
- White Yarn: For the beard, hat trim, and pom-pom. Worsted Weight.
- Black Yarn: For the belt. Worsted Weight.
- Gold/Yellow Yarn (small amount): For the belt buckle. Worsted Weight.
- Small amounts of each color are sufficient, making this a great scrap yarn project.
- Crochet Hook: A 3.0mm (US C/2) or 3.5mm (US E/4) hook. For amigurumi, you want a hook size that creates a very tight fabric with no visible gaps when stretched, so the stuffing doesn’t show through. If your stitches are naturally loose, go down a hook size.
- Scissors: For cutting yarn.
- Yarn Needle (Tapestry Needle): Absolutely essential for weaving in ends and assembling the different parts.
- Stuffing: Polyester Fiberfill (Poly-fil). You’ll only need a tiny bit.
- Stitch Marker (Highly Recommended!): To mark the beginning of each round, as you’ll be working in continuous spirals for the body and hat.
- Keychain Ring/Split Ring: The hardware to make it a keychain!
- Optional: 2 small black beads or embroidery floss for eyes.
2. Basic Crochet Stitches You’ll Use
This project focuses on fundamental amigurumi stitches:
- Magic Ring (MR) / Adjustable Ring: (Highly Recommended!) Creates a tight, hole-free center. Alternatively, you can
ch 2, then work all stitches of Round 1 into the 2nd ch from the hook. - Chain (ch): For starting and basic structure.
- Slip Stitch (sl st): For joining and neatening.
- Single Crochet (sc): This will be your primary stitch, creating a dense fabric for the body and hat.
- Increase (inc): Work 2 sc into the same stitch to add stitches.
- Decrease (sc2tog): Work 2 sc stitches together into one to reduce stitches. For a neater decrease in amigurumi, use the invisible decrease (insert hook into FLO of next 2 stitches, yarn over, pull through both FLO, yarn over, pull through 2 loops). This is optional for beginners but recommended for a cleaner finish.
- Fasten Off: To securely end your work.
- Weaving in Ends: Hiding yarn tails for a neat finish.
Crochet Santa Keychain Pattern
This pattern creates a Santa that’s approximately 2-2.5 inches (5-6.5 cm) tall, without the keychain ring.
Abbreviations (US Crochet Terms):
- MC: Main Color (Red)
- AC1: Accent Color 1 (White)
- AC2: Accent Color 2 (Black)
- AC3: Accent Color 3 (Gold/Yellow)
- MR: Magic Ring
- ch: chain
- sc: single crochet
- st(s): stitch(es)
- inc: increase (work 2 sc into the same stitch)
- sc2tog: single crochet 2 together (decrease)
- FO: Fasten off
Part 1: Santa’s Body (Start with Suit, then Head)
We’ll work in continuous rounds.
- Start with MC (Red) yarn.
- Round 1: Create a MR. Work 6 sc into the MR. (6 sc)
- Place your stitch marker in the first sc. You will move this marker up to the first stitch of each new round.
- Round 2: Inc in each st around. (12 sc)
- Round 3:
*Sc in the next st, inc in the next st.*Repeat from*to*around. (18 sc) - Round 4:
*Sc in the next 2 sts, inc in the next st.*Repeat from*to*around. (24 sc) - Round 5: Sc in each st around. (24 sc)
- Round 6: Sc in each st around. (24 sc)
- Change Color to AC1 (White): Work the last sc of Round 6 up to the last yarn over. Drop Red. Pick up AC1 (White) yarn. Yarn over with White and pull through both loops to complete the sc.
- Fasten off Red yarn, leaving a tail to weave in.
- Round 1: Create a MR. Work 6 sc into the MR. (6 sc)
- Continue with AC1 (White) for Head:
- Round 7: Sc in each st around. (24 sc)
- Round 8:
*Sc in the next 2 sts, sc2tog over the next 2 sts.*Repeat from*to*around. (18 sc) - Stuff the body firmly with polyester fiberfill. Ensure it’s evenly filled to create a smooth, round shape. Don’t overstuff to the point of distorting stitches.
- Round 9:
*Sc in the next st, sc2tog over the next 2 sts.*Repeat from*to*around. (12 sc) - Round 10:
*Sc2tog over the next 2 sts.*Repeat from*to*around. (6 sc) - Fasten off AC1 (White), leaving a long tail (about 8-10 inches / 20-25 cm).
- Close the hole: Thread the yarn tail onto your yarn needle. Insert the needle under the front loop only (FLO) of each of the remaining 6 stitches. Pull the yarn tail tight to close the hole. Secure the yarn and weave it into the head.
Part 2: Santa’s Hat
Start with MC (Red) yarn. Work in continuous rounds.
- Round 1: Create a MR. Work 6 sc into the MR. (6 sc)
- Place your stitch marker in the first sc.
- Round 2: Sc in each st around. (6 sc)
- Round 3:
*Sc in the next st, inc in the next st.*Repeat from*to*around. (9 sc) - Round 4: Sc in each st around. (9 sc)
- Round 5:
*Sc in the next 2 sts, inc in the next st.*Repeat from*to*around. (12 sc) - Round 6: Sc in each st around. (12 sc)
- Round 7:
*Sc in the next 3 sts, inc in the next st.*Repeat from*to*around. (15 sc) - Round 8: Sc in each st around. (15 sc)
- Change Color to AC1 (White): Work the last sc of Round 8 up to the last yarn over. Drop Red. Pick up AC1 (White) yarn. Yarn over with White and pull through both loops to complete the sc.
- Fasten off Red yarn, leaving a tail to weave in.
- Round 9 (White Trim): Sc in each st around. (15 sc)
- Fasten off AC1 (White), leaving a long tail for sewing.
- You can add a tiny bit of stuffing to the very tip of the hat if you want it to stand up a bit more, but it’s not strictly necessary.
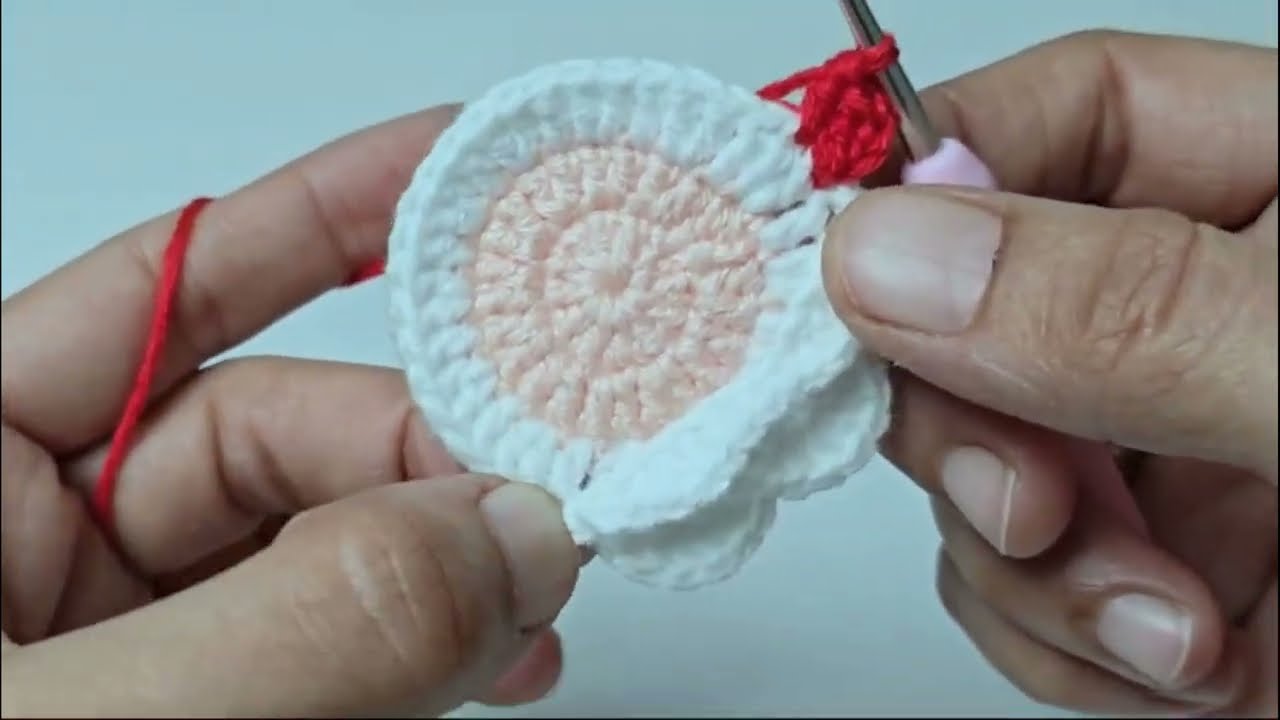
Part 3: Santa’s Beard
Use AC1 (White) yarn.
- Ch 5.
- Row 1: Work sc in the 2nd ch from hook. Hdc in the next ch. 2 dc in the next ch. Sc in the last ch. (5 stitches).
- Fasten off, leaving a long tail for sewing.
- This creates a small, curved beard shape.
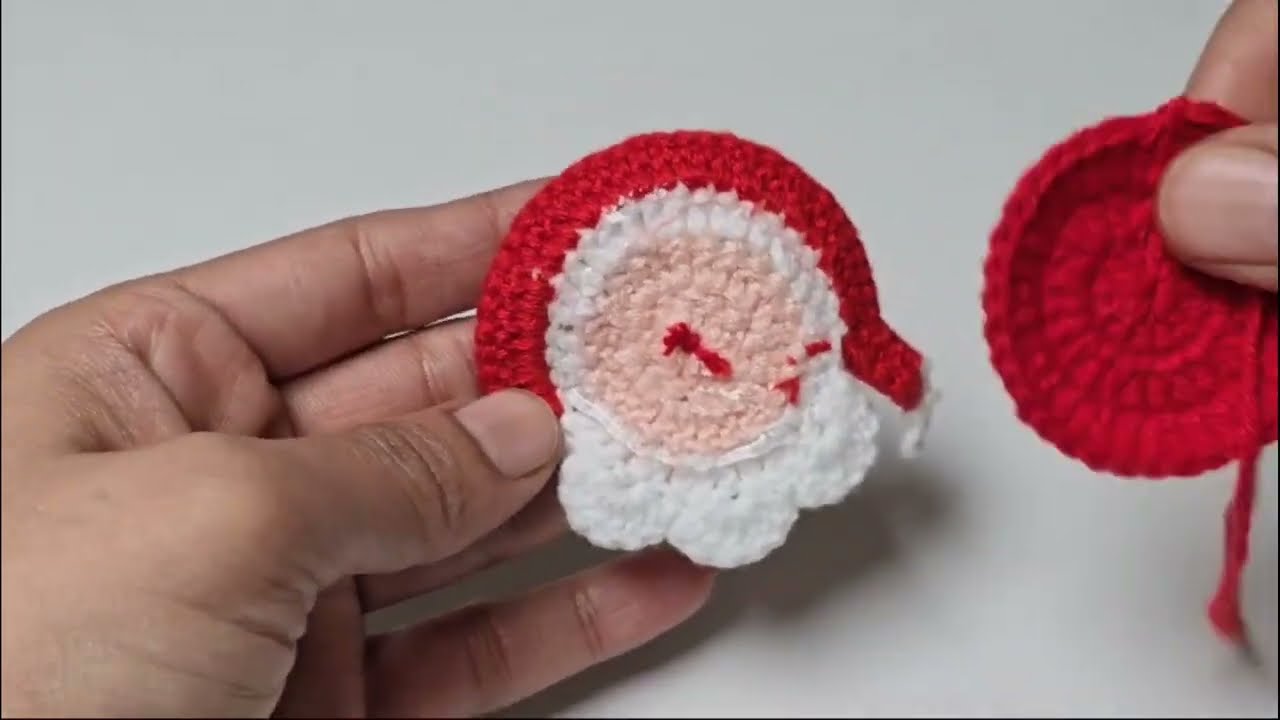
Part 4: Assembly & Details
- Attach Hat: Position the white band of the hat over Santa’s forehead, ensuring the hat’s point angles slightly to one side or straight up. Using the long white tail from the hat and your yarn needle, sew the hat securely to the head. Weave in ends.
- Hat Pom-Pom: Using AC1 (White), wrap yarn around two fingers about 10-15 times. Carefully slide it off your fingers. Tie a piece of yarn tightly around the middle of the wrapped yarn. Trim the loops to create a small pom-pom. Trim further to shape.
- Sew the pom-pom to the tip of Santa’s hat.
- Attach Beard: Sew the beard onto Santa’s face, just under where his eyes would be (or where you’ll embroider them).
- Embroider Eyes (Optional): With black embroidery floss or thin black yarn, use your yarn needle to embroider two small straight lines or French knots for Santa’s eyes above the beard. Alternatively, sew on two tiny black beads very securely.
- Add Belt:
- With AC2 (Black) yarn, ch a chain long enough to wrap around Santa’s body (around 12-15 ch, test it).
- Row 1: Sc in the 2nd ch from hook and in each ch across.
- FO, leaving tails for sewing.
- Wrap the black strip around Santa’s body, usually on Round 5 or 6 (the red section). Sew the ends together at the back, and then sew the belt firmly in place all the way around the body to prevent it from sliding.
- Belt Buckle:
- With AC3 (Gold/Yellow) yarn, ch 4. Sl st to the first ch to form a tiny ring.
- FO, leaving a tail.
- Sew this small gold ring onto the center front of the black belt.
- Attach Keychain Ring:
- Cut a short piece of Red yarn (about 6 inches / 15 cm).
- Using your yarn needle, thread the yarn through a sturdy stitch at the very top center of Santa’s hat.
- Thread both ends of this yarn piece through your keychain ring.
- Tie the yarn ends securely in a double knot, ensuring the keychain ring is firmly attached. Trim any excess yarn.
- Weave in All Remaining Ends: This is the most important step for a professional and durable finish. Double-check that all tails are neatly hidden.
Tips for a Perfect Santa Keychain
- Tight Stitches: For amigurumi, always aim for tight stitches. This prevents stuffing from showing through and helps Santa hold his shape.
- Invisible Decrease: If you want very neat decreases (especially on the head), practice the invisible single crochet decrease (invdec).
- Stuffing: Don’t be afraid to stuff firmly but gently. Use the back of your hook or a chopstick to push stuffing into tight spots.
- Proportions: If your Santa looks a bit off, adjust the number of rounds for the body or head until you like the proportions.
- Personalization: You can try different textures for the beard (e.g., loop stitch, or brushing out the yarn after it’s attached for a fuzzy look).
You now have an absolutely adorable and unique handmade Santa keychain, ready to spread some festive cheer! Happy crocheting!