by
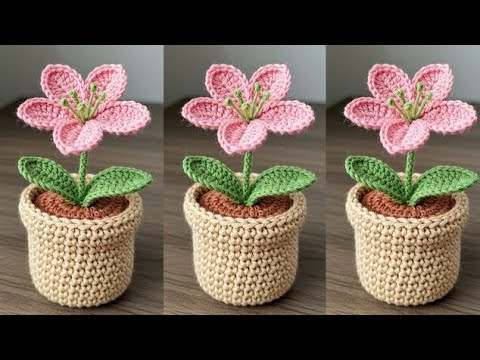
by Crocheting a potted flower is a charming project that combines the simplicity of a small amigurumi pot with the decorative appeal of a stylized flower. This guide details how to create a beautiful, small potted bloom that requires no watering!
Materials Needed
- Yarn:
- Color A (Pot): Brown, terracotta, or gray.
- Color B (Soil): Dark brown or black.
- Color C (Flower Stem): Green.
- Color D & E (Flower): Two colors for the petals and center (e.g., Yellow and Pink).
- Crochet Hook: The size recommended for your yarn.
- Stuffing: Polyester fiberfill.
- Cardboard or Plastic Insert (Optional): To stabilize the bottom of the pot.
- Scissors
- Tapestry Needle: For sewing and weaving in ends.
- Stitch Marker: Essential for working in the round.
Part 1: The Pot (Color A)
The pot is worked in continuous rounds, similar to a small basket.
- Round 1 (Bottom): Start with a magic ring. Work 6 sc into the ring. (6 sts)
- Round 2: inc in each stitch around. (12 sts)
- Round 3: [sc in the next st, inc] 6 times. (18 sts)
- Round 4: [sc in the next 2 sts, inc] 6 times. (24 sts)
- Round 5 (Creating the Side Wall): Working in the back loop only (BLO) for this round, sc in each stitch around. (24 sts)
- Rounds 6-9 (Straight Sides): sc in each stitch around. (24 sts)
- Round 10 (Rim): Working in the front loop only (FLO) for this round, sc in each stitch around. (24 sts)
- Fasten off and weave in the end. Insert your cardboard circle into the bottom of the pot for stability before proceeding.

Part 2: The Soil (Color B)
The soil piece will sit inside the pot.
- Round 1: Start with a magic ring. Work 6 sc into the ring. (6 sts)
- Round 2: inc in each stitch around. (12 sts)
- Round 3: [sc in the next st, inc] 6 times. (18 sts)
- Round 4: [sc in the next 2 sts, inc] 6 times. (24 sts)
- Join with a sl st to the first sc. Do not fasten off; change color to the stem color.
Part 3: The Stem and Leaves (Color C)
- Change to Color C (Green).
- Stem Base: ch 1, sc in the first 4 stitches of the soil piece. (4 sts)
- Stem Height: ch 1 and turn. sc in each of the 4 stitches. Repeat this row until your stem is the desired height (e.g., 10-15 rows).
- Leaves (Work on the side of the stem):
- sl st down the side of the stem to the soil level.
- Leaf 1: ch 6. sl st in the 2nd ch from the hook, sc in the next ch, hdc in the next ch, dc in the next ch, tr in the last ch. sl st back into the side of the stem.
- Leaf 2: sl st up the stem 3 stitches. Repeat the Leaf 1 instructions.
- Fasten off, leaving a tail at the top of the stem for attaching the flower.

Part 4: The Flower (Colors D & E)
We’ll make a simple, layered daisy-style flower.
A. Flower Center (Color D)
- Start with a magic ring. Work 6 sc into the ring. (6 sts)
- inc in each stitch around. (12 sts)
- Join with a sl st to the first sc. Fasten off Color D.
B. Petals (Color E)

- Join Color E into any stitch of the flower center.
- Petal Pattern: [ch 3, dc in the same st, tr in the next st, dc in the same st, ch 3, sl st in the same st].
- Repeat this petal sequence [sl st, ch 3, dc, tr, dc, ch 3, sl st] in each stitch around. You should have 12 petals.
- Join with a sl st to the first sl st. Fasten off and leave a tail for sewing.
Part 5: Assembly and Finishing
- Attach the Flower to the Stem: Using the tail from the flower, sew it securely to the top edge of the stem.
- Stuff the Pot: Place a layer of fiberfill inside the pot.
- Attach Soil and Stem: Place the soil piece (with the stem attached) on top of the stuffing, fitting it snugly into the pot’s rim. Use the long tail from the soil piece to sew the final round of the soil to the Round 10 (Rim) of the pot. Stitch neatly to create a clean join.
- Final Shaping: Gently bend the stem and leaves to make the flower stand upright and give it a natural, appealing shape.
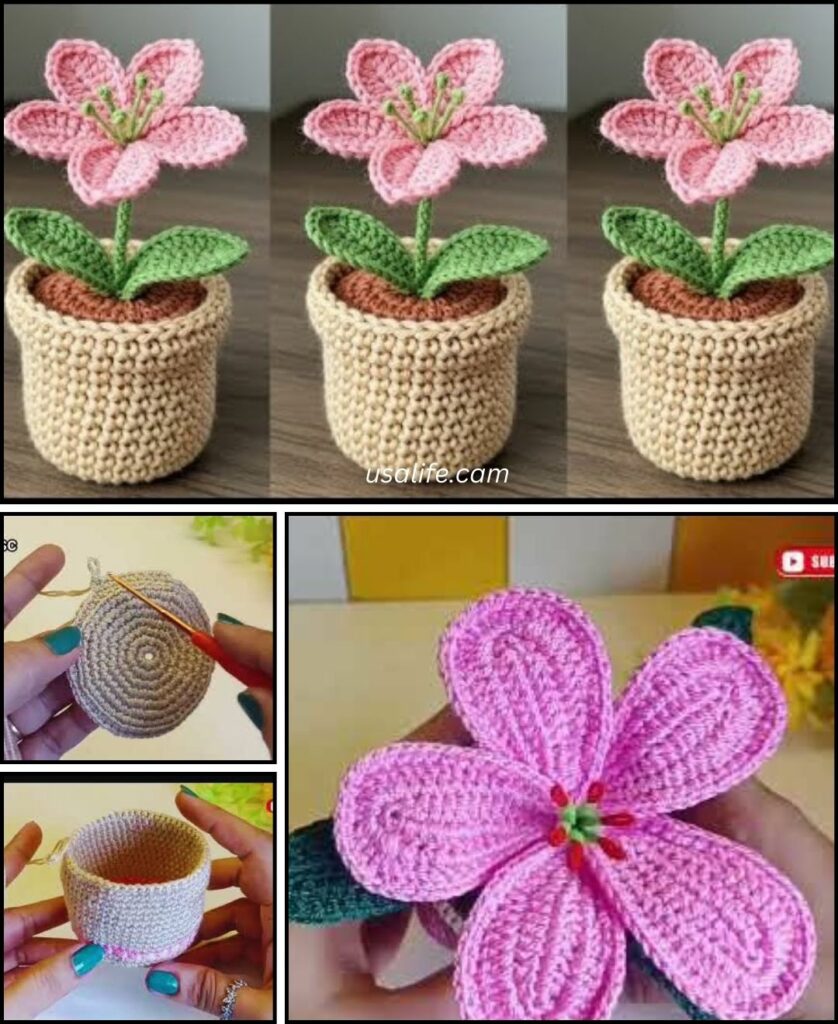
Your beautiful, handcrafted potted flower is ready to display!
Video tutorial: