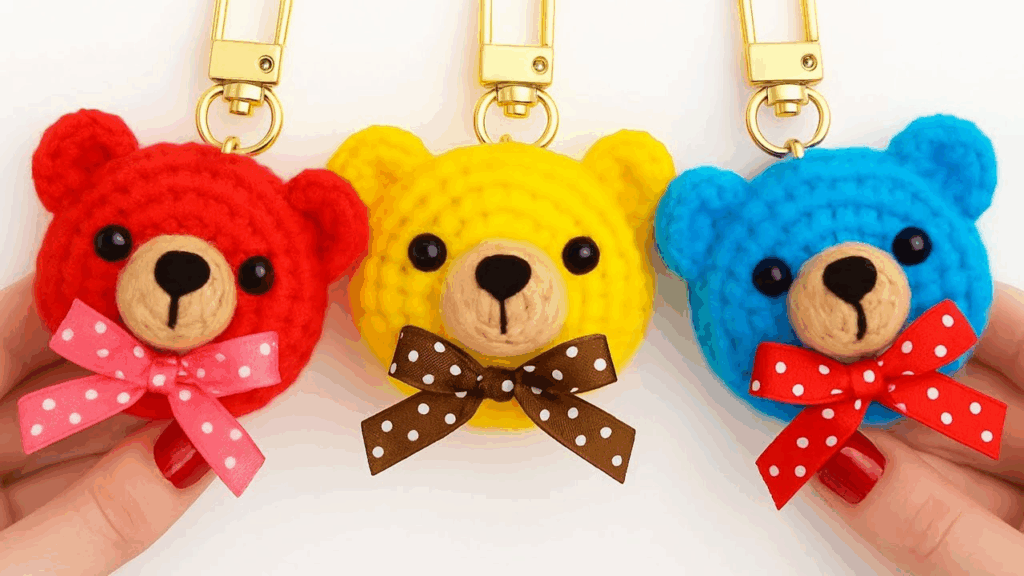
by
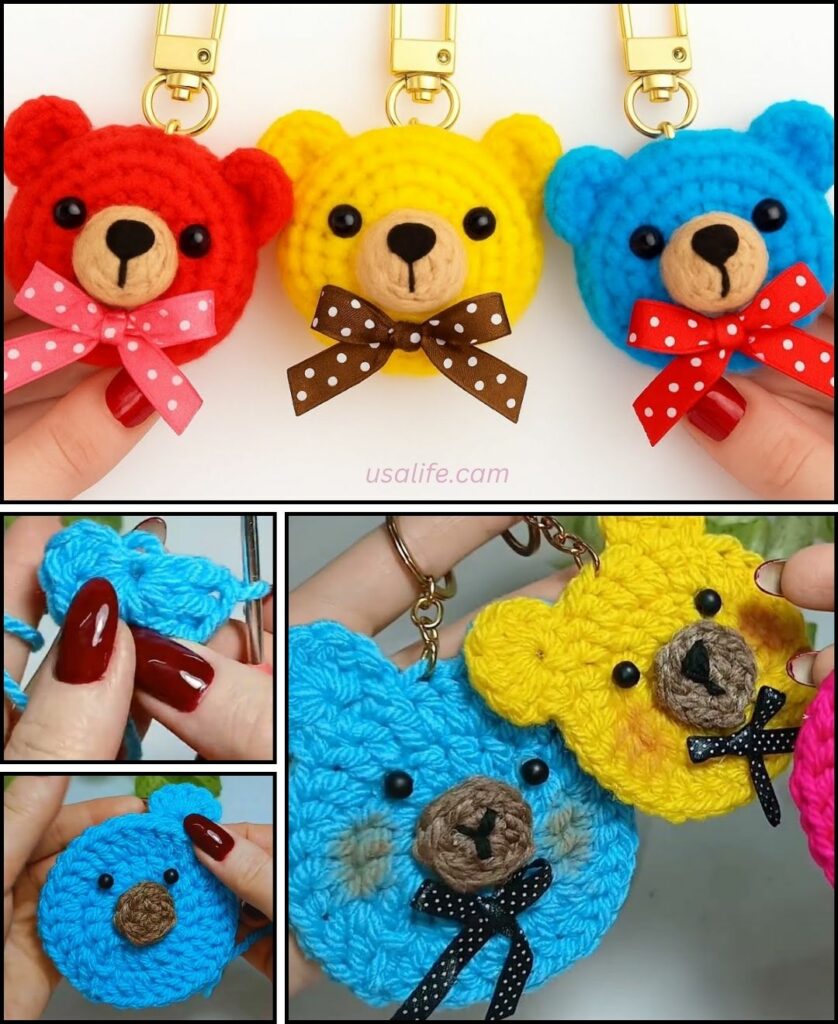
by Crocheting a little bear keychain is a wonderful project for beginners to learn the basics of Amigurumi, which is the Japanese art of crocheting small stuffed toys. The bear is made of simple shapes (spheres and semicircles) worked in the round, primarily using the single crochet (sc) stitch.
Here is a detailed, step-by-step guide for making an adorable little bear keychain.
Materials Needed
- Yarn: Small amounts of medium-weight yarn (worsted/size 4). You’ll need a main color for the body/head and a small amount of a contrasting color for the snout/muzzle.
- Crochet Hook: The size recommended for your yarn. Using a hook one size smaller than recommended creates a tight fabric, which is ideal for Amigurumi.
- Stuffing: Polyester fiberfill.
- Safety Eyes (optional): Small plastic eyes, or black yarn for embroidery.
- Keychain Hardware: A key ring or clip.
- Scissors
- Tapestry Needle: For sewing pieces together and weaving in ends.
- Stitch Marker: Essential for keeping track of rounds.

Part 1: The Head and Body (Main Color)
The head and body are often crocheted as one piece for simplicity. We will work in continuous rounds.
- Round 1 (Start of Head): Start with a magic ring. Work 6 sc into the ring. (6 sts)
- Round 2: inc (increase: 2 sc in one stitch) in each stitch around. (12 sts)
- Round 3: [sc in the next st, inc] 6 times. (18 sts)
- Rounds 4-7:sc in each stitch around. (18 sts)
- (Optional: Insert safety eyes now, between Rounds 5 and 6, about 4-5 stitches apart.)
- Round 8 (Start of Body): [sc in the next st, dec (decrease)] 6 times. (12 sts)
- Stuff the head firmly with fiberfill. Continue to stuff as you go.
- Round 9: sc in each stitch around. (12 sts)
- Round 10: [sc in the next st, inc] 6 times. (18 sts)
- Rounds 11-12: sc in each stitch around. (18 sts)
- Round 13 (Closing): [sc in the next st, dec] 6 times. (12 sts)
- Stuff the body firmly.
- Round 14: dec 6 times. (6 sts)
- Fasten off, leaving a tail. Thread the tail onto your tapestry needle, weave through the remaining 6 stitches, and pull tight to close the hole. Weave in the end.

Part 2: The Ears (Main Color, Make 2)
The ears are small, simple semi-circles. Do not stuff the ears.
- Round 1: Start with a magic ring. Work 6 sc into the ring. (6 sts)
- Round 2: inc in each stitch around. (12 sts)
- Fasten off, leaving a long tail for sewing.
Part 3: The Snout/Muzzle (Contrasting Color, Make 1)
This piece adds dimension to the face.
- Round 1: Start with a magic ring. Work 6 sc into the ring. (6 sts)
- Round 2: inc in each stitch around. (12 sts)
- Fasten off, leaving a long tail for sewing. Do not stuff the snout.

Part 4: Assembly and Finishing
- Attach the Snout: Use the long tail from the snout and a tapestry needle to sew it onto the face, centering it just below the eyes (around Rounds 4-7).
- Embroider Features: With black yarn, embroider a small nose onto the snout and a mouth if desired. If you didn’t use safety eyes, embroider two small black dots for eyes now.
- Attach the Ears: Sew the two ears onto the top of the head, folding them slightly at the bottom so they cup forward. Position them between Rounds 2 and 4.
- Attach the Keychain Loop:
- Join the main color yarn to the top center of the bear’s head.
- ch 10-15 (or the desired length of your loop).
- sl st back into the same stitch where you started the chain.
- Fasten off and weave in the end securely.
- Attach Hardware: Thread the key ring or clip through the loop you just created.
Your adorable little bear keychain is finished! It’s a great project for using up yarn scraps and makes a perfect gift.
Video tutorial: