by
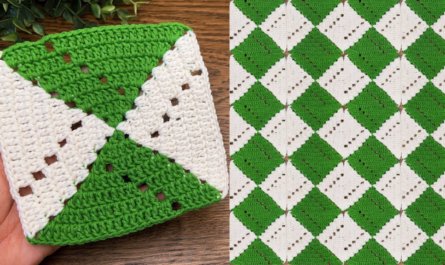
by That’s a lovely idea! A Crochet Heart Patterned Square Motif is a charming design often used for Valentine’s Day projects, blankets, or wall hangings. We can achieve this pattern using the Filet Crochet technique, which uses open mesh (spaces) and solid blocks to create an image.
Here is a detailed tutorial for a simple Filet Crochet Heart Square.

❤️ Filet Crochet Heart Square Motif
This pattern creates a heart floating within a simple mesh square. We will be working in turning rows.
Materials You’ll Need
- Yarn/Thread: Fine or light-weight yarn (Sport/DK or Size 10 Cotton Thread) works best to clearly define the filet mesh.
- Crochet Hook: The size recommended for your chosen thread/yarn (e.g., 3.5 mm).
- Scissors
- Tapestry Needle (for weaving ends).
Key Filet Crochet Terms
Filet crochet is read in terms of Blocks (Solid) and Spaces (Mesh).
| Term | Abbreviation | Construction |
| Block (Solid) | [B] | 3 DC stitches total (DC over DC, DC in CH-2 SP, DC over DC). |
| Space (Mesh) | [S] | 1 DC, CH 2, Skip 2 stitches. |
| Turning Chain | [T] | CH 3 (counts as 1 DC). |
Sizing and Foundation
The pattern will be 15 stitches tall and 15 stitches wide (5 Blocks/Spaces wide, 5 rows high, plus turning chain/anchor).
- Foundation Chain:ch 18. (This equals 5 Spaces + 1 turning DC = 16 stitches, plus 2 chains to create the first space).
- Alternative for Filet: ch (3 x number of spaces) + 1. For 5 spaces: (3 x 5) + 1 = 16. ch 16.
- Row 1 (Starting the Mesh): ch 3 (counts as first DC). dc in the 4th ch from the hook. ch 2, skip 2 ch. dc in the next ch. Repeat [ch 2, skip 2, dc in the next ch] 4 more times. (Total of 5 Spaces). ch 3 and turn.

Pattern Rows (Working the Heart)
You will follow the Block [B] and Space [S] instructions below. Remember:
- Space (S): ch 2, sk 2, dc in next st.
- Block (B): 2 dc in the space, dc in the next st.
Row 2: Starting the Heart Base
$$[S] \cdot [B] \cdot [S] \cdot [B] \cdot [S]$$
- ch 3 (T). dc in the next DC post. (Start 1 S).
- B: Work 2 dc in the ch-2 sp, dc in the next DC post.
- S: ch 2, sk 2 sts, dc in the next DC post.
- B: 2 dc in the ch-2 sp, dc in the next DC post.
- S: ch 2, sk 2 sts, dc in the top of the turning ch. ch 3 and turn.
Row 3: Heart Points
$$[S] \cdot [B] \cdot [B] \cdot [B] \cdot [S]$$
- ch 3 (T). dc in the next DC post. (Start 1 S).
- B: Work 2 dc in the ch-2 sp, dc in the next DC post.
- B: dc in the next 2 sts (from the previous block), dc in the next DC post.
- B: dc in the next 2 sts, dc in the next DC post.
- S: ch 2, sk 2 sts, dc in the top of the turning ch. ch 3 and turn.

Row 4: Widest Point
$$[B] \cdot [B] \cdot [S] \cdot [B] \cdot [B]$$
- ch 3 (T). dc in the next 2 sts. (Start 1 B).
- B: dc in the next 2 sts, dc in the next DC post.
- S: ch 2, sk 2 sts, dc in the next DC post.
- B: 2 dc in the ch-2 sp, dc in the next DC post.
- B: dc in the next 2 sts, dc in the top of the turning ch. ch 3 and turn.
Row 5: Top Curve
$$[S] \cdot [S] \cdot [B] \cdot [S] \cdot [S]$$
- ch 3 (T). dc in the next DC post. (Start 1 S).
- S: ch 2, sk 2 sts, dc in the next DC post.
- B: 2 dc in the ch-2 sp, dc in the next DC post.
- S: ch 2, sk 2 sts, dc in the next DC post.
- S: ch 2, sk 2 sts, dc in the top of the turning ch. ch 3 and turn.

Row 6: Finishing Mesh
$$[S] \cdot [S] \cdot [S] \cdot [S] \cdot [S]$$
- ch 3 (T). Work Space (S) across the entire row.
- Finish: Join with a sl st to the top of the beginning ch 3. Fasten off.
Edging and Finishing
To turn this rectangle into a neat square motif, you need a border.
- Round 1 (SC Border): Join yarn. ch 1. Work a round of sc evenly around the entire perimeter.
- Work 3 sc into each corner.
- Work 3 sc over the end of each DC/TR row.
- Round 2 (DC or Shell Border): Work a simple round of dc into every sc, maintaining the (dc, ch 2, dc) corner increase.
Blocking: Blocking is essential for filet crochet! It straightens the lines and opens up the mesh, making the heart design perfectly visible. Wet the square, pin it to the correct shape, and allow it to dry completely.
Would you like a tutorial on how to join these heart squares together?
Video tutorial: