 by
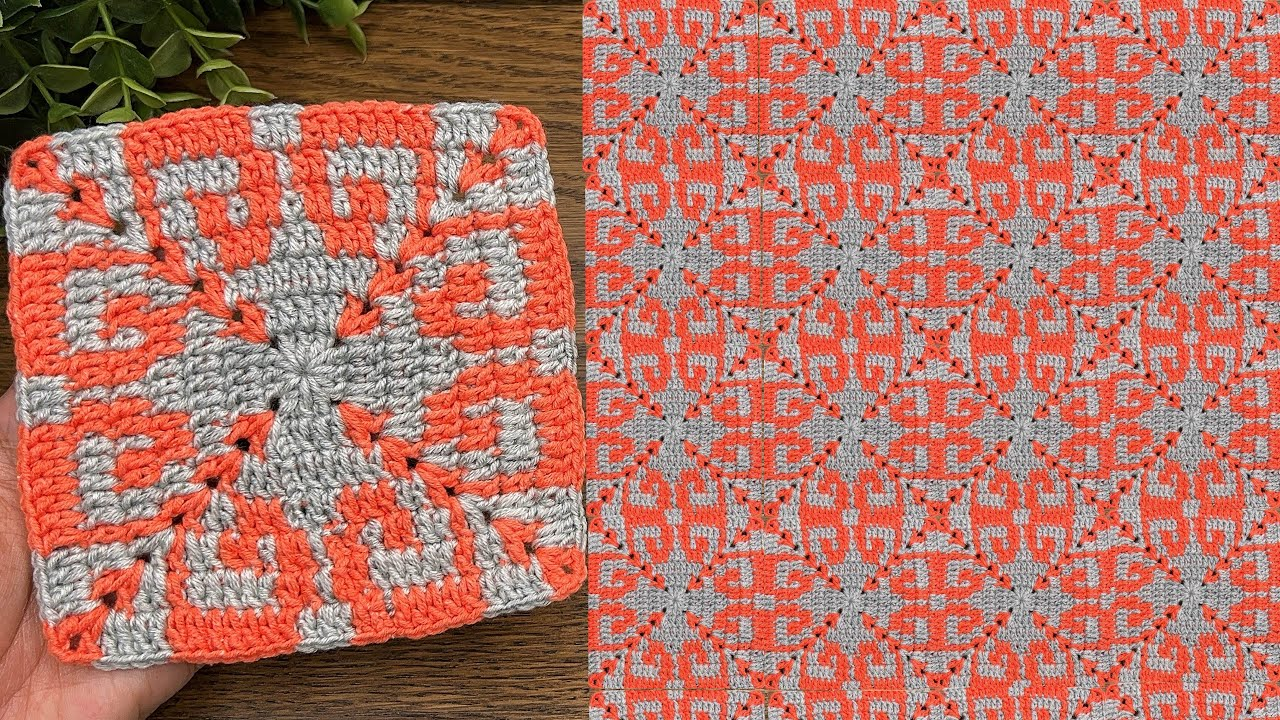
by That is a wonderful choice! Mosaic Crochet is a technique that uses two contrasting colors (worked one color per row) to create intricate, geometric patterns. The magic happens when you use the Drop Down Double Crochet (ddc) stitch to cover stitches from two rows below, “painting” the pattern onto the surface.1
This tutorial provides detailed instructions for a simple Geometric Diamond Mosaic Square, perfect for beginners to learn the fundamental technique.
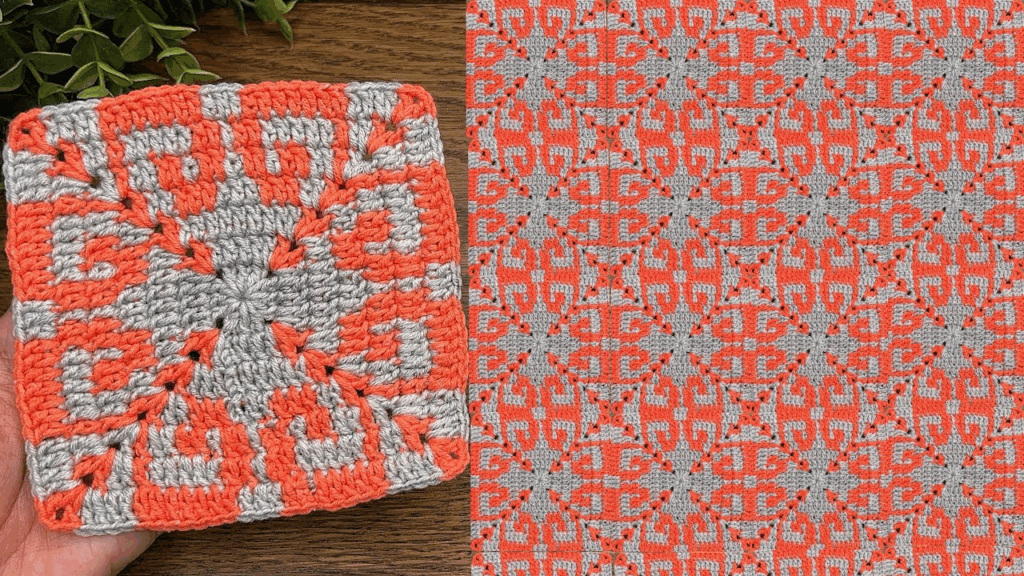
🔶 Geometric Diamond Mosaic Square Tutorial
This pattern is worked in rows and then joined to form a square, or it can be worked continuously in the round (though we will focus on the simpler row method here).
Materials You’ll Need
- Yarn: Medium-weight yarn (worsted/size 4). It is essential to choose two highly contrasting colors (e.g., White and Navy, or Black and Yellow).
- Color A: Background Color
- Color B: Pattern Color
- Crochet Hook: The size appropriate for your yarn (e.g., 5.0 mm).
- Scissors, Tapestry Needle.
Key Crochet Terms
| Abbreviation | Stitch Name |
| ch | Chain |
| sl st | Slip Stitch |
| sc | Single Crochet |
| dc | Double Crochet |
| ddc | Drop Down Double Crochet (Special Stitch) |
Special Stitch: Drop Down Double Crochet (ddc)
This is the only stitch that uses the non-working color.
- Yarn over (YO).
- Insert your hook into the front loop of the specified stitch two rows directly below (meaning, it will skip the chain spaces and the single crochet of the row directly below).
- Complete the stitch as a regular dc.

Part 1: Starting the Square
For a simple pattern repeat, we will make a swatch that is 21 stitches wide.
Foundation Chain
- With Color A (Background), ch 21.
Row 1 (Color A): Setup
- sc in the 2nd ch from the hook and sc in every chain across. (20 sc).
- Cut Color A, leaving a tail for weaving. Do not turn the work.
Row 2 (Color B): Introducing the Pattern
We join the new color on the Right Side of the fabric.
- Join Color B (Pattern Color) into the first sc.
- ch 1 (does not count as st). sc in every stitch across. (20 sc).
- Cut Color B, leaving a tail. Do not turn the work.
Row 3 (Color A): Starting the Diamond Base
We join the new color (Color A) back into the first sc stitch on the Left Side of the fabric.
- Join Color A. ch 1. Work sc in the first 9 sts.
- ddc in the next stitch (Drop down into the front loop of the corresponding stitch from Row 1).
- Work sc in the next 9 sts.
- Finish: Cut Color A. Do not turn.
(You have created the single central spike of the diamond base.)

Part 2: Building the Diamond Shape
Row 4 (Color B): Expanding the Diamond
We join Color B on the Right Side.
- Join Color B. ch 1. Work sc in the first 8 sts.
- ddc in the next stitch (dropping down to Row 2).
- Work sc in the next st (over the ddc from R3).
- ddc in the next st (dropping down to Row 2).
- Work sc in the next 8 sts.
- Finish: Cut Color B. Do not turn.
Row 5 (Color A): Widening the Shape
Join Color A on the Left Side.
- Join Color A. ch 1. Work sc in the first 7 sts.
- ddc in the next st (dropping down to Row 3).
- Work sc in the next 3 sts.
- ddc in the next st (dropping down to Row 3).
- Work sc in the next 7 sts.
- Cut Color A. Do not turn.
Row 6 (Color B): Top of the Diamond
Join Color B on the Right Side.
- Join Color B. ch 1. Work sc in the first 8 sts.
- ddc in the next st (dropping down to Row 4).
- Work sc in the next st.
- ddc in the next st (dropping down to Row 4).
- Work sc in the next 8 sts.
- Cut Color B. Do not turn.
(The diamond shape is now clearly visible, framed by Color A.)

Part 3: Squaring the Shape and Finishing
To turn this geometric panel into a square motif, we work a simple border.
Round 7: Simple SC Border (Color A)
- Join Color A to any corner. ch 1. Work sc evenly around all four sides of the rectangle, placing (sc, ch 2, sc) in each of the four corners.
- Tip: Work 1 sc into the side of each dc row, and 2 sc for the ch-3 ends, adjusting as needed to keep the sides flat.
- Join with a sl st to the first sc.
Round 8: DC Corner Frame (Color A)
- ch 3 (counts as dc).2 Work dc in every sc across the side until you reach the corner.
- Corner: Work (2 dc, ch 2, 2 dc) into the ch-2 corner space.
- Repeat: [dc in every st across the side, Corner (2 dc, ch 2, 2 dc)] 3 more times.
- Join with a sl st. Fasten off.
Final Step: Weaving
The most time-consuming part of this style is weaving in the ends! Since you cut the yarn after every row, use your tapestry needle to carefully weave all tails securely into the corresponding color on the back of the work.
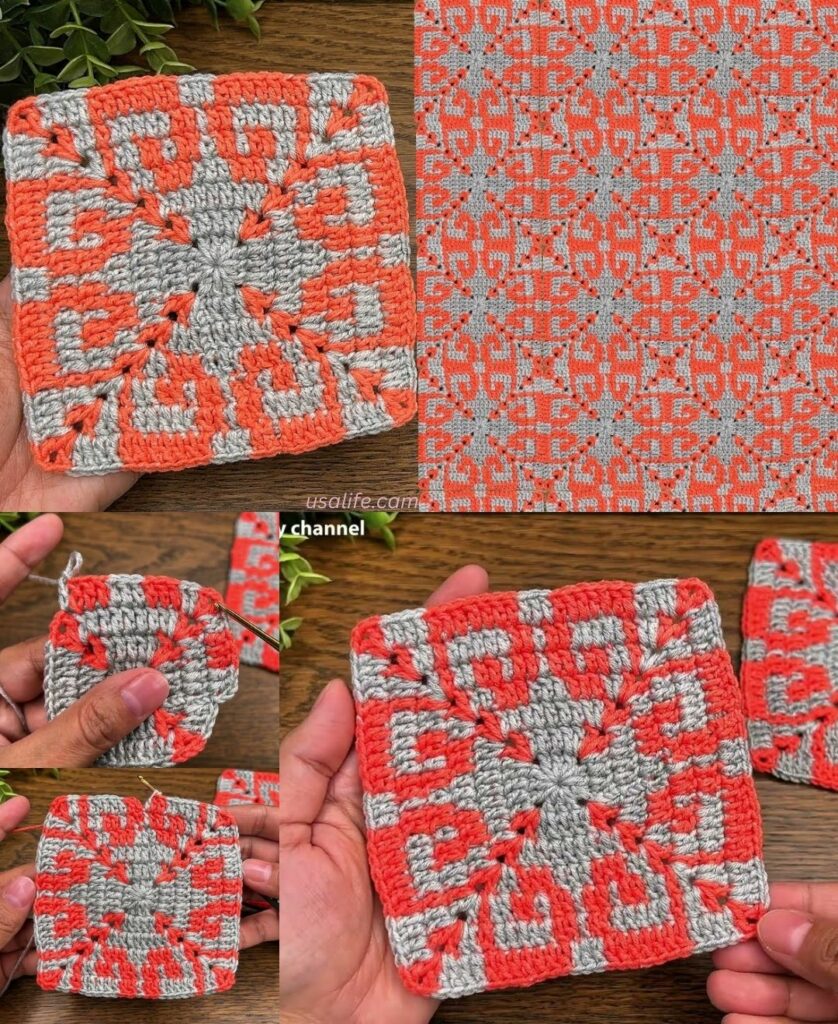
Your Geometric Diamond Mosaic Square is complete!
Video tutorial: