 by
by That sounds like a wonderful plan! Crocheting a motif pattern runner and a blouse are excellent ways to create beautiful, intricate pieces that are highly personalized. Both projects often rely on creating individual motifs (like squares, hexagons, or florals) and then joining them together, though a blouse might also use a solid, shaped fabric.
Given the warm climate in Phnom Penh, choosing light, breathable yarn is crucial for both comfort and drape. 100% cotton or a cotton/bamboo blend is highly recommended for both the runner (for washability and durability) and the blouse (for breathability and softness). For the blouse, a lighter yarn weight like Sport (Category 2) or DK (Category 3) will ensure it feels airy.

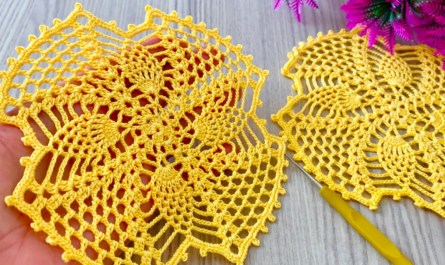
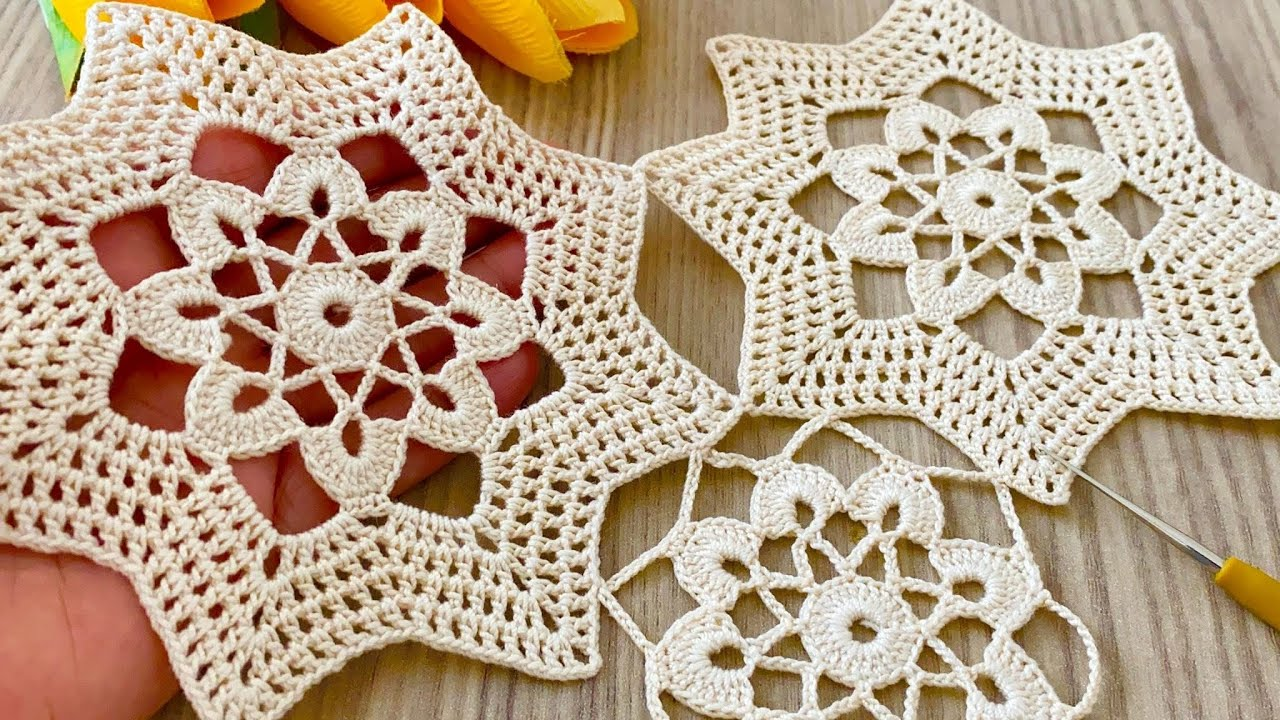
1. How to Crochet a Motif Pattern Table Runner
A motif runner is a highly customizable project. You can choose any shape (square, circle, hexagon) and join them in a line to fit your table.
A. Essential Materials & Concept
- Yarn: Light worsted or DK weight cotton for durability and stitch definition.
- Hook: Size appropriate for your yarn (e.g., 4.0mm to 4.5mm).
- Motif: Choose a Granny Square, a Solid Square, a Flower Motif, or a Hexagon pattern. The granny square is the simplest starting point.
- Scissors, Yarn Needle, Stitch Markers.
B. General Steps: Motif Runner Construction
Step 1: Design & Calculation
- Measure: Measure the length of your table where you want the runner to sit.
- Swatch: Crochet one complete motif (e.g., one square). Measure its width and height.
- Calculate: Divide your desired total runner length by the length of one motif to determine how many motifs you need in the main row.
- (Example: Runner needs to be 60 inches long. One square is 6 inches wide. You need $60 \div 6 = 10$ squares.)
- Practice Joining: Decide on your joining method (see Step 3).

Step 2: Crochet All Motifs
- Work all your necessary motifs following your chosen pattern (e.g., 10 squares).
- If using multiple colors, change colors as you go.
- Important: Leave long tails (10-15 inches / 25-38 cm) on at least two sides of each motif if you plan to use them for joining.
Step 3: Joining the Motifs
Joining is the most crucial step for a motif project. The goal is a seam that is neat and lies flat.
- Option 1: Slip Stitch Join (Invisible Seam):
- Align two motifs, right sides facing each other.
- Insert your hook through the corresponding loops of both motifs.
- Sl st along the edges you want to join. This creates a durable, flat seam that is often hidden.
- Option 2: Single Crochet Join (Raised Seam):
- Align two motifs, wrong sides facing (or right sides, depending on desired look).
- Sc through the corresponding loops of both motifs. This creates a slightly raised, decorative ridge.
- Option 3: Mattress Stitch (Sewn Join):
- Use your yarn needle and the long tails you left.
- Align the motifs flat, touching edges.
- Sew the edges together using the mattress stitch (which creates an almost invisible seam from the front) or a whip stitch.

Step 4: Add a Border (Optional but Recommended)
Once all motifs are joined in a line:
- Even Out Edges: Work 1-2 rounds of single crochet (sc) around the entire perimeter of the runner. This evens out any irregularities created by the joining and motif clusters.
- Decorative Edge: Add a simple or elaborate border (e.g., a scallop/shell stitch or simple hdc rows) to give the runner a finished, polished look and enhance its drape.
Step 5: Finishing
- Weave in All Ends: Securely hide all remaining yarn tails.
- Blocking (Highly Recommended!): Wet block the finished runner. Pin it to the correct straight dimensions, spray with water (or dampen), and let it air dry completely. This will ensure the runner lies perfectly flat.
2. How to Crochet a Blouse (Garment Construction)
Crocheting a blouse requires careful attention to sizing, shaping, and drape. The simplest method for a beginner is the Top-Down Yoke method, but for a motif top, the Panel Method is also common.
A. Essential Materials & Concept
- Yarn: Sport or DK weight, soft, breathable fiber (Cotton, Bamboo blend) for a light garment.
- Hook: Size appropriate for yarn (e.g., 3.0mm to 4.0mm).
- Design: Choose a simple stitch (like HDC) for a basic fit, or a Lace/Shell Stitch for a motif look.
- Measuring Tape, Stitch Markers, Yarn Needle, Buttons (Optional).
B. General Steps: Top-Down Blouse Construction (Simple Yoke)
This method starts at the neck and grows outwards, minimizing seaming.
Step 1: Design & Gauge Swatch (CRUCIAL!)
- Measurements: Get the wearer’s chest, shoulder-to-shoulder, arm circumference, and desired finished length.
- Gauge Swatch: Do not skip this. Chain 20+ stitches, work 10 rows in your chosen stitch. Measure 4×4 inches. Adjust hook size until your gauge matches your desired pattern. This ensures the blouse will fit.

Step 2: Crochet the Yoke
- Foundation Chain: Chain the number of stitches needed for the neckline circumference (based on your gauge).
- Yoke Rounds/Rows: Work in rounds or rows, increasing stitches evenly at specific points to form the shoulders and neckline. A common method is to increase at 4 points (for the back, two sleeves, and the front/openings). The pattern will instruct you on the exact increase rate.
- Continue Increasing until the yoke lies flat and the circumference fits comfortably over the widest part of the wearer’s shoulder/chest area.
- Reach Armhole Depth: Stop increasing when the yoke reaches the armpit level.
Step 3: Divide for Body and Sleeves
- Next Row: Work across the Back stitches.
- Chain 2-4 stitches for the underarm (creates the armpit space).
- Skip the Sleeve stitches.
- Work across the Front stitches (or continue the opening).
- Chain 2-4 stitches for the other underarm.
- Skip the second Sleeve stitches.
- Join/Continue the body rows/rounds.
Step 4: Crochet the Body
- Work straight rows or rounds in your pattern, working into the underarm chain spaces.
- Continue until the blouse reaches the desired length (e.g., waist or hip).
- Add a finishing border (e.g., sc or ribbing) to the bottom edge.
Step 5: Crochet the Sleeves (Optional)
- Rejoin Yarn: Attach yarn at the center of the underarm chain space.
- Work in Rounds: Work in rounds around the armhole opening.
- Taper: Gradually decrease stitches every few rounds to taper the sleeve to the wrist or elbow.
- Cuff: Finish with a cuff or border.
Step 6: Finishing
- Neckline/Front Placket: Work 2-3 rows of single crochet around the neckline and down the front openings to provide a neat, stable edge. This is where you would place buttonholes if the blouse has a front closure.
- Weave in Ends: Secure all tails.
- Blocking: Essential for a garment! Wet block the blouse, shaping the sleeves and body, and let it dry flat. This sets the stitches and vastly improves the drape.
3. Stitch Ideas for a “Motif” Blouse or Runner
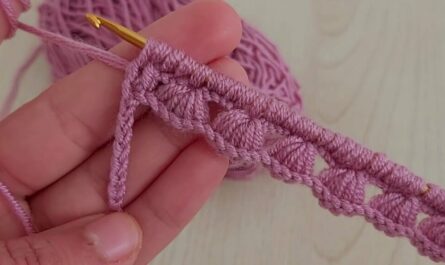
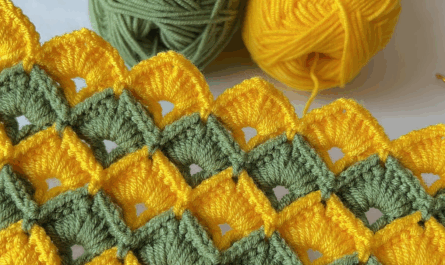
If you want a highly textured or visually interesting project, consider these stitches:
| Stitch Pattern | Best For | Look | Key Stitches |
| Granny Square/Stripe | Runner, Boxy Blouse | Lacy, open, classic texture | dc, ch-sp |
| Shell/Scallop | Blouse (good drape) | Airy, feminine, good vertical texture | dc (multiple in one stitch) |
| Lace V-Stitch | Blouse, Runner | Very open, quick to grow | (dc, ch 1, dc) in one stitch |
| Solid HDC/SC | Runner (durable) | Dense, sturdy, good color contrast | hdc or sc |

Which project are you most excited to start, the runner or the blouse, and what kind of motif/stitch are you thinking of using?
Video tutorial: