 by
by That’s a wonderful project! A colorful Granny Square blanket is a classic and versatile undertaking, allowing you to play with color combinations while mastering a fundamental motif.
Here is a detailed guide covering the Classic Open Granny Square Pattern and instructions on designing and assembling a Colorful Blanket.

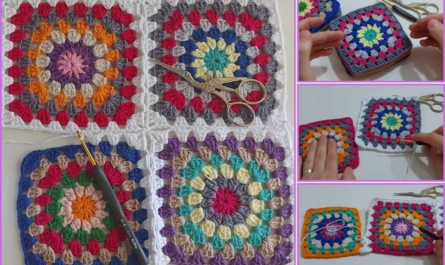
I. The Classic Open Granny Square Pattern
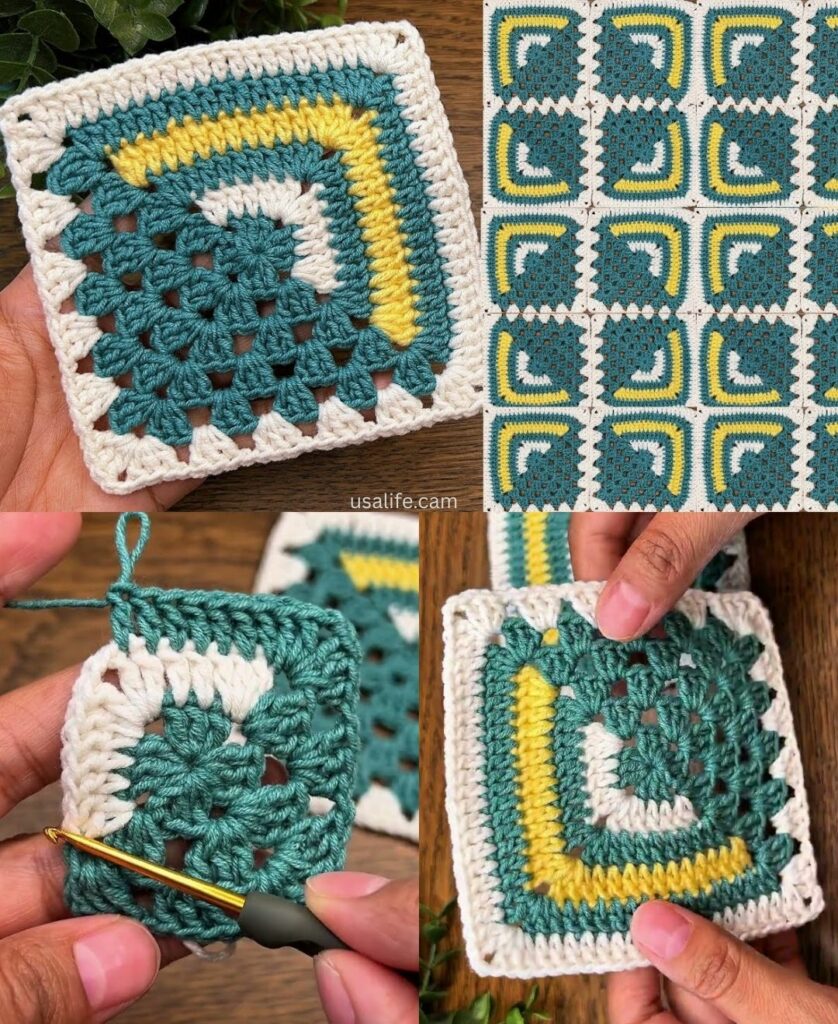
We will use the same basic, easy-to-learn motif as before, as it’s the most common style for blankets.
Skill Level: Beginner
Yarn Recommendation: Worsted Weight (Aran) acrylic yarn is highly recommended for blankets due to its softness, durability, affordability, and washability.
Hook Recommendation: Appropriate for your yarn, usually 5.0 mm (H/8) or 5.5 mm (I/9).
Abbreviations: (Standard US Terms)
- ch: chain
- st(s): stitch(es)
- sl st: slip stitch
- dc: double crochet
- sp: space
- ch-sp: chain space
- MR: Magic Ring
Motif Instructions (The Square)
Foundation: Start with a MR or Ch 4, sl st to first ch to form a ring.
Round 1: Forming Corners
- Ch 3 (counts as 1st dc). Work 2 more dc into the ring (First 3-dc cluster).
- Corner: Ch 3.
- Work (3 dc, ch 3) into the ring three more times.
- Sl st to the top of the starting ch 3 to join. (Four 3-dc clusters, four ch-3 corners).
- [OPTIONAL COLOR CHANGE HERE] Fasten off old color and join new color in any ch-3 corner space with a sl st.

Round 2: Expanding the Sides
- Sl st into the ch-3 corner space (if you didn’t change color, sl st over the next 2 dc and into the corner space).
- Start Corner 1: Ch 3, 2 dc, ch 3, 3 dc in the same corner space.
- Side: Ch 1.
- Next Corner: Work (3 dc, ch 3, 3 dc) into the next ch-3 corner space.
- Repeat steps 3 and 4 two more times.
- Ch 1. Sl st to the top of the starting ch 3 to join.
- [OPTIONAL COLOR CHANGE HERE]
Round 3 and Subsequent Rounds (Repeat Pattern):
- Sl st into the ch-1 side space to begin the round (or join new color here).
- Side Cluster: Ch 3, 2 dc in the starting ch-1 space.
- Side: Ch 1.
- Corner: In the next ch-3 corner space, work (3 dc, ch 3, 3 dc).
- Side: Ch 1.
- Work 3 dc into the next ch-1 space.
- Repeat steps 3 through 6 around the square.
- Close with a ch 1, sl st to the top of the starting ch 3 to join.

Continue this pattern until the squares are the desired size (e.g., 4, 5, or 6 rounds total).
II. Designing Your Colorful Blanket
The beauty of a colorful granny square blanket is in the planning!
1. Determine Size and Motif Count
- Standard Throw: Approx. $50″ \times 60″$
- Baby Blanket: Approx. $36″ \times 40″$
- Calculation:
- Make one finished square and measure its width (W).
- Desired Width of Blanket / W = Motifs Wide (A)
- Desired Length of Blanket / W = Motifs Long (B)
- Total Motifs Needed: $A \times B$
- Example: If your motif is 5 inches wide, and you want a 50″ x 60″ blanket:
- $50 / 5 = 10$ Motifs Wide
- $60 / 5 = 12$ Motifs Long
- Total: 120 Motifs
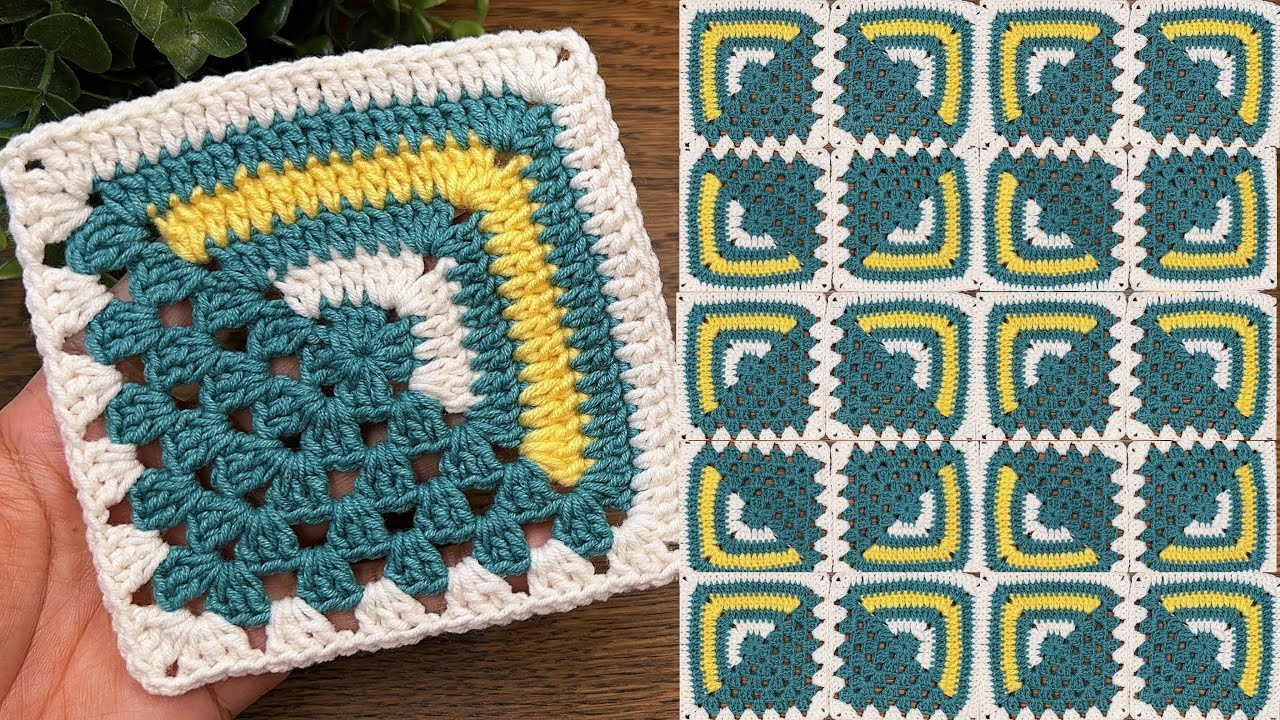
2. Plan Your Color Palette
The pattern of color change is what makes the blanket visually interesting.
| Color Pattern | Description | Assembly Look |
| Scrap Buster | Randomly choose colors for each round/square. | Chaotic, vibrant, maximalist. |
| Controlled Random | Use a consistent background color (e.g., White or Black) for the final 1-2 rounds of every square. Vary the center colors randomly. | Holds the squares together visually; less chaotic. Highly Recommended. |
| Color Blocks | Use 4-5 fixed color combinations. Create sets of squares, then arrange the sets in a repeating grid. | Checkerboard or striped look; clean and organized. |
| Ombre/Gradient | Arrange the finished squares to fade from one color (or shade) to another across the blanket. | Sophisticated, flowing, modern. |
3. Color Change Technique
For a cleaner look, use the same color for the final 1 or 2 rounds of every square. This is the Joining Color (often white, cream, or gray) and creates a cohesive “grid” effect.

III. Assembly: Joining the Motifs
You have several great joining options. For a large blanket, Join-As-You-Go (JAYG) or a simple sewing join are usually best.
Method A: Simple Mattress Stitch (Sewing)
- Preparation: Finish all squares completely and weave in ends.
- Layout: Arrange all squares on the floor or a large bed exactly how you want them to appear.
- Joining: Use your Joining Color yarn (or a complementary color) and a tapestry needle.
- Sew the squares together in long strips (vertically or horizontally) using the Mattress Stitch (ideal for invisible seams) or a simple Whipstitch (creates a visible ridge).
- Once all vertical strips are joined, sew the strips together horizontally.
Method B: Single Crochet Join (Crochet)
- Preparation: Finish all squares completely.
- Joining: Hold two squares together, wrong sides facing (or right sides facing, depending on the seam look you want).
- Attach the Joining Color yarn to a corner with a sl st.
- Work a Single Crochet (sc) stitch through both layers (the corresponding stitch of each square) across the entire edge.
- Fasten off and repeat until all squares are joined. (This creates a pronounced, raised seam).
Method C: Join-As-You-Go (JAYG)
This is the most efficient method as it eliminates the separate joining step and weaving in the ends of the joining color.
- Motif 1: Complete Motif 1 completely (all rounds).
- Motif 2: Complete Motif 2, but stop before the final round (the Joining Color round).
- Final Round (Joining Color): Start the final round on Motif 2. When you reach a corner or ch-1 space that is meant to connect to Motif 1:
- Corner Join: Instead of (ch 3) in the corner space, work ch 1, sl st into the corresponding ch-3 space of Motif 1, ch 1.
- Side Join: Instead of (ch 1) between clusters, work sl st into the corresponding ch-1 space of Motif 1.
- Continue joining Motif 2 along the edges of Motif 1 until it is fully connected on the necessary sides.
- Continue this process for all subsequent squares, joining along 1 or 2 sides as needed.
IV. Finishing Border
A border frames the blanket and helps correct any slight size irregularities between squares.
- Round 1 (Foundation): Join your main border color (usually the Joining Color) in any corner.
- Ch 3, and work dc stitches evenly around the entire perimeter of the blanket.
- Work (2 dc, ch 2, 2 dc) in each corner.
- Ensure you work stitches evenly into the side edges of the motifs and across the joining seams.
- Round 2 (Solid): Ch 3, dc in every dc around. Work (2 dc, ch 2, 2 dc) in the corners.
- Round 3 (Decorative – Optional Shell Stitch):
- Sl st to move to the center of a side.
- Shell: Skip 2 stitches, work 5 dc into the next stitch, skip 2 stitches, sl st into the next stitch. Repeat this pattern around the entire blanket.
- Sl st to join. Fasten off and weave in all remaining ends.
Video tutorial: