 by
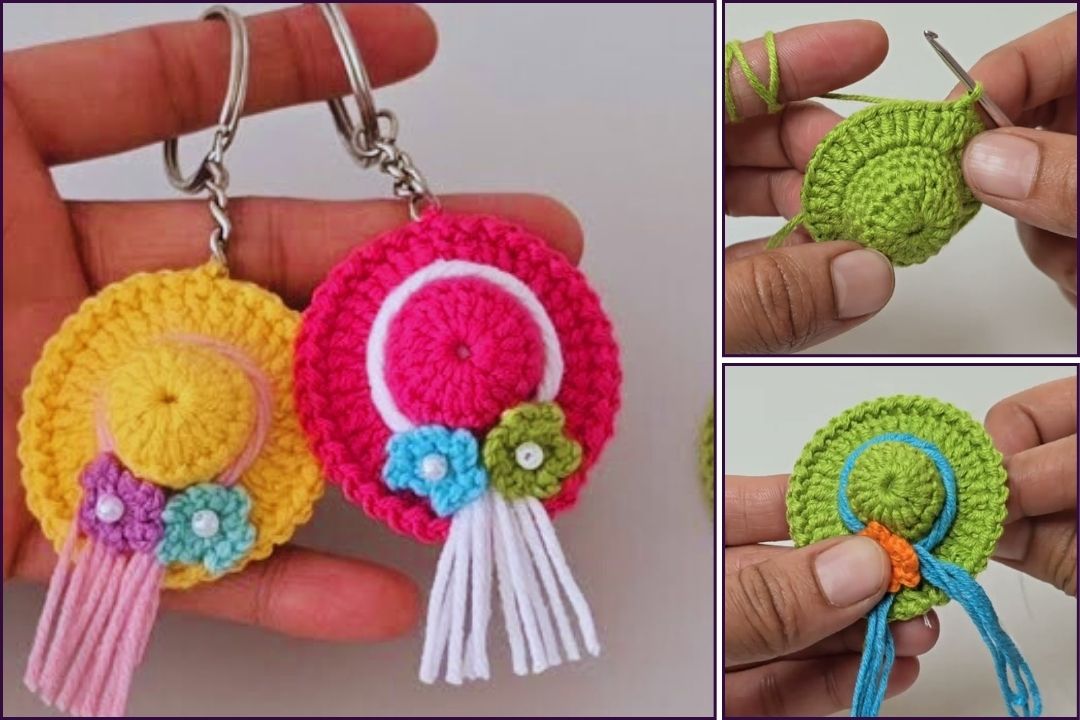
by How to Crochet a Cute Mini Hat Keychain: A Beginner’s Tutorial
Crocheting a mini hat keychain is an incredibly charming and quick project, perfect for using up yarn scraps! These tiny hats are delightful as keychains, zipper pulls, or even as miniature ornaments. They also make excellent last-minute gifts.
Given your location in Phnom Penh, where it’s often warm, 100% cotton yarn is an excellent choice for this project. Cotton is durable, holds its shape well (important for a keychain!), and its clear stitch definition will make your mini hat look crisp and neat.
1. Essential Materials You’ll Need
- Yarn:
- Any color(s) you like! This is perfect for using up small scraps.
- Worsted Weight (Aran / Medium / Category 4) 100% Cotton or a sturdy Acrylic yarn. You’ll need very little, perhaps 5-10g per hat.
- Optional: A tiny bit of contrasting yarn for a brim stripe or pom-pom.
- Crochet Hook:
- A 3.0mm (US C/2) or 3.5mm (US E/4) hook. For small amigurumi-style projects like this, a smaller hook than recommended for your yarn creates a tighter fabric, which helps the hat hold its shape and makes it more durable.
- Scissors: For cutting yarn.
- Yarn Needle (Tapestry Needle): Essential for weaving in ends and attaching the pom-pom (if using).
- Keychain Hardware: A standard split ring keychain or a small swivel clasp.
- Optional for Pom-Pom: Small pom-pom maker, or just your fingers/a fork.
2. Basic Crochet Stitches You’ll Use
This pattern is designed to be beginner-friendly, using fundamental crochet stitches and working in the round.
- Magic Ring (MR) / Adjustable Ring: (Highly Recommended!) Creates a tight, hole-free start for the top of the hat. If you’re not familiar, a
ch 2and working into the 2nd ch from hook also works. - Chain (ch): Used for turning and creating stitches.
- Slip Stitch (sl st): For joining rounds.
- Single Crochet (sc): The primary stitch for the body of the hat, creating a dense fabric.
- Half Double Crochet (hdc): Used for the brim to give it a slight flare.
- Fasten Off: Securely ending your work.
- Weaving in Ends: Hiding yarn tails for a neat and durable finish.
Crochet Mini Hat Keychain Pattern
This pattern creates a cute, slightly tapered mini hat, perfect for a keychain.
Abbreviations (US Crochet Terms):
- MR: magic ring
- Rnd: Round
- ch: chain
- sl st: slip stitch
- sc: single crochet
- hdc: half double crochet
- inc: increase (2 sc in next st)
- st(s): stitch(es)
Part 1: The Hat Top & Body
We’ll start at the top of the hat and work our way down. This is worked in continuous rounds, so use a stitch marker to keep track of your first stitch in each round.
- Rnd 1: Start with a Magic Ring (MR). Work 6 sc into the MR. Pull tail to close ring. (6 sc)
- If not using MR: Ch 2, 6 sc in 2nd ch from hook. Sl st to join, Ch 1.
- Place stitch marker in the first sc of the next round.
- Rnd 2: [Inc] in each st around. (12 sc)
- Rnd 3: [Sc 1, inc] 6 times. (18 sc)
- Rnd 4: [Sc 2, inc] 6 times. (24 sc)
- Rnd 5: Sc in each st around. (24 sc)
- Rnd 6: Sc in each st around. (24 sc)
- At this point, you have the main body of the hat.
Part 2: The Brim
We’ll use hdc to give the brim a slight flare.
- Rnd 7: Ch 1 (does not count as a stitch). Work 2 hdc in each st around. (48 hdc)
- Join with a sl st to the first hdc of the round.
- Rnd 8 (Optional – for a wider brim): Ch 1. Sc in each st around. (48 sc)
- Join with a sl st to the first sc of the round.
- Fasten off, leaving a tail of about 6-8 inches (15-20 cm) for weaving in.
Part 3: Finishing and Keychain Attachment
- Weave in Ends: Use your yarn needle to carefully weave in all loose yarn tails. For the starting tail from the magic ring, pull it tight to cinch the hole closed and then weave it securely into the inside of the hat. Weave in the ending tail neatly around the brim.
- Add a Pom-Pom (Optional):
- Make a tiny pom-pom using your fingers, a fork, or a small pom-pom maker.
- Use the tails of the pom-pom to tie it securely to the very top of the hat (the center of your Magic Ring). Weave the tails into the inside of the hat to hide them.
- Attach Keychain Hardware:
- Using a new piece of yarn (about 6 inches) in your hat’s main color, or just using your yarn needle directly:
- Thread the yarn needle through the very top center of the hat.
- Create a small loop of stitches (e.g., about 5-7 chains, then sl st back into the same stitch to form a loop). Go over this loop a couple of times with your yarn needle to reinforce it, making it very strong.
- Weave in the ends of this loop securely into the inside of the hat.
- Slide the split ring of your keychain hardware onto this loop. Make sure it’s firmly attached, as keychains get a lot of use!

4. Tips for a Charming & Durable Hat Keychain
- Yarn Scraps: This is the perfect project to bust those tiny yarn scraps you have! Mix and match colors for fun, striped hats.
- Consistent Tension: Try to maintain even tension throughout your crocheting. This ensures a uniform look and a well-shaped hat.
- Invisible Join: When working in the round, a “nearly invisible join” for your sl st can make your seams less noticeable if you’re aiming for perfection.
- Sturdiness: The smaller hook size is key for durability. For extra firmness, you can even stiffen the hat slightly with a fabric stiffener or white glue diluted with water, once it’s completely finished and dry.
- Personalize It:
- Stripes: Change colors every 1-2 rounds for a striped hat.
- Embellishments: Tiny buttons, beads (ensure they’re secure if for kids), or even a tiny embroidered initial can add character.
- Different Brim: Instead of hdc, you could do a round of
[sc 1, ch 1, sk 1]for a lacy brim, or just more rounds of sc.
You now have all the details to crochet an adorable and practical mini hat keychain! Enjoy making these cute little accessories.