 by
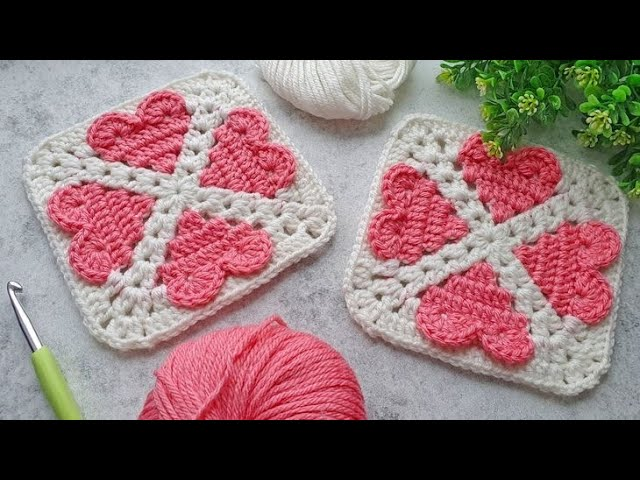
by To crochet a heart within a granny square, you’ll combine a dense, central heart motif with the classic open-work structure of the granny square. This project is ideal if you’re comfortable with basic crochet stitches and changing colors.
Here is a detailed, step-by-step guide on how to create a beautiful “Heart in a Granny Square” motif.

Materials Needed
- Yarn: Medium-weight yarn in two contrasting colors.
- Color A: For the Heart (e.g., Red or Pink).
- Color B: For the Background/Square (e.g., White or Blue).
- Crochet Hook: The size recommended for your yarn.
- Scissors: To cut the yarn.
- Tapestry Needle: To weave in the ends.

Abbreviations
- ch: chain
- sl st: slip stitch
- sc: single crochet
- hdc: half double crochet
- dc: double crochet
- tr: treble crochet (or triple crochet)
- sp: space
- st(s): stitch(es)
Pattern Instructions
We’ll start by forming the heart in the center and then build the square outward.
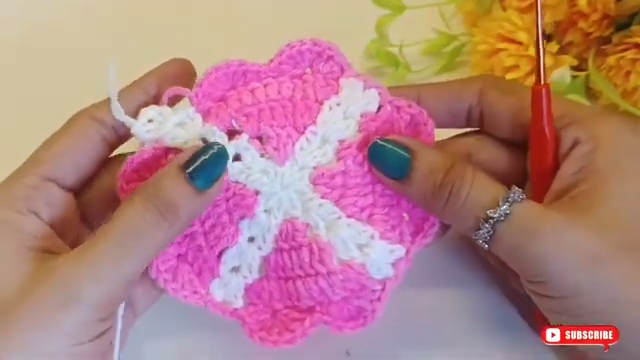
Round 1: The Heart (Color A)
- Start: With Color A, create a magic ring (or
ch 4and join with asl st). - Form the Heart: Work the following sequence of stitches into the center ring:
3 dc3 hdcch 11 dc(the bottom point of the heart)ch 13 hdc3 dc
- Finish: Pull the tail of the magic ring to tighten the center. Join with a sl st to the first
dcto complete the heart shape. - Fasten off Color A and weave in the ends to secure the heart.

Round 2: Building the Foundation (Color B)
This round establishes the first four corners of your granny square around the heart.
- Join Yarn: Join Color B with a
sl stinto the centerch-1space at the top curve of the heart. - First Corner:
ch 3(counts as firstdc), work 2 dc into the samech-1space.ch 2(this is your first corner space).
- Second Corner: Work 3 dc into the
1 dcstitch at the bottom point of the heart.ch 2.
- Third Corner: Work 3 dc into the next
ch-1space (at the second top curve of the heart).ch 2.
- Fourth Corner: Work 3 dc into the top of the beginning
ch 3from Round 1.ch 2.
- Finish: Join with a sl st to the top of the beginning
ch 3.
Round 3: Defining the Square
Now you’ll start working the signature granny clusters into the spaces created in the previous round.
- Start: sl st into the next two
dcstitches and then sl st into the firstch-2corner space. - Corner:
ch 3(counts asdc), work 2 dc,ch 2, 3 dc into the same corner space. This is your first full corner: (3 dc, ch 2, 3 dc). - Side:
ch 1(side space).- Work 3 dc into the next
ch-2space. ch 1.
- Repeat Corner: Work (3 dc, ch 2, 3 dc) into the next
ch-2corner space. - Continue repeating the Side and Corner sequences around the square.
- Finish: Join with a sl st to the top of the beginning
ch 3.
Round 4 and Beyond: Expanding the Square
You will now follow the standard granny square pattern to increase the size.
- Start: sl st over to the next
ch-2corner space. - Corner: Work (ch 3, 2 dc, ch 2, 3 dc) into the corner space.
- Side:
ch 1. Work 3 dc into each availablech-1side space, separating each cluster with ach 1. - Next Corner: Work (3 dc, ch 2, 3 dc) into the next corner space.
- Repeat the Side and Corner sequence until the square is complete.
- Finish: Join with a sl st to the top of the beginning
ch 3. Fasten off and weave in all remaining ends.
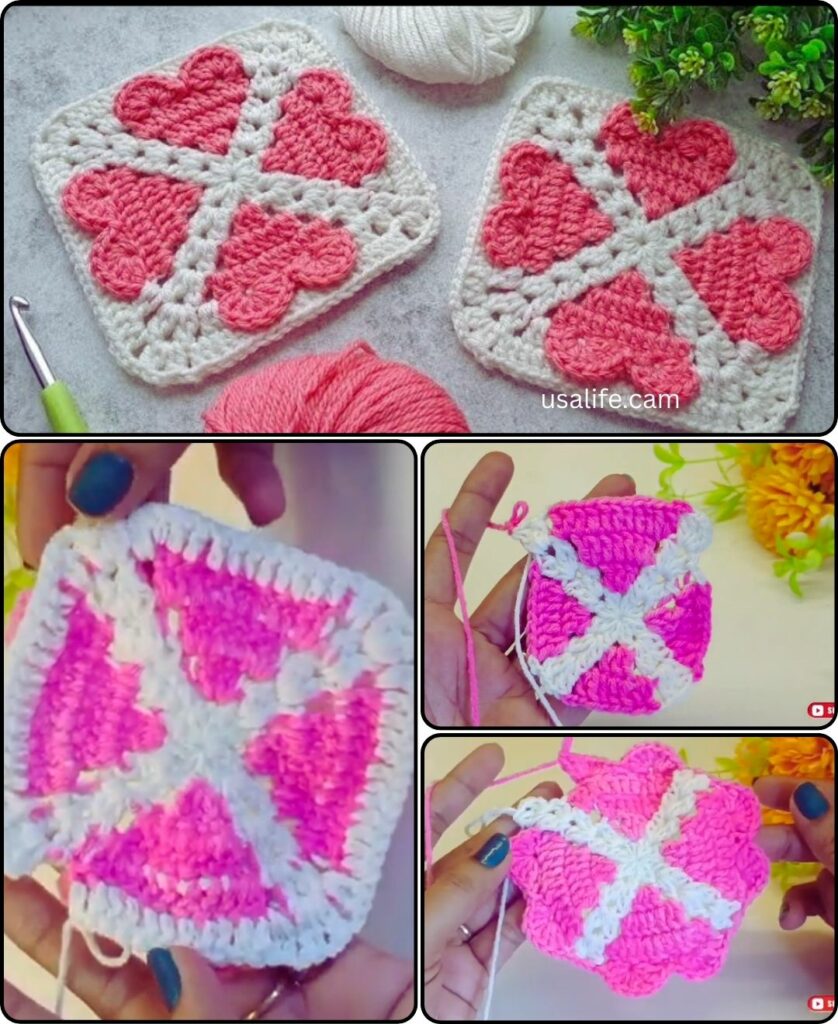
This pattern results in a unique motif where the heart is fully integrated, making it perfect for blankets, pillows, or gifts for loved ones!
Video tutorial: