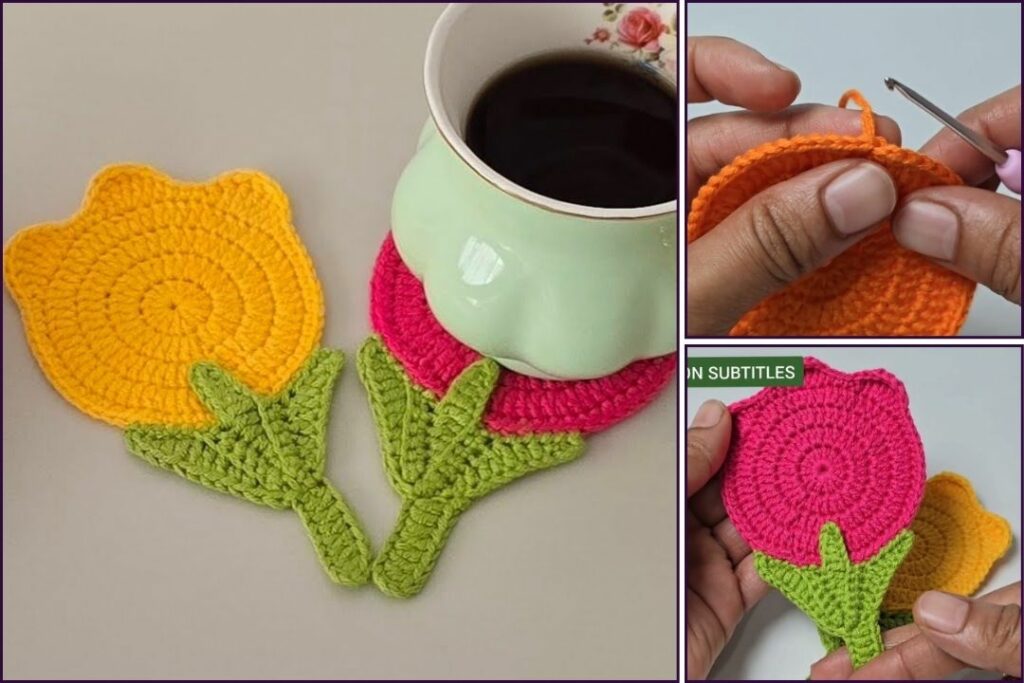
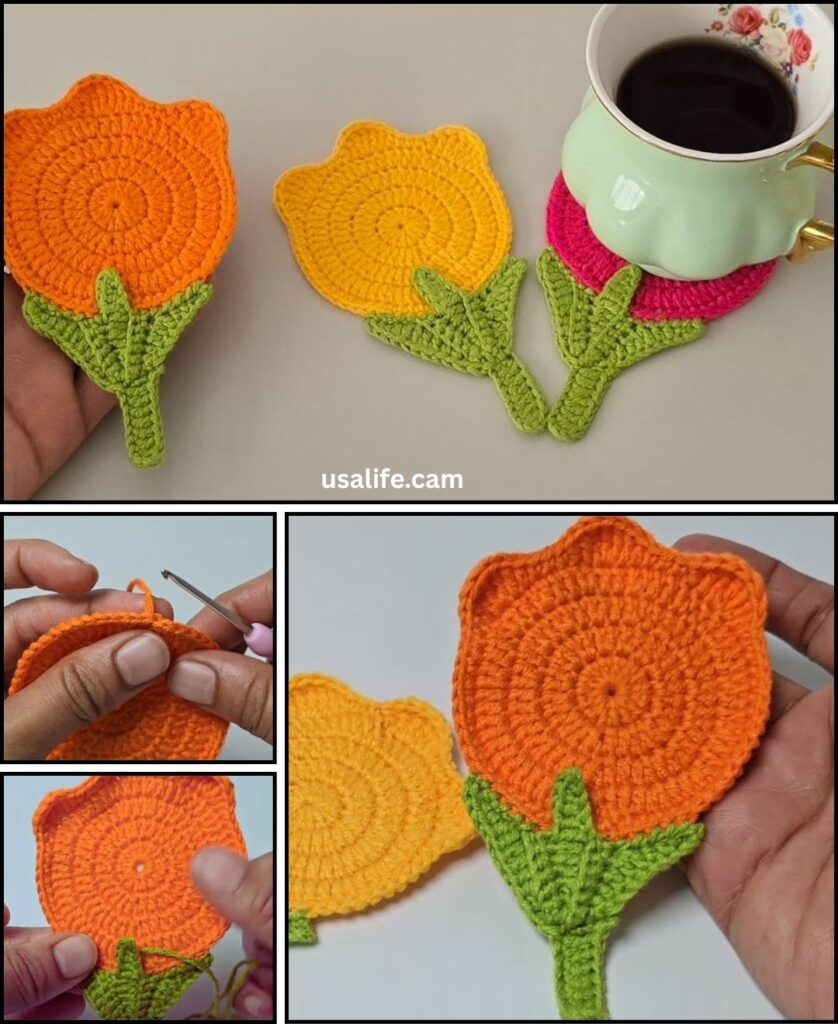
It’s a delightful idea to crochet a tulip coaster! These are charming, functional, and add a beautiful touch of spring to any home. Just to clarify, crochet uses a single hook, while knitting uses two needles. This tutorial will focus entirely on how to crochet a tulip-shaped coaster.
Given that you’re in Phnom Penh, where it’s warm, 100% cotton yarn is an excellent choice for coasters. Cotton is naturally absorbent, durable, holds its shape well when wet, and its clear stitch definition will make your tulip coaster look crisp and pretty.

How to Crochet a Cute Tulip Coaster Tutorial
This tutorial will guide you through creating a flat coaster that’s shaped like a tulip flower, complete with petals and a leaf.
1. Essential Materials You’ll Need
- Yarn:
- Flower Color (MC): For the tulip petals (e.g., pink, red, yellow, purple, white). Worsted Weight (Aran / Medium / Category 4) 100% Cotton is highly recommended. You’ll need about 20-30g per coaster.
- Green Yarn: For the stem and leaf (small scrap, contrasting or complementary green).
- Crochet Hook:
- A 4.0mm (US G/6) or 4.5mm (US 7) hook. Choose a hook size that makes your stitches fairly dense so the coaster lies flat and holds its shape well.
- Scissors: For cutting yarn.
- Yarn Needle (Tapestry Needle): Essential for weaving in ends and sewing on the leaf.
- Stitch Marker (Optional but helpful): To mark the beginning of rounds or specific stitches.

2. Basic Crochet Stitches & Techniques You’ll Use
This pattern primarily uses fundamental crochet stitches and working in the round/rows:
- Magic Ring (MR): (Also Magic Circle or Adjustable Ring). Excellent for a tight, hole-free center for the flower. If you’re new to this, a quick video tutorial on “crochet magic ring” can be very helpful!
- Chain (ch): Used for starting, turning chains, and creating spaces.
- Slip Stitch (sl st): For joining rounds and neatening.
- Single Crochet (sc): Creates a dense, sturdy fabric.
- Half Double Crochet (hdc): A medium-height stitch.
- Double Crochet (dc): A taller stitch.
- Triple/Treble Crochet (tr): The tallest stitch used, for the taller parts of the petals.
- Double Crochet 2 Together (dc2tog): A decrease stitch, used to shape the petals.
- How to dc2tog: YO, insert hook into first st, YO, pull up loop (3 loops on hook). YO, pull through 2 loops (2 loops on hook). YO, insert hook into next st, YO, pull up loop (4 loops on hook). YO, pull through 2 loops (3 loops on hook). YO, pull through all 3 loops on hook.
- Fasten Off: Securely ending your work.
- Weaving in Ends: Hiding tails for a neat finish.
Crochet Tulip Coaster Pattern
The tulip coaster will be worked in sections: the flower head, then the stem, and finally the leaf, which will be sewn on.
Abbreviations (US Crochet Terms):
- MC: Main Color (Flower petal color)
- GC: Green Color (Stem & Leaf color)
- Rnd: Round
- Row: Row
- ch: chain
- sl st: slip stitch
- sc: single crochet
- hdc: half double crochet
- dc: double crochet
- tr: triple crochet (or treble crochet)
- dc2tog: double crochet 2 together
- MR: magic ring
- st(s): stitch(es)
(...): work stitches into the same stitch/space[...]: repeat instructions in brackets

Part 1: Tulip Flower Head (Main Color – MC)
We’ll create the main part of the flower as a semi-circle/oval, which forms the base of the coaster.
- Ch 19.
- Row 1: Dc in the 3rd ch from hook (the 2 skipped chs count as 1 dc). Dc in the next 15 ch. Work (6 dc) into the last ch. Now, working down the other side of the foundation chain (into the bottom loops), dc in the next 16 ch. (Total: 39 dc)
- Row 2: Ch 2 (does not count as st). Turn. Sc in the first 18 sts. Work (2 sc) in each of the next 3 sts (increases for the round part of the tulip). Sc in the next 18 sts. (Total: 42 sc)
- This should form a rounded, ovalish shape.
- Row 3 (Petal Definition): Ch 2 (does not count as st). Turn.
- Petal 1: Dc in the first 2 sts. Work (dc, tr, dc) all in the next st. Dc in the next 2 sts.
- Petal 2: Sl st in the next st. Dc in the next 2 sts. Work (dc, tr, dc) all in the next st. Dc in the next 2 sts.
- Petal 3 (Center): Sl st in the next st. Dc in the next 2 sts. Work (dc, 2 tr, dc) all in the next st. Dc in the next 2 sts. (This one is slightly taller).
- Petal 4: Sl st in the next st. Dc in the next 2 sts. Work (dc, tr, dc) all in the next st. Dc in the next 2 sts.
- Petal 5: Sl st in the next st. Dc in the next 2 sts. Work (dc, tr, dc) all in the next st. Dc in the next 2 sts.
- Sl st into the last st.
- Fasten off MC, leaving a long tail for weaving in.
Part 2: Stem (Green Yarn – GC)
The stem will be a short, sturdy rectangle.
- With GC, Ch 5.
- Row 1: Sc in the 2nd ch from hook. Sc in the next 3 ch. (4 sc)
- Row 2: Ch 1, turn. Sc in each sc across. (4 sc)
- Row 3: Ch 1, turn. Sc in each sc across. (4 sc)
- Adjust rows to make your stem longer or shorter if desired.
- Fasten off GC, leaving a long tail for sewing.

Part 3: Leaf (Green Yarn – GC)
The leaf is a simple pointed shape.
- With GC, Ch 8.
- Row 1: Sc in the 2nd ch from hook. Hdc in the next ch. Dc in the next 3 ch. Hdc in the next ch. Sc in the last ch.
- Fasten off GC, leaving a long tail for sewing.
4. Assembling Your Crochet Tulip Coaster
Now to bring your tulip to life!
- Weave in all initial yarn ends from the flower head, stem, and leaf. Do this carefully on the wrong side (back) of each piece.
- Attach Stem:
- Position the top edge of the stem onto the bottom center of the tulip head.
- Using the long tail from the stem and your yarn needle, securely sew the stem to the tulip head. Make sure it’s centered and straight.
- Attach Leaf:
- Position the leaf so it extends from one side of the stem, pointing slightly upwards or outwards.
- Using the long tail from the leaf and your yarn needle, securely sew the base of the leaf to the stem and the main coaster body. You can also make a few small stitches along the curve of the leaf to attach it to the coaster if you want it to lie flatter.
- Weave in All Remaining Ends NEATLY: This is crucial for a polished, professional-looking coaster. Take your time to hide all tails securely within the stitches on the back of the coaster.

5. Finishing Your Crochet Tulip Coaster (Crucial Step!)
Proper finishing makes your coaster durable and look its best.
- Blocking (Highly Recommended!): For a flat, well-shaped coaster, blocking is key.
- Gently wet your finished coaster.
- Carefully squeeze out any excess water (do NOT wring!).
- Lay the coaster flat on a clean, dry towel or a foam blocking mat. Carefully shape it into a perfect tulip, making sure the petals are defined and the stem and leaf are straight.
- Allow it to air dry completely. This will help it lie flat and maintain its beautiful shape.

6. Tips for a Stylish & Durable Tulip Coaster
- Yarn Choice: Cotton is paramount for coasters due to its absorbency and heat resistance. Avoid acrylic if you plan to put very hot mugs on it, as acrylic can melt.
- Tension: Aim for consistent, firm tension to create a dense fabric that won’t stretch out easily with use. This is vital for a coaster.
- Color Play: Experiment with different flower colors! A set of coasters in various tulip shades (red, yellow, pink, purple) would be stunning.
- Edging (Optional): If you want a more defined edge, you can add a final round of
scstitches around the entire perimeter of the tulip (after Row 3 of the head, and then again after attaching the stem/leaf for the full outline). - Make a Set: Crochet a set of 2, 4, or 6 tulip coasters for a lovely gift set or to brighten your own home.
- Care: Hand wash or machine wash on a delicate cycle with cool water, and lay flat to dry.
You now have a detailed tutorial on how to crochet an adorable and practical tulip coaster! Enjoy bringing these beautiful spring flowers to life with your hook and yarn.


