by
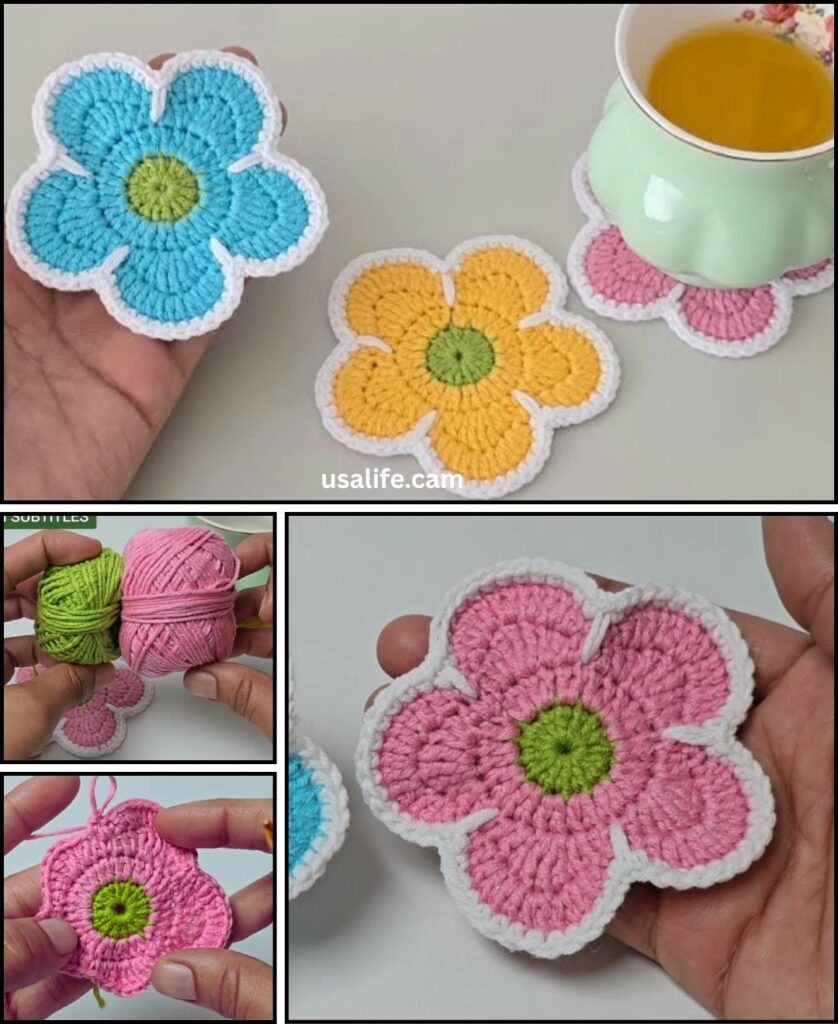
by It’s a lovely idea to crochet a daisy flower coaster! These coasters are not only practical but also incredibly charming, bringing a touch of freshness and cheer to any table. Just to clarify, crochet uses a single hook, while knitting uses two needles. This guide will focus entirely on how to crochet a daisy flower coaster.
For the warm climate of Phnom Penh, 100% cotton yarn is an excellent choice for coasters. Cotton is naturally absorbent, durable, holds its shape well, and its clear stitch definition will make your daisy coaster look crisp and beautiful.
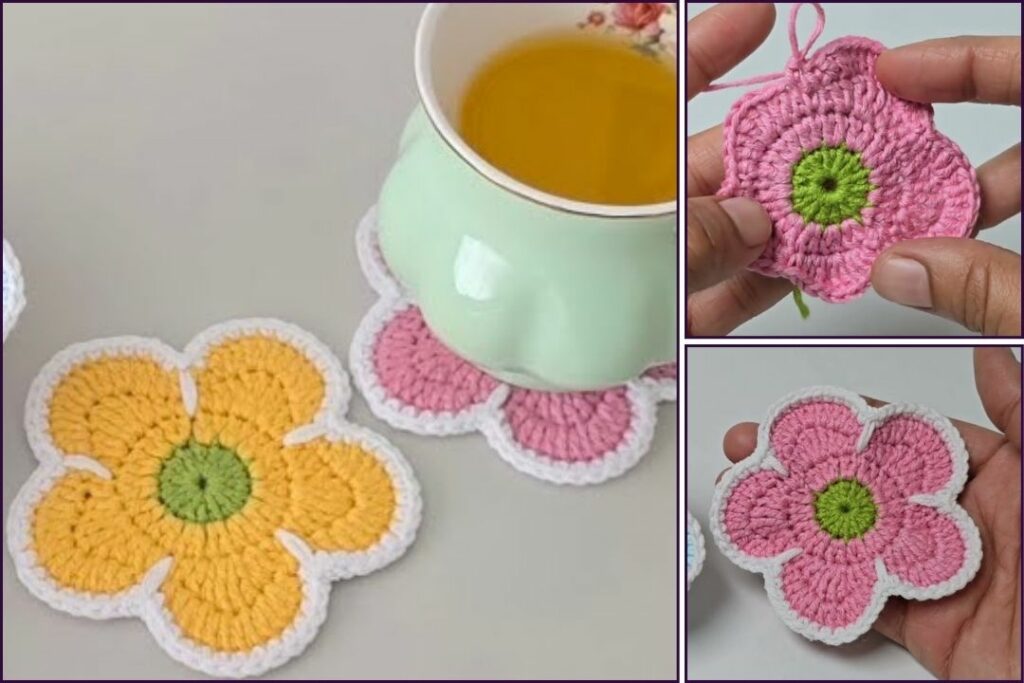
How to Crochet a Cute Daisy Flower Coaster
This tutorial will guide you through creating a flat, circular coaster that resembles a classic daisy, with a distinct center and radiating petals.
1. Essential Materials You’ll Need
- Yarn:
- Center Color (CC): For the daisy’s center (e.g., yellow, orange, or brown). Worsted Weight (Aran / Medium / Category 4) 100% Cotton is highly recommended. You’ll need a small amount.
- Petal Color (PC): For the daisy’s petals (e.g., white, cream, or a pastel shade). Worsted Weight (Aran / Medium / Category 4) 100% Cotton. You’ll need about 20-30g per coaster.
- Optional – Green Yarn (GC): For a leaf or a subtle border (small scrap).
- Crochet Hook:
- A 4.0mm (US G/6) or 4.5mm (US 7) hook. Choose a hook size that makes your stitches fairly dense so the coaster lies flat and holds its shape well.
- Scissors: For cutting yarn.
- Yarn Needle (Tapestry Needle): Essential for weaving in ends.
- Stitch Marker (Optional but helpful): To mark the beginning of rounds.

2. Basic Crochet Stitches & Techniques You’ll Use
This pattern uses fundamental crochet stitches and working in the round:
- Magic Ring (MR): (Also Magic Circle or Adjustable Ring). Excellent for a tight, hole-free center. If you’re new to this, a quick video tutorial on “crochet magic ring” can be very helpful!
- Chain (ch): Used for starting, turning chains, and creating spaces.
- Slip Stitch (sl st): For joining rounds and neatening.
- Single Crochet (sc): Creates a dense, sturdy fabric.
- Half Double Crochet (hdc): A medium-height stitch.
- Double Crochet (dc): A taller stitch.
- Puff Stitch (Puff St): This stitch creates a raised, textured “puff” which is perfect for daisy petals.
- How to make a Puff Stitch (example for 3 dc puff): YO, insert hook into stitch/space, YO, pull up a loop (3 loops on hook). [YO, insert hook into same stitch/space, YO, pull up a loop] 2 more times (7 loops on hook). YO, pull through all 7 loops on hook. Ch 1 to close (this closing chain usually counts as part of the puff stitch).
- Fasten Off: Securely ending your work.
- Weaving in Ends: Hiding tails for a neat finish.
Crochet Daisy Flower Coaster Pattern
We’ll start with the center of the daisy, then add the petals in a new color, and finally finish with an optional outer border.
Abbreviations (US Crochet Terms):
- CC: Center Color
- PC: Petal Color
- GC: Green Color (Optional)
- Rnd: Round
- ch: chain
- sl st: slip stitch
- sc: single crochet
- hdc: half double crochet
- dc: double crochet
- Puff St: Puff Stitch (as described above)
- MR: magic ring
- st(s): stitch(es)
(...): work stitches into the same stitch/space[...]: repeat instructions in brackets

Part 1: Daisy Center (Center Color – CC)
This forms the yellow (or brown) middle of your daisy.
- Rnd 1: Start with a MR. Ch 2 (does not count as a stitch). Work 10 hdc into MR. Pull tail to close ring tightly. Join with sl st to the top of the first hdc. (10 hdc)
- Alternative Start (if MR is tricky): Ch 3, join with sl st to first ch to form a ring. Ch 2. Work 10 hdc into the ring. Join with sl st to top of first hdc.
- Fasten off CC, leaving a short tail to weave in.
Part 2: Daisy Petals (Petal Color – PC)
Now we’ll add the characteristic daisy petals.
- Join PC with a sl st into any hdc from Rnd 1 (the center).
- Rnd 2:
*Work 1 Puff St into the same stitch where you joined (this includes the ch 1 to close the puff). Ch 1.*Repeat from*to*into each of the next 9 stitches around. You will have 10 Puff Stitches.- Join with sl st into the first ch 1 space after your first puff stitch (this creates a seamless look, not into the top of the puff itself). (10 Puff Sts, 10 ch-1 sps)
- Tip: The ch 1 after each puff stitch creates the space you’ll work into in the next round.
- Rnd 3: Ch 1 (does not count as st).
*Work 2 sc into the first ch-1 space. Work 1 sc into the top of the next Puff St.*Repeat from*to*around (into each ch-1 space and each puff stitch).- Join with sl st to the first sc of the round. (30 sc)
- Your coaster should be taking shape as a flat circle with the petals defined. If it’s ruffling or cupping, check your tension or consider adjusting the number of stitches in this round.
- Fasten off PC, leaving a medium tail to weave in.

Part 3: Optional Green Border / Stem (Green Color – GC)
You can add a subtle green border or a small stem to your daisy.
Option A: Simple Green Border (Recommended for a coaster)
- Join GC with a sl st into any sc from Rnd 3.
- Rnd 4: Ch 1 (does not count as st). Work 1 sc in each sc around. Join with sl st to the first sc of the round. (30 sc)
- Fasten off GC, leaving a tail to weave in.
Option B: Small Leaf (Alternative to or in addition to border)
- With GC, Ch 8.
- Row 1: Sc in the 2nd ch from hook. Hdc in the next ch. Dc in the next 3 ch. Hdc in the next ch. Sc in the last ch.
- Fasten off GC, leaving a long tail for sewing.
- Attach: Position the leaf on the back of the coaster, slightly off-center at the bottom. Use your yarn needle to sew it securely.

5. Finishing Your Crochet Daisy Flower Coaster (Crucial Step!)
Proper finishing makes your coaster durable and look its best.
- Weave in All Ends NEATLY: This is absolutely critical for a polished, professional-looking coaster. Use your yarn needle to carefully weave in every single yarn tail securely into the stitches on the back of your coaster. Take your time to hide them well. Do not just snip them short, or they may unravel with use.
- Blocking (Highly Recommended!): For a flat, well-shaped coaster, blocking is key.
- Gently wet your finished coaster.
- Carefully squeeze out any excess water (do NOT wring!).
- Lay the coaster flat on a clean, dry towel or a foam blocking mat. Carefully shape it into a perfect circle, ensuring the petals lay nicely.
- Allow it to air dry completely. This will help it lie flat and maintain its beautiful shape, which is essential for a coaster.
6. Tips for a Stylish & Durable Daisy Coaster
- Yarn Choice: Cotton is paramount for coasters due to its absorbency and heat resistance. Avoid acrylic if you plan to put very hot mugs on it, as acrylic can melt.
- Tension: Aim for consistent, firm tension to create a dense fabric that won’t stretch out easily with use. This is vital for a coaster.
- Puff Stitch Consistency: Try to make your puff stitches uniform in size for neat, even petals.
- Color Play: Experiment with different center colors (brown for a classic look, orange for a more vibrant one). Petals don’t have to be white – try yellow, pink, or light blue for a whimsical daisy!
- Make a Set: Crochet a set of 2, 4, or 6 daisy coasters for a lovely gift set or to brighten your own home.
- Care: Hand wash or machine wash on a delicate cycle with cool water, and lay flat to dry.
You now have a detailed tutorial on how to crochet a delightful and practical daisy flower coaster! Enjoy bringing these little bursts of sunshine to life with your hook and yarn.