by
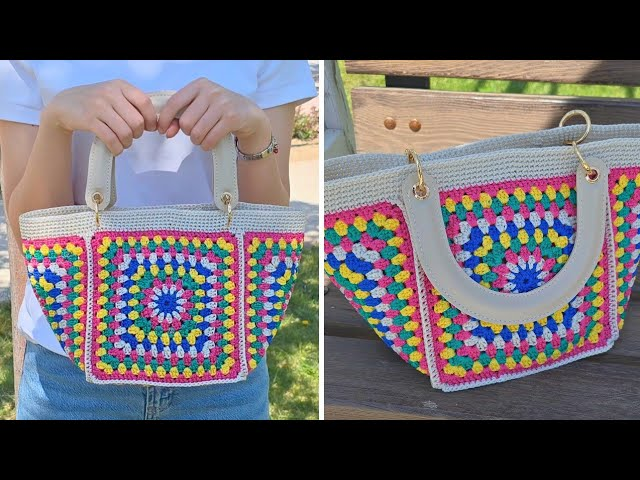
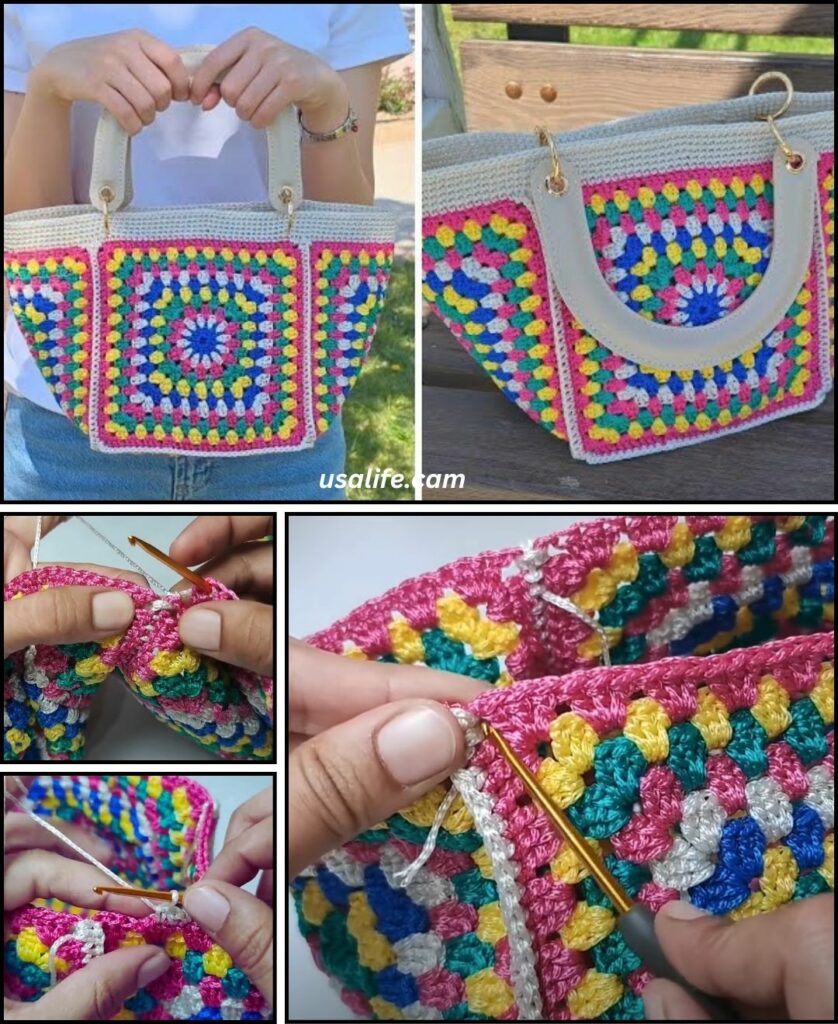
by A crochet granny square bag is a timeless and charming accessory, perfect for adding a touch of handmade style to your outfit or for carrying your essentials. It’s also a fantastic project for using up yarn scraps! Just to clarify, crochet uses a single hook, while knitting uses two needles. This guide will focus entirely on how to crochet a granny square bag.
Given that you’re in Phnom Penh, where it’s warm, 100% cotton yarn or a cotton blend is an excellent choice for a bag. Cotton is durable, has great stitch definition, and is less prone to stretching out of shape compared to some other fibers, especially for a bag that will carry weight. Plus, it’s breathable if you’re carrying items that might need a bit of air circulation.
How to Crochet a Granny Square Bag: A Detailed Tutorial
This guide will walk you through creating a simple, classic granny square bag. The process involves crocheting multiple granny squares, joining them together, and then adding a handle and an optional lining.
1. Essential Materials You’ll Need
- Yarn:
- Fiber: 100% Cotton or a Cotton Blend is highly recommended for durability and shape retention. Acrylic yarn also works well, especially if you want a softer drape.
- Weight: Worsted Weight (Aran / Medium / Category 4) is a great all-rounder for bags. It works up quickly and creates a sturdy fabric. DK (Double Knitting / Category 3) can be used for a smaller, lighter bag.
- Colors: Get creative! You’ll need a main color (for joining and the handle) and several contrasting or complementary colors for the granny squares. This is an ideal project for using up yarn scraps.
- Quantity: This will depend on the size of your bag and squares. For a medium-sized tote, you might need 200-400g of yarn in total.
- Crochet Hook:
- Choose a hook size appropriate for your yarn weight. For Worsted weight, a 4.0mm (US G/6) or 5.0mm (US H/8) hook is common. A slightly smaller hook will create a denser fabric for a sturdier bag, while a larger one will make a looser, more drapey bag.
- Scissors: For cutting yarn.
- Yarn Needle (Tapestry Needle): Absolutely essential for weaving in ends (and there will be many!) and for securely joining your squares.
- Stitch Markers (Optional but helpful): To mark corners or the start of rounds.
- Measuring Tape: To measure your squares and gauge.
- Optional for Lining: Fabric for lining (cotton canvas or linen works well), sewing machine or needle and thread, pins.
- Optional for Handle: D-rings, purse hardware, wooden/bamboo handles (if not crocheting a handle).
2. Basic Crochet Stitches You’ll Use
You’ll need a solid grasp of basic crochet stitches, particularly those used in granny squares:
- Chain (ch): For foundation and chain spaces.
- Slip Stitch (sl st): For joining rounds.
- Double Crochet (dc): The primary stitch for granny squares, forming the “clusters.”
- Magic Ring (MR) / Adjustable Ring: (Optional but recommended) For a tight, hole-free center. Alternatively, a
ch 4, sl st to joinring can be used.
The Classic Granny Square Pattern
This is the fundamental building block of your bag. You’ll make multiple copies of this.
Abbreviations (US Crochet Terms):
- ch: chain
- sl st: slip stitch
- dc: double crochet
- sp: space
- MR: magic ring
(...): work stitches into the same stitch or space[...]: repeat instructions in brackets
Step 1: Crocheting Your Granny Squares
Make as many squares as you need for your desired bag size. A good starting point for a simple tote might be 13 squares (9 for the body, 4 for the bottom).
To Make One Granny Square:
- Start: With Color 1, create a Magic Ring (MR).
- (Alternatively: Ch 4, sl st into the 1st ch to form a ring.)
- Round 1: Ch 3 (counts as 1st dc). Work 2 dc into the ring.
*Ch 2 (this creates a corner space). Work 3 dc into the ring.*Repeat from*to*2 more times. Ch 2. Join with a sl st to the top of the beginning Ch 3. (You should have 4 clusters of 3 dc, separated by ch-2 corner spaces). - Round 2: (Change to Color 2 on the last sl st if desired, or continue with Color 1). Sl st into the first ch-2 corner space. Ch 3 (counts as 1st dc). Work (2 dc, ch 2, 3 dc) all into the same ch-2 corner space.
*Ch 1 (this creates a side space). In the next ch-2 corner space, work (3 dc, ch 2, 3 dc).*Repeat from*to*2 more times. Ch 1. Join with a sl st to the top of the beginning Ch 3.
- Round 3: (Change to Color 3 on the last sl st if desired). Sl st into the first ch-2 corner space. Ch 3 (counts as 1st dc). Work (2 dc, ch 2, 3 dc) all into the same ch-2 corner space.
*Ch 1. Work 3 dc into the next ch-1 side space. Ch 1. In the next ch-2 corner space, work (3 dc, ch 2, 3 dc).*Repeat from*to*2 more times. Ch 1. Work 3 dc into the last ch-1 side space. Ch 1. Join with a sl st to the top of the beginning Ch 3.
- Subsequent Rounds (if desired): Continue increasing the size of your square by adding more rounds. Each round, you’ll add
(3 dc, ch 2, 3 dc)in the corner spaces and3 dcinto each ch-1 side space, with ach 1between side groups. - Fasten off, leaving a tail about 6-8 inches (15-20 cm) for weaving in.
- Make Many: Create all the squares you need for your bag. For a simple tote, you’ll generally want 9 squares for the body (3 rows of 3 squares) and 4 for the bottom (2 rows of 2 squares).

Step 2: Planning Your Bag Layout
Before joining, lay out your squares to visualize the bag’s shape.
- Simple Tote Bag (common layout):
- Main Body: 3 rows of 3 squares (total 9 squares). This will form the front, back, and sides of your bag when folded.
- Bottom: 2 rows of 2 squares (total 4 squares). This will be sewn to the bottom edges of the main body.
[SQ] [SQ] [SQ] <-- Top edge of front/back [SQ] [SQ] [SQ] [SQ] [SQ] [SQ] ------ (Bottom edge of body) [SQ] [SQ] <-- Bottom of bag [SQ] [SQ] - Custom Shapes: You can also create rectangular bags (fewer squares wide, more squares tall), or bags with a single front/back panel made of many squares.
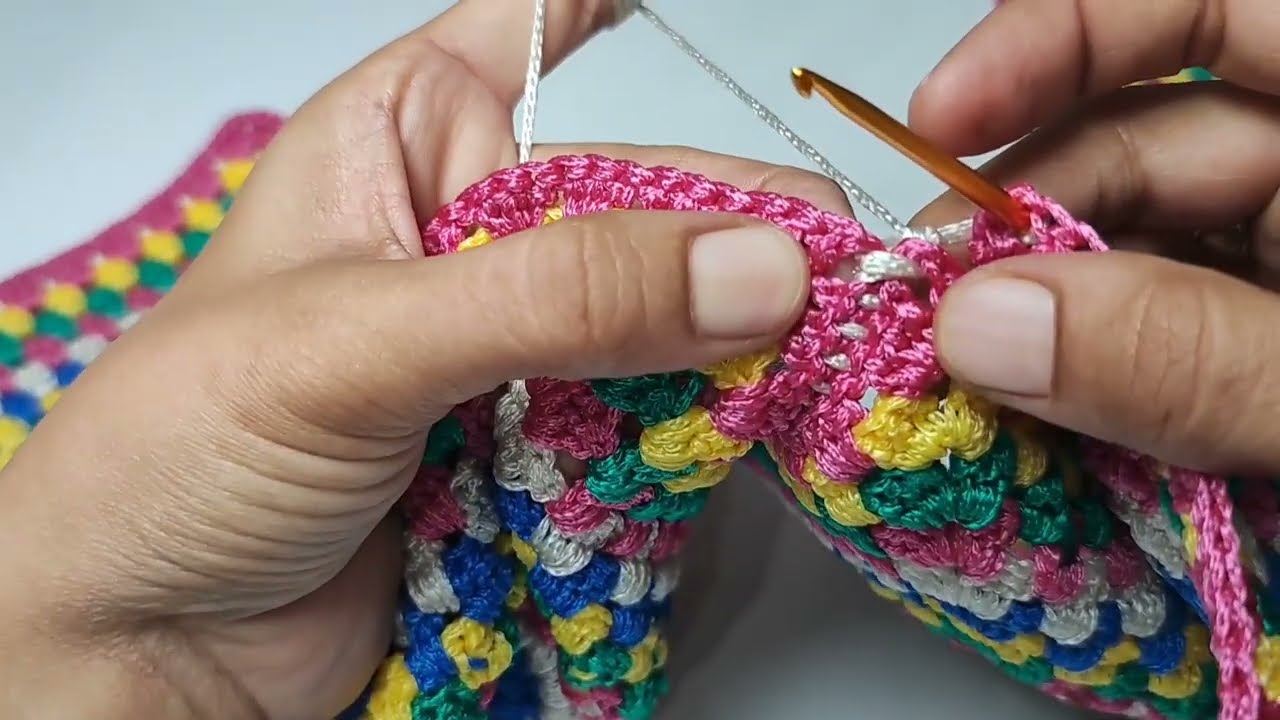
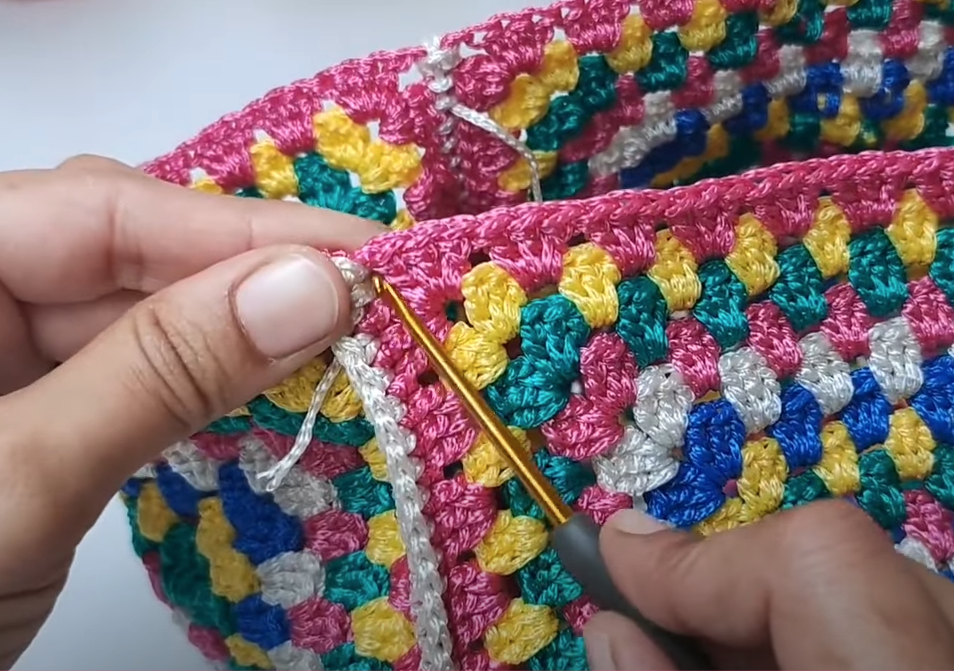
Step 3: Joining Your Granny Squares
This step requires patience but is crucial for a strong, neat bag.
- Weave in ALL ends on each individual granny square before joining. This makes the finished bag much neater.
- Joining Method (Choose one):
- Whip Stitch (with yarn needle): Creates a neat, almost invisible seam. Line up two squares, wrong sides together, and whip stitch through the back loops of both squares.
- Slip Stitch Join (with crochet hook): Creates a slightly raised, visible ridge. Line up two squares, wrong sides together. Insert hook through loops of both squares, sl st across.
- Single Crochet Join (with crochet hook): Creates a stronger, more pronounced ridge. Work sc stitches through both squares.
- Join-As-You-Go (JAYG): More advanced, but eliminates endless sewing. You crochet the last round of a square and join it to already completed squares simultaneously. This creates a very clean finish but requires careful planning.
- Join the Main Body: Join your 9 squares into a 3×3 grid.
- Join the Bottom: Join your 4 bottom squares into a 2×2 grid.
- Assemble the Bag:
- Fold the 3×3 grid into a tube (the center column of squares forms the front and back, and the outer columns fold to become the sides). Join the vertical seams.
- Attach the 2×2 bottom piece to the bottom edges of the square tube you’ve formed. This is done by sewing/joining all around the perimeter.
Step 4: Finishing the Top Edge
This creates a neat opening for your bag.
- Join your main color yarn (or a complementary color) to any stitch on the top edge of the bag.
- Round 1: Ch 1 (does not count as st). Work 1 sc in each stitch around the entire top opening of the bag. When you reach a joining seam, try to work 1-2 sc over the seam for stability. Join with a sl st to the first sc.
- Round 2-3 (or more): Ch 1, sc in each st around. Join with sl st.
- This creates a sturdy border for your bag’s opening. You can add more rows of sc or even hdc/dc for a wider border.
Step 5: Adding the Bag Handle
This is where your bag becomes functional!
Option A: Crocheted Handles (Recommended for beginners)
- Determine Length: Measure how long you want your handles to be (e.g., 20-24 inches for a shoulder bag, 12-16 inches for a hand-held tote).
- Crochet a Strip: Using your main color yarn:
- Ch a chain slightly longer than your desired handle length (e.g., Ch 80 for a 20-inch handle).
- Row 1: Sc in the 2nd ch from hook and in each ch across.
- Rows 2-5 (or more): Ch 1, turn. Sc in each sc across. (This creates a flat, sturdy strip. For more sturdiness, you can fold this strip in half lengthwise and sew the edges together to make a tube.)
- Fasten off, leaving a long tail for sewing.
- Attach Handles:
- Determine where you want the handles placed on the bag (typically equidistant from the side seams on the front and back).
- Using your yarn needle, securely sew the ends of each crocheted strip to the inside of the bag’s top border. Go through the fabric multiple times for strength.
- Repeat for the second handle.
Option B: Wooden/Bamboo Handles or D-Rings
- Purchase your desired handle hardware.
- Attach to Bag: Follow the instructions that come with your hardware. Often, you will need to crochet around a D-ring or create loops to attach the wooden handle. You can also sew loops of yarn directly onto the bag’s top edge and then thread the hardware through those loops.
Step 6: Optional Lining (Highly Recommended for Durability)
A fabric lining will make your bag much more durable, prevent stretching, and keep small items from falling through stitches.
- Measure Bag: Measure the dimensions of your finished crochet bag (height, width, and depth of the bottom).
- Cut Fabric: Cut fabric pieces to match these dimensions, adding about 1/2 inch (1.25 cm) seam allowance on all sides. You’ll need:
- A rectangular piece for the main body (circumference of bag x height of bag).
- A rectangular piece for the bottom (width of bag x depth of bag).
- Alternatively, cut one large piece that will fold up to form the bag and bottom, and then sew side seams.
- Sew Lining: Sew your fabric pieces together to create a fabric bag shape that matches your crocheted bag. Hem the top edge of the lining.
- Insert and Sew: Insert the fabric lining into your crocheted bag. Pin the top edge of the lining just below the crocheted border. Hand-stitch the lining securely to the inside of the bag using a matching sewing thread and a small, neat running stitch or whip stitch.
7. Finishing Your Crochet Granny Square Bag
- Weave in All Remaining Ends: Double-check every part of your bag for loose yarn tails. Weave them in thoroughly and securely.
- Blocking (Optional but Recommended): For a more structured bag, a gentle steam block or wet block can help even out your stitches and seams. Lay the bag flat, gently shape it, and allow it to dry completely. For a tote, you can even stuff it lightly with towels while drying to help it hold its shape.
You now have a detailed guide on how to crochet a charming and functional granny square bag! Enjoy showing off your beautiful handmade creation.