 by
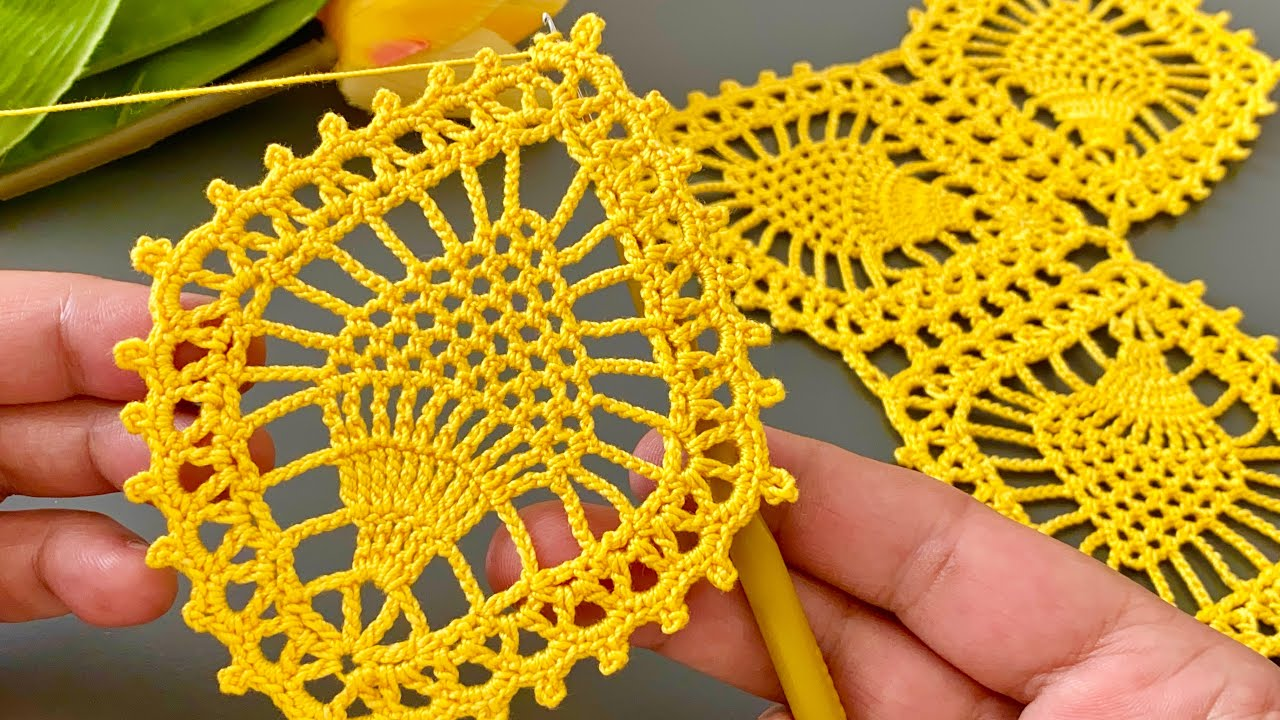
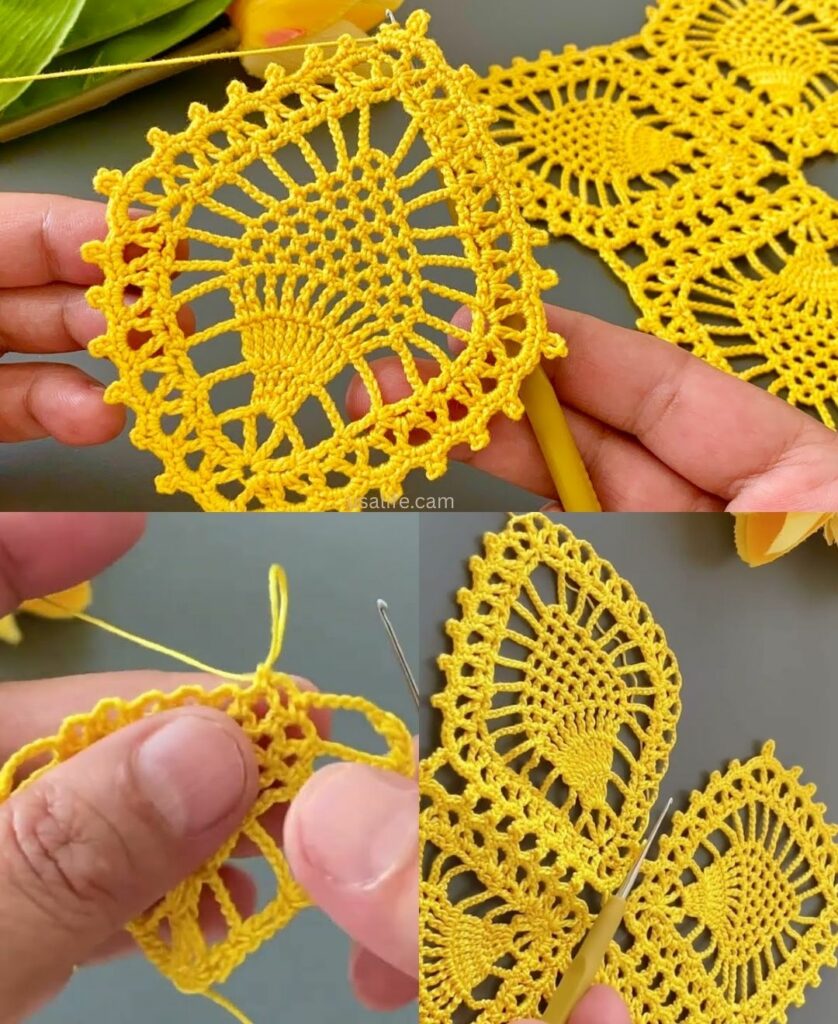
by Crocheting with the Pineapple Motif creates an exceptionally beautiful, intricate lace fabric. This motif is characterized by its expanding and contracting fan or shell structure, perfect for items that require beautiful drape and a delicate look.
Given the warm climate in Phnom Penh, the lace nature of the pineapple motif is ideal, as it offers maximum breathability.

Yarn Selection for Pineapple Crochet
For both a runner (which needs sturdiness) and a blouse (which needs drape):
- Yarn Fiber: 100% Cotton, Cotton/Bamboo Blend, or Linen Blend. These fibers enhance the crispness of the lace and are breathable.
- Yarn Weight: DK (Category 3) or Sport Weight (Category 2) to keep the fabric light and airy.
- Hook Size: Usually 3.5mm to 4.5mm, often slightly larger than suggested to ensure the fabric remains loose and draping.
Understanding the Simple Pineapple Motif Structure
A basic pineapple motif is a large, central shell or fan followed by a contracting mesh section that creates the signature rounded shape.
Key Stitches Used
- Chain (ch), Slip Stitch (sl st), Single Crochet (sc).
- Double Crochet (dc).
- Shell/Fan: A cluster of dc stitches worked into one space.
- Mesh/Lace: Created by alternating
sc(orsl st) andchspaces (ch 3,ch 5, etc.).

1. Pineapple Crochet Simple Runner Tutorial
A simple runner uses the pineapple motif repeated across the width and/or length to create an elegant centerpiece. The key here is maintaining straight edges.
A. Construction Outline (Repeating Motifs Across Width)
- Foundation Chain: Chain the desired length of the runner (e.g., 50–70 inches). This creates your long starting edge.
- Row 1 (Base): Work a simple row of
dcorscacross the entire chain.Ch 3, turn. - Establish Motif Repeat: In the next few rows, establish the sections for each pineapple. The pattern will require a specific multiple of stitches (e.g., multiple of 12 or 16).
- Pineapple Base (Expansion): Work the initial, expanding shell/fan that will form the base of the first pineapple row across the entire width of the scarf. This is the row where the stitch count temporarily increases.
- Mesh Body Rows (Contraction): Work a series of rows using
scandchspaces (e.g.,sc, ch 3, skip 3, sc). These rows are worked only within the established motif sections, and the number of chain loops will decrease with each successive row, creating the rounded, contracting shape of the pineapple body. - Next Pineapple Base (Expansion): Once the mesh is complete and the previous pineapple is fully defined, work the next set of expanding shells/fans, anchoring them neatly at the bottom points of the previous motifs.
- Repeat: Continue alternating between the Mesh Body (Contraction) rows and the Shell Base (Expansion) rows until the runner reaches the desired width.
- Edges and Finishing:
- Long Edges: Add a final straight border (2-3 rows of
sc) along the long side edges to ensure they are even and tidy. - Blocking (Highly Recommended): Pin the runner to its final straight, long dimensions and wet block it. This is essential for opening the lace and making the runner lie perfectly flat.
- Long Edges: Add a final straight border (2-3 rows of

2. Pineapple Crochet Blouse Tutorial
Integrating the pineapple motif into a blouse requires focusing on shaping and drape, making the Top-Down Yoke the best method.
A. Construction Outline (Top-Down Yoke Integration)
Step 1: Yoke Setup (Simple Stitch)
- Gauge: Crucial! Match your gauge to the pattern’s requirements.
- Neckline: Chain for the neckline and work a few starting rows in a simple, stable stitch like
hdcordc. - Yoke Increases: Work the increases (at the four corner points) for the yoke using the simple stitch until the yoke is large enough to drape over the shoulders and reach the armpit. Do not introduce the pineapple lace yet.
Step 2: Integrating the Pineapple Pattern
- First Pineapple Row: Introduce the Shell/Fan base of the pineapple motif across the entire circumference of the yoke, spacing them evenly. This will likely be the row just before the armhole division.
- Division: Divide the yoke for the Body and Sleeves (as detailed in previous general garment instructions). The pineapple motif will now be split between the front, back, and sleeves.

Step 3: Body and Sleeves
- Body (The Tunic Length): Continue working the Mesh Body Rows (Contraction) followed by the New Shell Base (Expansion) in rounds around the body stitches. This will create cascading rows of pineapple lace that flow from the yoke downward.
- Drape: Use a very light yarn (Sport Weight) to ensure the multiple layers of the pineapple lace don’t feel too heavy.
- Sleeves: Rejoin yarn at the underarm and continue the pineapple pattern in rounds on the sleeve stitches. The open lace is perfect for airy summer sleeves.
Step 4: Finishing
- Edges: Finish the neckline, sleeve cuffs, and bottom hem with a simple, solid border of
scorsl st. - Blocking (Critical): Wet block the finished garment. Pin out the pineapple lace motifs gently but firmly to open the lace and set the beautiful drape of the blouse/tunic.
Essential Tips for Pineapple Crochet
- Count Every Chain: Pineapple patterns are precise. If you miss a chain in the mesh section, the motif will collapse or pucker. Count the chains and the loops in every mesh row.
- Loose Tension on Chains: Keep the chains in the mesh section loose! If they are tight, the pattern will curl and will not open up properly, even with blocking.
- Smooth Yarn: Use smooth cotton or acrylic. Fuzzy yarn (like mohair) hides the intricate detail of the lace, which is the whole point of the pineapple pattern.
Video tutorial: