by
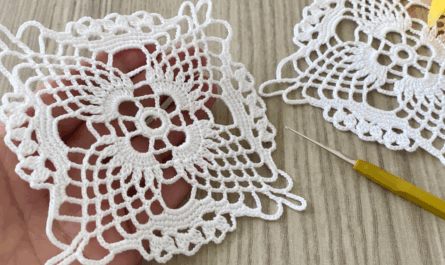
by To make a Unique Square Motif, you must move away from standard repetitive stitches and incorporate architectural depth. We will design a motif I call the “Celestial Compass Square.”
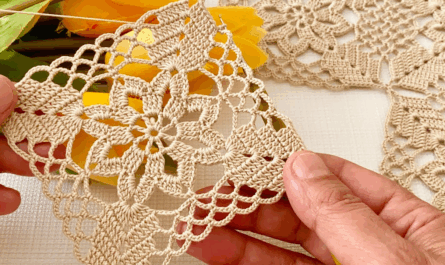
This design is unique because it uses layered heights—it starts as a thick, 3D textured circle and “breaks” into a square using long-post stitches. It is sturdy enough for home decor but intricate enough for high-fashion garments.

I. The Technical “Blueprint”
- Unique Feature: The “Floating Frame.” The corners are not just increases; they are independent pillars that make the center “star” look like it is suspended.
- Yarn Choice: Use a Multi-strand or Twisted Cotton. Avoid fuzzy wool, as it hides the intricate stitch definition.
- Hook: Use a hook that is slightly smaller than the yarn suggests (e.g., 3.5mm for a yarn that suggests 4.0mm) to ensure the 3D elements don’t sag.
II. The Celestial Compass Pattern
Round 1: The Sun (The 3D Core)
- Magic Ring: Ch 2 (counts as 1st hdc).
- Work 11 hdc into the ring. Sl st to join.
- Detail: Pull the ring as tight as possible so there is zero “eye” in the center. (12 sts).
Round 4: The Solar Flares (Texturing)
- Ch 1. In the first stitch, work a Puff Stitch (Yarn over, pull up a loop 3 times, pull through all loops).
- Ch 1.
- Repeat [Puff Stitch, Ch 1] in every stitch around.
- Sl st to join. (12 Puffs).
- Why this is unique: Most squares use flat stitches here; the Puff adds immediate 3D luxury.
Round 3: The Geometric Bridge
- Sl st into the first ch-1 space.
- Ch 3 (counts as dc). Work 2 dc in the same space.
- Ch 1.
- Work 3 dc in the next ch-1 space.
- Repeat [3 dc, ch 1] in every space around. Sl st to join.
- Result: A dense, circular floral shape.

Round 4: The “Compass” Squaring (The Master Row)
This is where we use varying heights to “break” the circle into a square.
- Corner 1: Sl st to a ch-1 space. Ch 5 (counts as a Treble + ch 1). In the same space, work (3 tr, ch 2, 3 tr).
- Side 1:
- Ch 1. Skip the 3-dc cluster.
- In the next ch-1 space, work 3 hdc. (This pulls the side down while the trebles keep the corners high).
- Ch 1. Skip the 3-dc cluster.
- Corner 2: In the next ch-1 space, work (3 tr, ch 2, 3 tr).
- Repeat around. Sl st to join.
III. “Detail and Detail”: Creating the Unique Look
To ensure your motif doesn’t look like a store-bought pattern, apply these three Designer Details:
1. The “Back-Post” Shadow
In Round 5 (if you choose to add a border), work your stitches as BPDC (Back Post Double Crochet).
- Effect: This pushes the edge of the square forward, creating a physical “shadow” around the central star. It makes the motif look like carved stone.
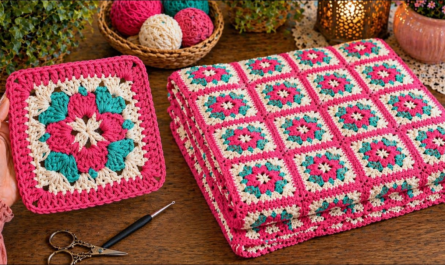
2. The Color-Melt Technique
- Rounds 1-2: Use a dark color (e.g., Charcoal).
- Round 3: Use a medium color (e.g., Silver).
- Round 4: Use a bright color (e.g., White).
- Result: The motif looks like it is radiating light from the center outward.

3. The “Picot” Points
On the final round, at the very peak of the 4 corners, work a Ch-3 Picot.
- Why: This adds a “sharpness” to the square that makes it look modern and stylish rather than traditional and “cutesy.”
IV. Application for All Projects
| Project | Unique Strategy |
| Multipurpose Runner | Join 12 motifs in a single row. Use a Tapestry Needle to sew them together using the Mattress Stitch so the seam is completely flat for plates/vases. |
| Stylish Blouse | Use a Silk-Linen blend. Join motifs only at the corners (the Picot points). This creates a “diamond” gap between squares, making the blouse airy and avant-garde. |
| Baby Blanket | Work the motif in soft acrylic but use a Jumbo Hook. This makes the “Celestial” center very large and squishy for the baby to touch. |
V. Final Detail: Blocking
Because of the Puff Stitches in Round 2, this square will want to “bowl” (curl inward).
- You must wet-block.
- Pin the corners out strictly.
- Steam the center puffs gently without touching the iron to the yarn.
- Once it cools, the “Unique Square” will stay perfectly flat and professional.

Would you like to see how to adapt this square into a triangle for a matching shawl?