by
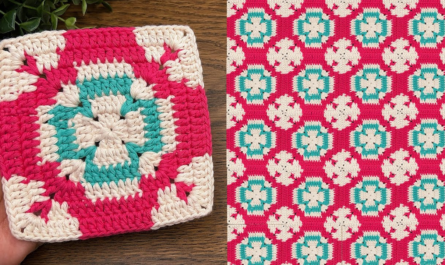
by A 4-row square motif is the “sweet spot” for most crochet projects—it is large enough to show off a pattern but small enough to keep your joins manageable. By the time you reach the fourth row, you have created a stable, geometric square that is ready to be joined into a larger project.
Here is a detailed, step-by-step masterclass on how to construct a perfect 4-Row Solid Square Motif.
🧶 The Foundation
- Stitch Key:
ch(chain),sl st(slip stitch),dc(double crochet). - The Corner Rule: For every row, your corner will consist of
(2 dc, ch 2, 2 dc)to ensure the square stays flat and sharp.
🛠 The 4-Row Construction
Row 1: The Core
- Start:
ch 4, join withsl stto form a ring. - The Start:
ch 3(counts as first dc), work 2 dc into the ring. - The Pattern:
ch 2(corner), work 3 dc into the ring. Repeat 3 times total. - Join:
sl stto the top of the initialch 3.
Row 2: Expanding the Foundation
- Travel:
sl stto the first corner space. - Corner:
ch 3,2 dc,ch 2,3 dc(all in the same corner). - The Side:
ch 1. - The Pattern: In each of the 3 remaining corners, work
(3 dc, ch 2, 3 dc). Remember toch 1between each corner cluster. - Join:
sl stto the top of the initialch 3.

Row 3: Building Density
- Travel:
sl stto the first corner. - Corner:
ch 3,2 dc,ch 2,3 dc(in corner). - The Side:
ch 1. Work a cluster of 3 dc into the side space (the gap created by thech 1in Row 2).ch 1. - The Pattern: Repeat
(3 dc, ch 2, 3 dc)in corners and3 dcin side spaces, withch 1between clusters. - Join:
sl stto the top of the initialch 3.
Row 4: The Final Frame
- Travel:
sl stto the first corner. - Corner:
ch 3,2 dc,ch 2,3 dc(in corner). - The Sides:
ch 1. Work 3 dc into each of the two side spaces along the edge.ch 1between each cluster. - The Pattern: Continue around:
(3 dc, ch 2, 3 dc)in every corner and3 dcin every side space. - Join:
sl stto the top of the initialch 3.
📐 How to Achieve the “Pro” Look
1. The Turning Secret
To prevent your square from spiraling as it grows to Row 4, turn your work over after every single row. By alternating the direction you work in, you keep your stitches perfectly vertical, which eliminates the “skewed” look that many beginner squares suffer from.

2. The “Solid” Variation
If you want your 4th row to be completely solid (no holes), modify the final row:
- Instead of
ch 1between side clusters, work 1 dc into every stitch of the clusters below. - This creates a thick, architectural border that makes the square look much more like a high-end tile.
3. Blocking the 4-Row Motif
A 4-row square is lightweight and susceptible to stretching. Blocking is essential.
- The Method: Once Row 4 is finished, pin it to a blocking board, pulling the corners into a perfect 90-degree angle.
- The Set: Lightly steam it with an iron (holding it 2 inches away from the surface). This relaxes the yarn fibers and “locks” the square into its final, permanent size.
💡 Creative Idea: The “Color-Frame” Motif
To make these 4-row squares stand out, try this color sequence:
- Row 1: Bright color (The heart).
- Row 2: Neutral color (The transition).
- Row 3: Bright color (The detail).
- Row 4: Dark/Contrasting color (The frame). By using a dark, solid color for the 4th row, you create a “graphic” look that makes your squares look like modern art when joined together.

Would you like me to suggest a layout guide for joining these 4-row squares into a specific project, such as a tote bag or a baby blanket?