 by
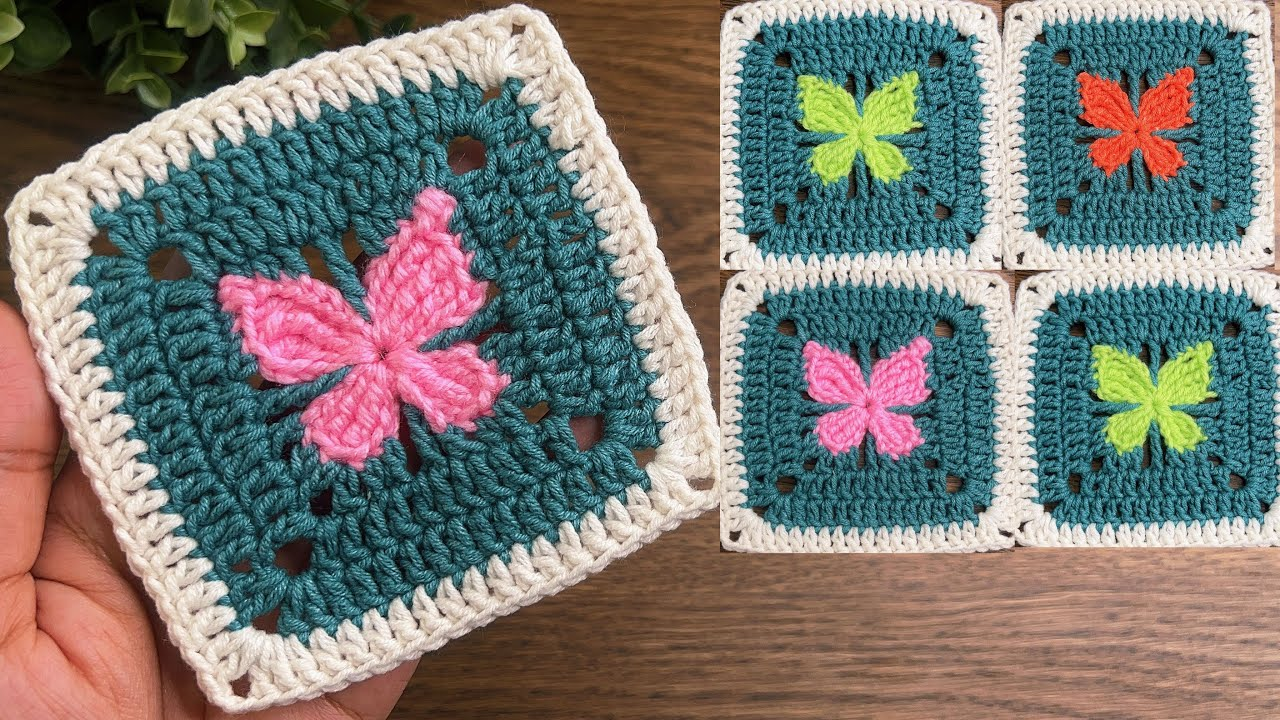
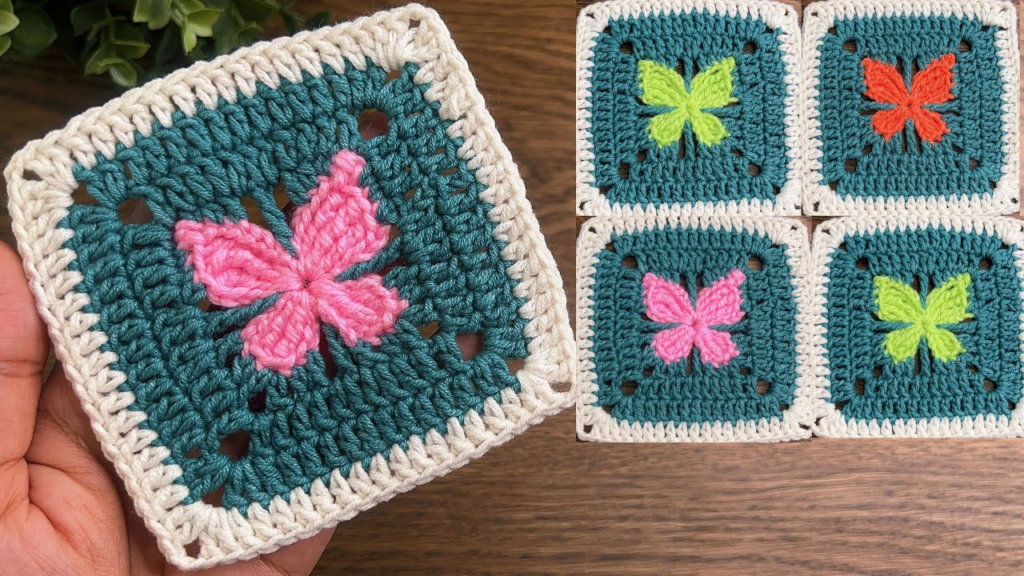
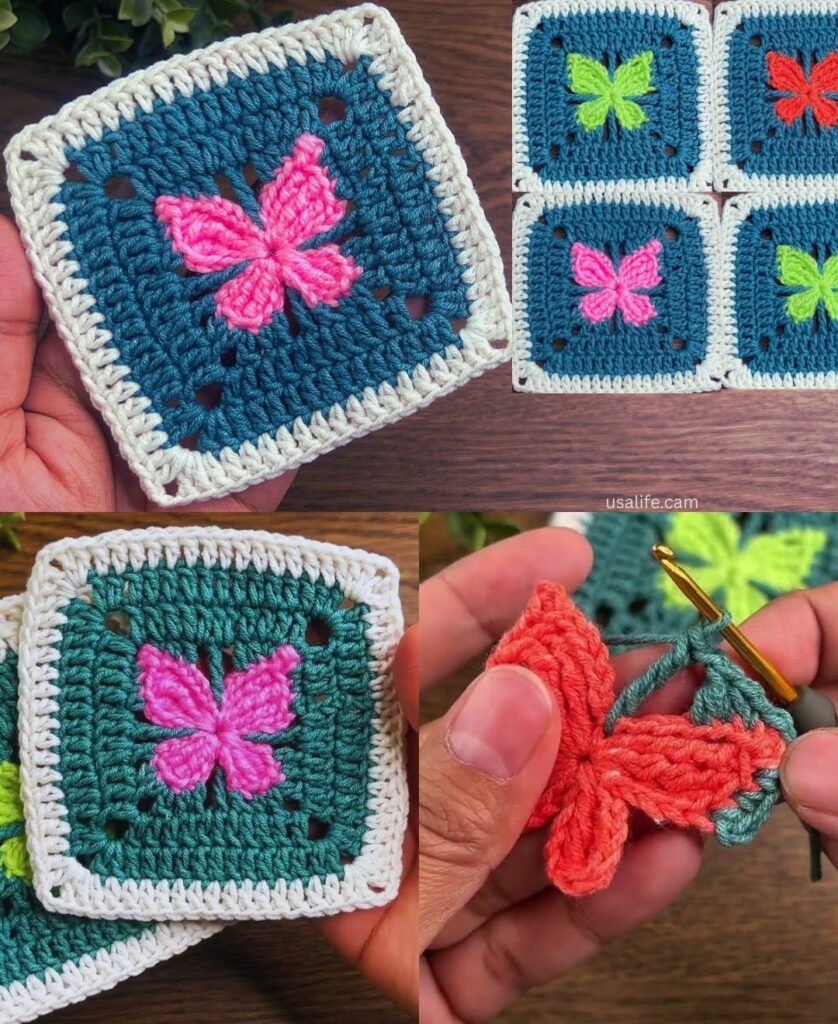
by Creating a Granny Square Butterfly is a delightful project. Instead of a traditional square, you will crochet a center “body” and then add “wings” that resemble the shape of a butterfly.
This tutorial breaks it down into very easy steps that even a beginner can follow.
🧶 The Butterfly Toolkit
- Yarn: Two contrasting colors. Use one color for the Body/Center (e.g., Brown or Black) and one for the Wings (e.g., Bright Yellow, Pink, or Blue).
- Hook: 4.0 mm or 5.0 mm.
- Stitch Key (US Terms):
- ch: Chain
- sl st: Slip Stitch
- sc: Single Crochet
- dc: Double Crochet
- tr: Treble Crochet (Yarn over twice before inserting hook)
🛠 The Step-by-Step Guide
Part 1: The Body (Color A)
- Start:
ch 6and join with asl stto form a small ring. - The Middle:
ch 3(counts as first dc), work 15 dc into the ring. - Join:
sl stto the top of thech 3. Fasten off and weave in your ends. You now have a solid circle—this is the center of your butterfly.

Part 2: The Wings (Color B)
We will create four “petals” or wings around this center circle.
- Attach Color B: Join your second color into any stitch of the circle with a
sl st. - Wing 1 (Top Left):
ch 3, work 3 dc into the same stitch, thench 3andsl stinto the same stitch. - Wing 2 (Top Right): Move to the next stitch,
ch 3, work 3 dc into the same stitch,ch 3andsl stinto the same stitch. - Wing 3 (Bottom Right): Move to the next stitch,
ch 4, work 3 tr (treble crochet) into the same stitch,ch 4andsl stinto the same stitch. - Wing 4 (Bottom Left): Move to the next stitch,
ch 4, work 3 tr into the same stitch,ch 4andsl stinto the same stitch.

Note: By using
dcfor the top wings andtrfor the bottom wings, you naturally create the larger shape of a butterfly!
Part 3: The Finishing Touches
- Fasten off: Leave a long tail of yarn (about 8 inches).
- The Antennae: Take that long tail and wrap it tightly around the middle of the butterfly, pulling it slightly to “pinch” the center. This gives the butterfly its iconic shape.
- Tie: Secure the yarn at the back with a double knot. If you want, you can leave two small loops of the yarn sticking out at the top to act as antennae.

✨ How to Turn it into a Granny Square
If you want to place this butterfly inside a granny square to use in a blanket:
- The Frame: Once your butterfly is finished, use your “Frame” color (a neutral like cream or white) to crochet around the butterfly.
- The Technique: You will crochet into the “gaps” created by the chain spaces of the wings. Simply work a round of
dcclusters(3 dc, ch 1)around the butterfly until you have created enough space to form a square shape. - Blocking: Because the butterfly has different heights (the shorter dc wings vs. the taller tr wings), it will look a bit wrinkled. Steam blocking is essential here. Pin the four corners of your “Butterfly Square” to a mat and steam it flat. This will make the wings pop out and look professional.
💡 Beginner Tips for Success
- Don’t worry about perfection: Butterfly wings in nature aren’t perfectly symmetrical, and yours don’t have to be either!
- Use stitch markers: If you find it hard to see which stitch to work into next, place a stitch marker in the first stitch of every wing so you don’t lose your place.
- Pinch it: The “pinching” in Part 3 is the most important step—don’t be afraid to pull that center yarn tail tight to define the head and wings!
Would you like to try making a few of these to join into a blanket, or would you like to know how to add a border to make them into individual hanging ornaments?