by
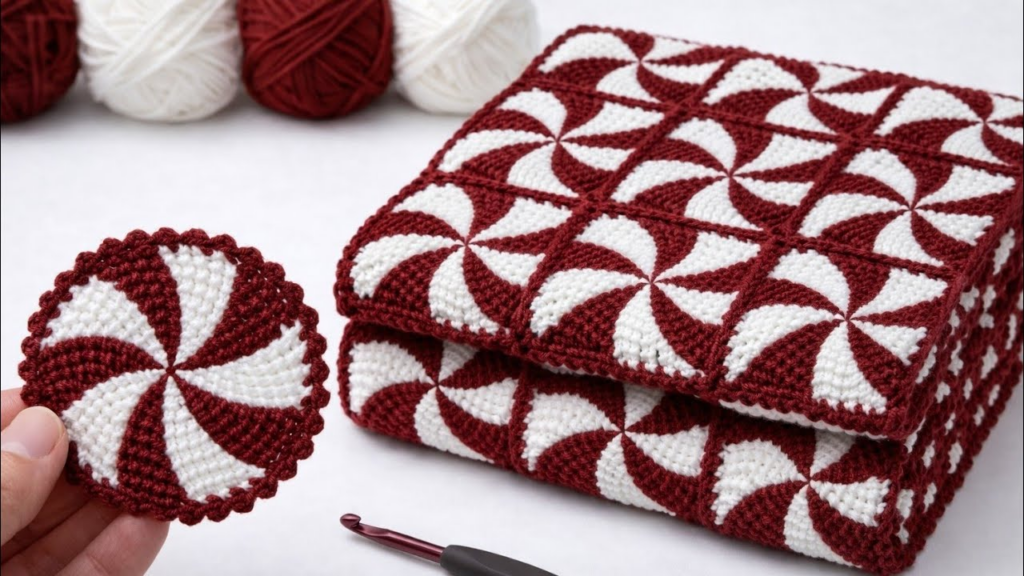
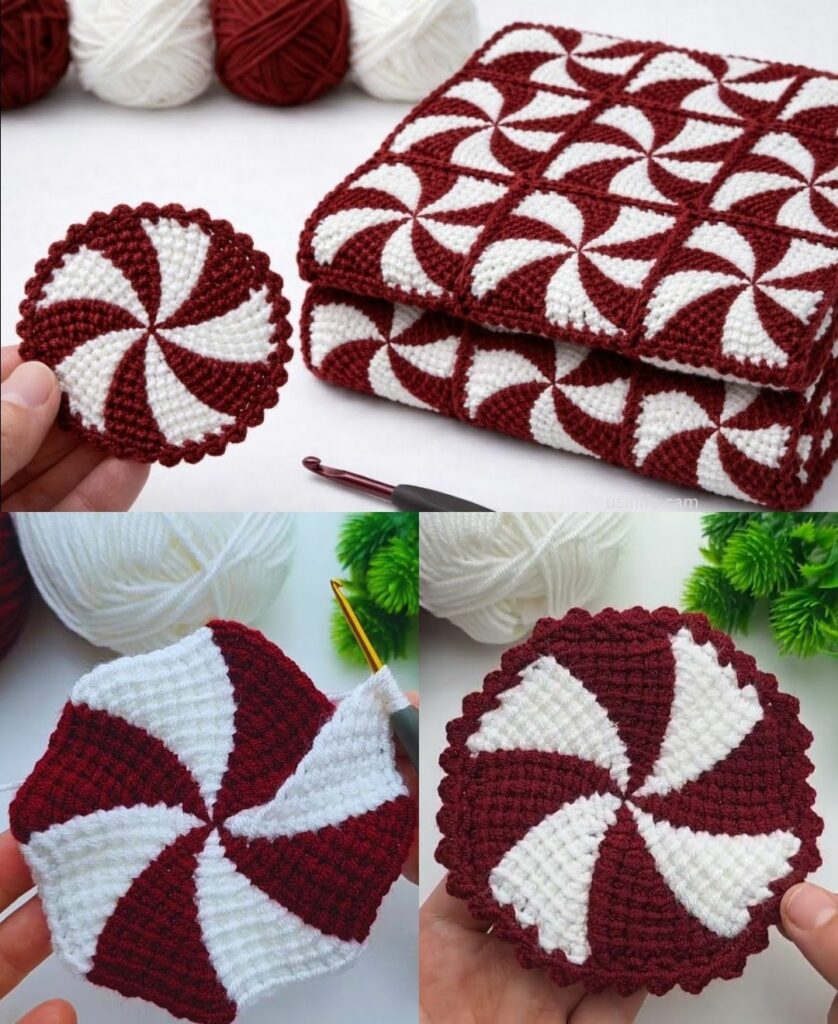
by The Pinwheel Motif is a mesmerizing design that creates a sense of movement. Because the stitches are worked in a spiral-like fashion, it creates a “swirl” effect that looks like a spinning wheel. It is a fantastic project for both beginners and experienced crocheters because it is simple to construct but visually complex.
Here is your detailed guide to crafting this dynamic motif.
🧶 The Pinwheel Toolkit
- Yarn: A medium-weight (DK or Worsted) cotton or acrylic. If you want the “swirl” to really pop, use two contrasting colors: a Light/Bright color for the center pinwheel and a Neutral/Dark color for the frame.
- Hook: 4.0 mm – 5.0 mm.
- Stitch Key (US Terms):
- ch: Chain
- sl st: Slip Stitch
- sc: Single Crochet
- dc: Double Crochet
- tr: Treble Crochet (Yarn over twice before inserting hook)

🛠 The Step-by-Step Instructions
Part 1: The Pinwheel Center (Color A)
- The Ring:
ch 6, join withsl stto form a ring. - The “Arms” (The Swirl):
ch 10(this long chain creates the first arm).- Work 1
scin the 2nd chain from hook, then1 hdc,1 dc,3 tr,1 dc,1 hdc,1 scback down the chain. sl stinto the ring to secure the arm.
- Repeat: Repeat this process 7 more times until you have 8 arms radiating from the center.
- Join:
sl stinto the base of the first arm and fasten off.
Part 2: The Square Frame (Color B)
This is where you turn your swirly star into a square.
- Attach: Join your Frame color in the tip of any “arm.”
- The Corner:
ch 3(counts as firstdc),2 dcin the tip of the arm,ch 2,3 dcin the same tip. - The Side:
ch 1. Work3 dcinto the space between the arms of the pinwheel.ch 1. - The Pattern: Continue working
(3 dc, ch 2, 3 dc)in every other arm tip (for the 4 corners) and3 dcin the remaining arm tips (for the side gaps). - Join:
sl stinto the top of the initialch 3.

🌟 Design Tips for Professionals
- For Coasters: Use 100% Cotton yarn. Acrylic will melt if a hot mug is placed on it. Cotton is heat-resistant and durable. Keep your tension tight so the coaster is firm and doesn’t wobble.
- For Blankets: If you are joining these into a blanket, do not over-stuff the squares. The pinwheel center is already textured; keep the frame simple so the “swirl” remains the star of the show.
- The “Double-Sided” Trick: If you want your coaster to be reversible, make two identical pinwheel motifs. Place them back-to-back and use a
sl stto join them around the entire edge. This hides all your yarn tails and gives you a thick, professional-grade coaster.

💡 Pro-Blocking Technique
The pinwheel is a very structural motif. If you don’t block it, the arms will tend to twist or curl.
- The Technique: Pin the center of the pinwheel, then stretch each of the 8 arms out symmetrically.
- The Steam: Use a steamer to relax the yarn while it is stretched.
- The Result: When you remove the pins, the “swirl” will lay flat, and your square will be perfectly geometric, making it infinitely easier to join to other motifs.
📏 Size Variations
- Mini Pinwheel: Use a smaller hook (3.0 mm) and embroidery thread for delicate decorative accents or jewelry.
- Jumbo Pinwheel: Use a bulky weight yarn and an 8.0 mm hook to create a large-scale, modern pinwheel pillow cover.
Would you like me to explain how to join these into a continuous blanket, or would you like to know how to create a “leaf” border to make the pinwheel look like a flower?