by
by That’s a beautiful request! Combining the geometric structure of a Hexagon with a soft Flower Motif creates an elegant and highly versatile design, perfect for joining into blankets, runners, or garments.
I will detail a tutorial for the Starburst Flower Hexagon Motif, which uses textured stitches and strategic color changes (if desired) to make the flower visually pop while maintaining the six-sided structure.

🌻 Gorgeous Starburst Flower Hexagon Motif Tutorial
This pattern starts with a raised, dimensional flower center and then transitions into the sharp, defined six-sided hexagon frame.
Materials You’ll Need
- Yarn: DK (Size 3) or Medium Weight (Worsted/Size 4).
- Color A (Flower Center): Yellow or contrasting color.
- Color B (Petals): Main flower color.
- Color C (Frame): Green or background color.
- Crochet Hook: The size appropriate for your yarn (e.g., 4.0 mm – 5.0 mm).
- Scissors, Tapestry Needle.
Key Crochet Terms
| Abbreviation | Stitch Name |
| ch | Chain |
| sl st | Slip Stitch |
| sc | Single Crochet |
| dc | Double Crochet |
| tr | Treble Crochet |
| FPdc | Front Post Double Crochet |
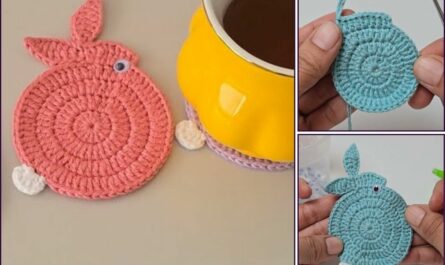
Part 1: The Dimensional Flower Center
Round 1: Foundation (Color A)
- Start: With Color A, make a Magic Ring.
- Base: ch 2 (does not count as st). Work 12 hdc (half double crochet) into the ring.
- Finish: Pull the tail tight. Join with a sl st to the top of the first hdc. (12 sts). Fasten off Color A.

Round 2: Beginning the Petals (Color B)
We start creating the six distinct petals.
- Join: Join Color B into any stitch with a sl st.
- Petal Anchor: ch 1. Work sc in the same stitch.
- Petal: ch 3. Skip 1 stitch.
- Repeat: [sc in the next st, ch 3, skip 1 st] 5 more times. (6 ch-3 loops).
- Finish: Join with a sl st to the first sc.
Round 3: Dimensional Petals (Color B)
We fill the ch-3 loops with tall stitches to create the dimensional flower shape.
- sl st into the first ch-3 loop.
- First Petal: Work [sc, hdc, dc, tr, dc, hdc, sc] into the same ch-3 loop.
- Anchor: Work sl st into the next sc anchor stitch.
- Repeat: Work [Shell (sc, hdc, dc, tr, dc, hdc, sc) into the next ch-3 loop, sl st into the next sc anchor] 5 more times. (6 finished dimensional petals).
- Finish: Join with a sl st to the base of the first petal. Fasten off Color B.

Part 2: Squaring the Hexagon Frame
Round 4: Establishing the Hexagon Sides (Color C)
We use single crochet and chain loops to define the six straight sides around the dimensional flower.
- Join: Join Color C into the tr (tallest stitch) of any petal with a sl st.
- Corner Space: ch 3.
- Side Edge: Work sc into the sl st between the two petals.
- Corner Space: ch 3.
- Repeat: [sc into the tr (peak) of the next petal, ch 3, sc into the sl st between the petals, ch 3] 5 more times. (12 ch-3 loops).
- Finish: Join with a sl st to the first sc.
Round 5: Building the Granny Hexagon Structure (Color C)
We fill the ch-3 spaces with double crochet clusters, which is the classic way to build a hexagonal granny frame.
- sl st into the first ch-3 loop. ch 3 (counts as dc). Work 2 dc into the same loop. (First side cluster).
- Corner Shell: ch 2. Work 3 dc into the next ch-3 loop. ch 2.
- Side Cluster: Work 3 dc into the next ch-3 loop.
- Repeat: Continue the sequence: [ch 2, 3 dc in next loop, ch 2, 3 dc in next loop] 5 more times. (This creates 6 sides separated by ch-2 corner spaces).
- Finish: Join with a sl st to the top of the beginning ch 3.

Round 6: Final Frame
This round expands the hexagon and makes the edges clean for joining.
- Move to Corner: sl st over to the next ch-2 corner space.
- Corner: ch 3 (counts as dc). Work (2 dc, ch 2, 3 dc) into the corner space.
- Side: ch 1. Work 3 dc into the next ch-2 side space. ch 1.
- Repeat: Work the sequence [Corner Shell (3 dc, ch 2, 3 dc) in the next corner sp, ch 1, 3 dc in the next side sp, ch 1] 5 more times.
- Finish: Join with a sl st to the top of the beginning ch 3. Fasten off.
Final Steps: Blocking
Blocking is vital for this hexagon motif. The dimensional flower center can cause the piece to pucker slightly. Wet the motif, gently shape the center flower, and firmly pin all six corners to create a perfect, flat hexagonal shape. Allow it to dry completely to set the gorgeous final structure.
Video tutorial: