by
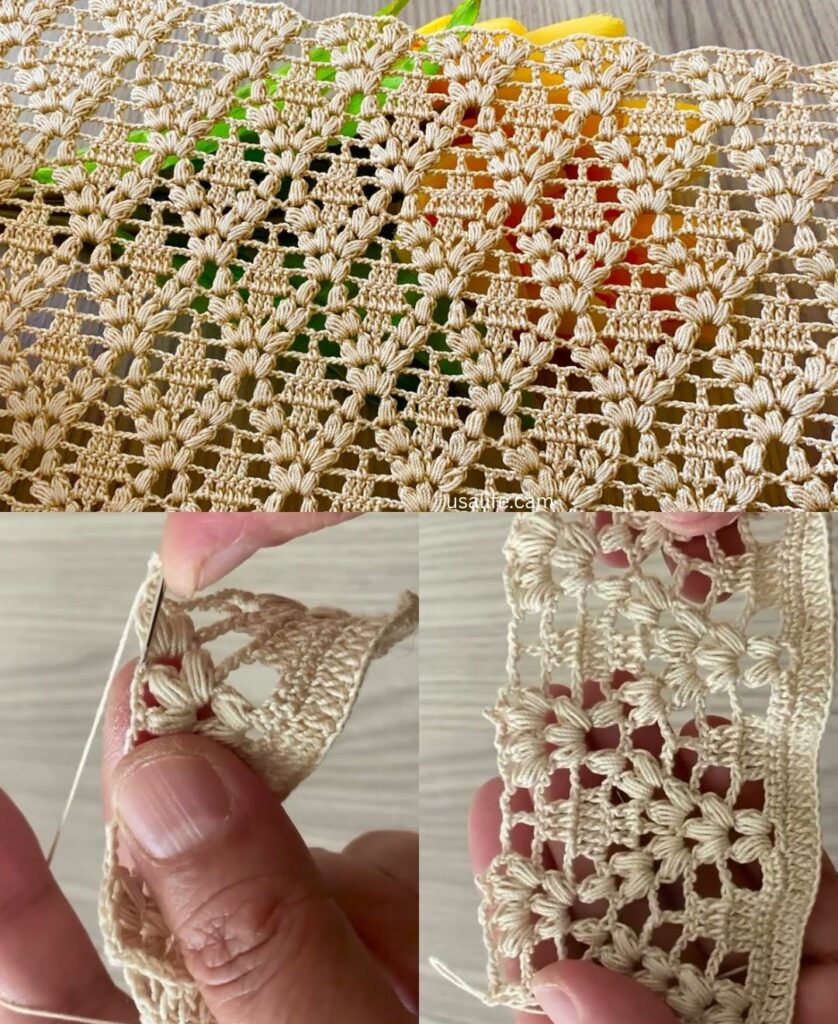
by That is a beautiful and effective technique! Using repeated Cluster or Bobble stitches to create lace fabric results in a stunning, highly textured textile with a geometric, floral-like pattern that pops off the surface. The open lace quality comes from strategically placing chain spaces around these textured elements.
I will detail a step-by-step tutorial for the “Puffy Star Flower Lace,” a fabric pattern that uses the 4-DC Cluster (a common cluster variation) to create a repeating floral element framed by airy chain spaces.

🌟 Puffy Star Flower Lace Fabric Tutorial
This pattern uses a two-row repeat to build the textured fabric.
Materials You’ll Need
- Yarn/Thread: DK (Size 3) or Sport Weight yarn. A smooth cotton or acrylic blend works best to clearly define the texture.
- Crochet Hook: The size appropriate for your yarn (e.g., 4.0 mm).
- Scissors, Tapestry Needle.
Key Crochet Terms
| Abbreviation | Stitch Name |
| ch | Chain |
| sl st | Slip Stitch |
| sc | Single Crochet |
| dc | Double Crochet |
| Cl | 4-DC Cluster (Special Stitch) |
Special Stitch: 4-DC Cluster (Cl)
This stitch creates the textured “puffy” element.
- (Yarn over, insert hook into stitch/space, yarn over, pull up loop, yarn over, pull through 2 loops) 4 times in the same stitch/space (5 loops on hook).1
- Yarn over and pull through all 5 loops on the hook. Ch 1 to lock the cluster.

Step-by-Step Instructions
Foundation Chain
The repeat for this pattern is a multiple of 5 chains + 1.
- ch a length that is a multiple of 5 (e.g., 30, 40, 50) and then add 1 extra chain. (Example: ch 31).
Row 1: Establishing the Cluster Base
This row sets up the stitches where the clusters will be placed in the next row.
- ch 3 (counts as dc). Work dc in the 4th ch from the hook.
- Work dc in the next 3 chs.
- Lace Space: ch 2. Skip 2 chs.
- Repeat: [dc in the next 3 chs, ch 2, skip 2 chs] across the row until you have 4 chs remaining.
- Work dc in the last 4 chs. ch 3 and turn.
Row 2: Placing the Clusters (The Textured Row)
This row creates the dimensional floral-like structure.
- Skip the first dc. Work dc in the next dc.
- Central Cluster: Work Cl (4-DC Cluster) into the next dc stitch.
- Outer Lace: ch 3.
- Anchor: Work sc into the ch-2 space from the previous row.
- Outer Lace: ch 3.
- Repeat: [Skip 2 dc, dc in the next dc, Cl in the next dc, dc in the next dc, ch 3, sc in the ch-2 space, ch 3] across the row until you reach the final block of dc stitches.
- Finish: Skip 2 dc. Work dc in the last dc. Work dc in the top of the beginning ch 3. ch 3 and turn.

Row 3: Positioning for the Next Cluster Row
This row resets the base stitches and spaces the next clusters in the gaps of the previous row to create the offset tile effect.
- Skip the first dc. Work dc in the next dc.
- Work 2 dc into the next ch-3 space.
- Lace Space: ch 2.
- Side: Work dc into the next ch-3 space. Work dc in the next dc.
- Repeat: [2 dc in the next ch-3 space, dc in the sc anchor, 2 dc in the next ch-3 space, ch 2, dc in the next dc] across the row until you reach the end.
- Finish: Work dc in the top of the beginning ch 3. ch 3 and turn.
Repeating the Pattern
- To continue the fabric, alternate between Row 2 and Row 3.
- Row 2 (Cluster Row) is always worked into the base created by Row 3, placing the Clusters over the central dc stitches.
- Row 3 (Base Row) is always worked into the ch-3 loops and sc anchors of Row 2.
Finishing the Fabric
- Final Edge: Once the desired height is reached, finish with a final Row 1 Repeat (dc clusters across the entire top) for a clean, straight edge.
- Blocking: Blocking is highly recommended for this type of patterned lace. It evens out the open chain spaces and forces the bobbles/clusters to truly pop forward, defining the beautiful floral-like texture.
Video tutorial: