by
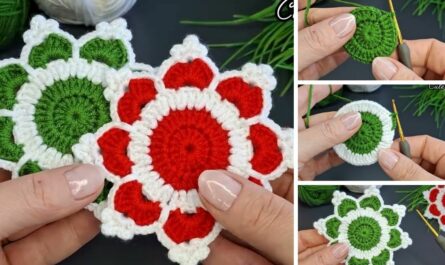
by That is a perfect project for the holidays! A Crochet Snowflake Motif is a beautiful, delicate ornament, and the pattern is built using increases and chain loops to create intricate, geometric points.
Here is a detailed, step-by-step tutorial for the Classic 6-Pointed Star Snowflake, which is simple enough for a dedicated beginner but yields a stunning, crisp result when blocked.

❄️ Classic 6-Pointed Snowflake Motif Tutorial
This design uses basic single crochet (sc), double crochet (dc), and chain stitches to form the six primary arms and decorative picot points.
Materials You’ll Need
- Thread/Yarn:
- For a stiff, delicate ornament: Size 10 or 20 Mercerized Cotton Thread (White or metallic silver).
- For a soft appliqué: Fine weight yarn (Fingering/Size 1).
- Crochet Hook: A small steel hook appropriate for your thread (e.g., 1.5 mm – 2.5 mm).
- Scissors, Tapestry Needle.
- Stiffening Solution (Essential): Liquid starch, a sugar-water solution, or craft glue mixed with water (necessary for the snowflake to hold its shape).
Key Crochet Terms
| Abbreviation | Stitch Name |
| ch | Chain |
| sl st | Slip Stitch |
| sc | Single Crochet |
| dc | Double Crochet |
| Picot | ch 3, sl st into the first ch |
Export to Sheets
Part 1: The Center Ring and Foundation
Round 1: Foundation (Center)
- Start: Make a Magic Ring (or ch 4, sl st to join).
- Base: ch 2 (does not count as st). Work 12 sc into the center ring.
- Finish: Pull the tail tight. Join with a sl st to the first sc. (12 sts).

Round 2: Creating the Spokes
We establish the six spokes that will form the arms of the snowflake.
- ch 3 (counts as dc). Work dc in the same st.
- Spoke Loop: ch 3. Skip 1 stitch.
- Repeat: [2 dc in the next st, ch 3, skip 1 st] 5 more times. (6 sets of 2 dc, 6 ch-3 loops).
- Finish: Join with a sl st to the top of the beginning ch 3.
Part 2: Building the Six Arms
Round 3: First Layer of Arms
This round locks the spokes and begins to lengthen the arms.
- sl st into the next dc. ch 1. Work sc in the same dc.
- Arm Base: ch 3.
- Center Point: Work sc, Picot, sc into the ch-3 loop.
- Arm Base: ch 3.
- Anchor: Work sc into the second dc of the next 2-dc cluster.
- Repeat: [ch 3, sc Picot sc in the ch-3 loop, ch 3, sc in the second dc of the next cluster] 5 more times.
- Finish: Join with a sl st to the first sc.
Round 4: Final Decorative Points
We add a longer chain loop to the side of the arm and define the final points.
- sl st into the first ch-3 loop. ch 1. Work sc in the loop.
- Outer Loop (Side): ch 5. Work sc into the Picot peak.
- Decorative Peak: ch 3, sl st into the 3rd ch from the hook (creates a small Picot).
- Arm Tip: ch 4, sl st into the 4th ch from the hook (creates a longer Picot for the tip).
- Decorative Peak: ch 3, sl st into the 3rd ch from the hook (creates the second small Picot).
- Outer Loop (Side): ch 5. Work sc into the next ch-3 loop.
- Anchor: Work sc into the next sc anchor stitch (between the arms).
- Repeat: Continue the entire sequence [sc in ch-3 loop, ch 5, sc in Picot peak, Picot 3-ch, Picot 4-ch, Picot 3-ch, ch 5, sc in ch-3 loop, sc in anchor] 5 more times.
- Finish: Join with a sl st to the first sc. Fasten off.

Final Step: Stiffening and Shaping (Essential)
A crochet snowflake will not look crisp and defined without proper stiffening and blocking.
- Preparation: Mix your stiffening solution (e.g., liquid starch, or 1 part craft glue to 1 part water).
- Soak: Submerge the finished snowflake completely in the solution. Gently squeeze out the excess (do not twist or wring).
- Pinning: Lay the damp snowflake on a blocking mat or piece of Styrofoam. Crucially, pin every single point (the six long Picots) firmly outward, ensuring the snowflake is perfectly symmetrical. Pin the center gently.
- Dry: Allow the snowflake to dry completely (usually 12–24 hours, depending on the solution and humidity).
- Remove: Carefully remove the pins. The snowflake will now hold its beautiful, crisp shape.

Your gorgeous 6-Pointed Snowflake is ready to hang for Christmas!
Video tutorial: