by
by Gemini said
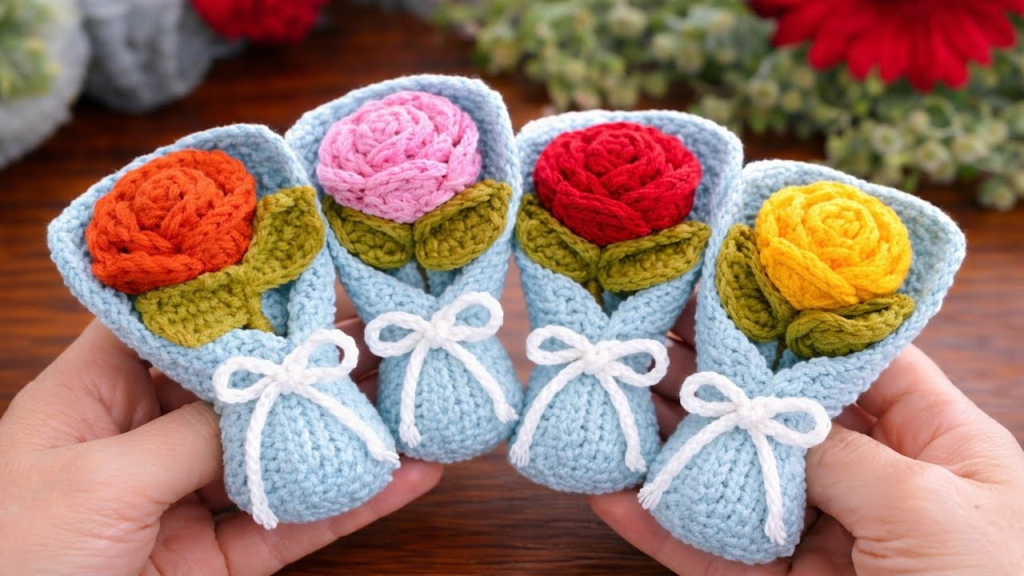
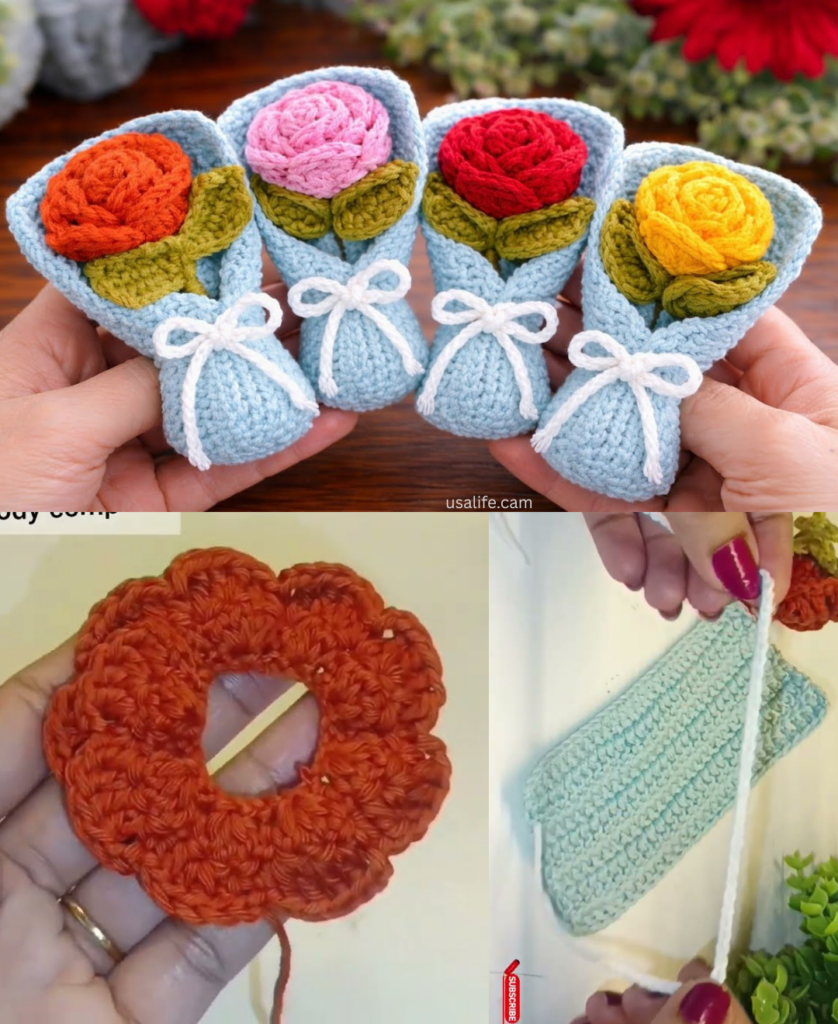
The beauty of a Mini Crochet Rose Bouquet is that it offers the elegance of a floral arrangement without the tragedy of wilting. These are perfect for wedding favors, tiered tray decor, or a “just because” gift that lasts forever.
To make a rose “mini,” we use a linear construction method—crocheting a flat, scalloped ribbon and rolling it into a bud.
🧶 The Mini Bouquet Supply List
Since we are aiming for “mini,” your yarn choice is the most important factor. Using bulky yarn will result in a “cabbage” rather than a rose.
| Item | Recommendation | Why? |
| Yarn | Size 10 Cotton Thread or Fingerweight (Weight 1-2) | Creates crisp, tiny petals that hold their shape. |
| Hook | 1.75 mm – 2.25 mm | Keeps the tension tight so the “flower” doesn’t look floppy. |
| Stems | 20-22 Gauge Floral Wire | Thin enough to be delicate, strong enough to support the head. |
| Extras | Green Floral Tape & Hot Glue | For a professional, seamless stem finish. |

🛠 Step 1: The Rose “Ribbon” Pattern
This pattern creates a single mini rose. Repeat this 3 to 5 times for a small bouquet.
Stitch Key (US Terms)
- ch: Chain
- sc: Single Crochet
- dc: Double Crochet
- sl st: Slip Stitch
Instructions
- The Foundation: ch 26.
- Row 1: sc in the 2nd ch from hook and in each ch across. ch 1, turn. (25 sc).
- Row 2 (The Arches): [ch 2, skip 1 stitch, sc in the next] repeat across. ch 1, turn.
- Row 3 (The Petals): In each ch-2 loop across, work: (sl st, sc, 3 dc, sc, sl st).
- Finish: Fasten off, leaving a 10-inch tail for sewing.
Insight: If you want the rose to look “opening” (more realistic), work 2 dc in the first three loops, 3 dc in the middle loops, and 4 tr (treble crochet) in the last three loops.
🛠 Step 2: Rolling and Sculpting
This is where the magic happens. Your flat strip of lace is about to become a 3D flower.
- The Center: Take the end where you started your chain. Roll it tightly into a small cylinder. This is the “heart” of the rose.
- The Spiral: Continue wrapping the ribbon around the center, keeping the bottom edges aligned. Wrap a bit more loosely as you move outward to let the petals “bloom.”
- The Secure: Thread your long yarn tail into a tapestry needle. Sew through the bottom layers (the foundation chain) multiple times in a “star” pattern to lock all the layers together.

🛠 Step 3: The Stem and Calyx (Optional but Recommended)
A rose looks unfinished without the little green leaves at the base (the calyx).
- Calyx: In green yarn, make a Magic Ring. Work 5 sc into the ring. In the next round, work [ch 4, sl st in 2nd ch from hook, sc in next, hdc in next, sl st back into the ring] 5 times.
- The Wire: Take your floral wire and poke it through the center of the calyx and into the bottom of the rose.
- The Glue: Add a tiny drop of hot glue to the bottom of the rose where the wire enters. Slide the calyx up so it hugs the bottom of the flower.
- The Wrap: Wrap the wire stem with green floral tape (or green yarn) from top to bottom.

💐 Step 4: Finishing Your Bouquet
- Vary the Heights: When bundling your roses, cut the wires at slightly different lengths. This creates a more natural “dome” shape.
- Add “Baby’s Breath”: Crochet tiny white “dots” (Magic ring, 4 sc, close) and attach them to thin wires to fill the gaps between roses.
- The Wrap: Wrap the bundle of stems in a small piece of brown kraft paper or a lace doily and tie it with a twine bow.
💡 Quick Wit Tip for Beginners
“If your first rose looks more like a colorful cinnamon roll than a flower—don’t panic. Simply roll it tighter next time. In the crochet world, there are no mistakes, only ‘unique botanical variations.'”
Would you like me to provide a pattern for a tiny “Green Leaf” to add some foliage to your bouquet?