by
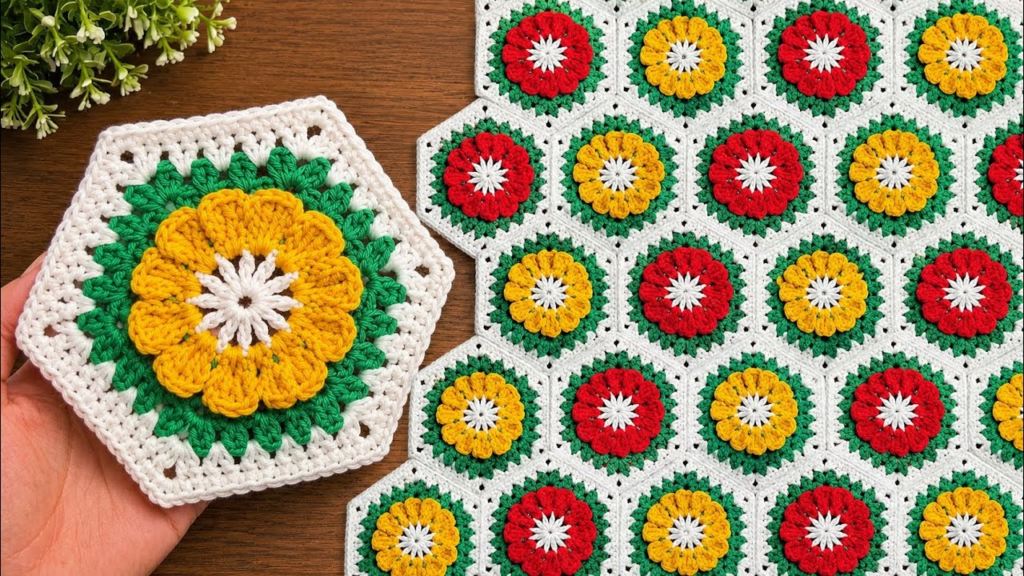
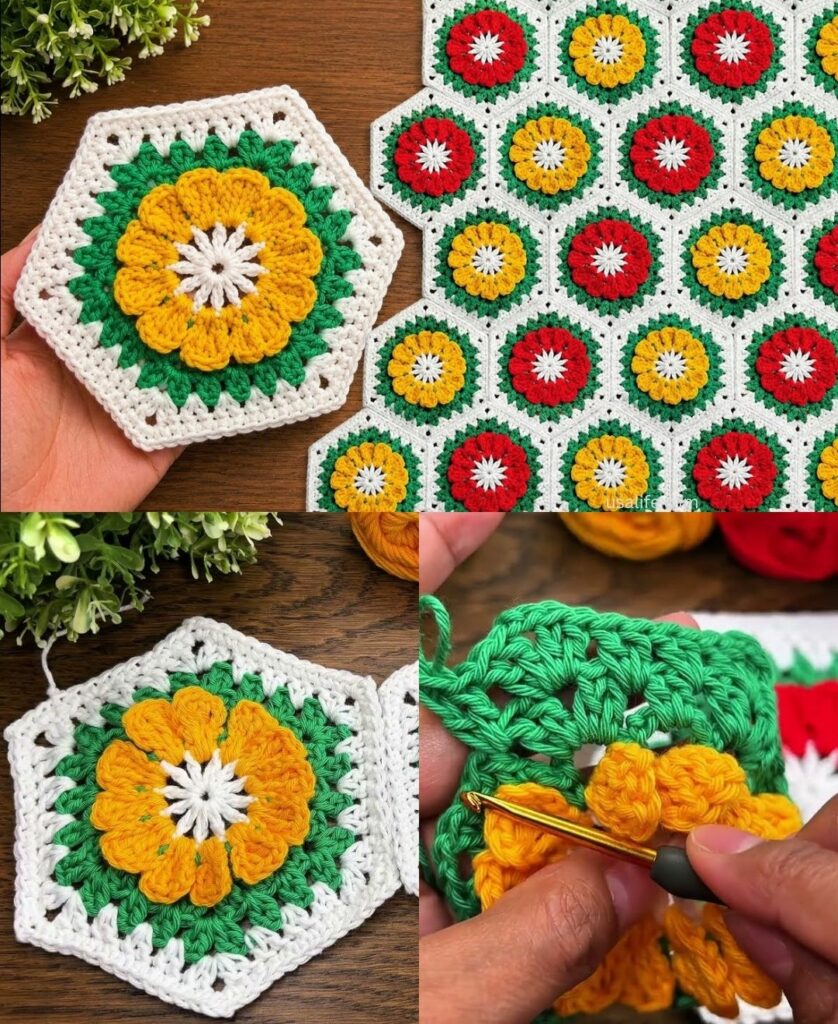
by The 3D Floral Hexagon is a show-stopping motif. By combining a raised, textured flower center with a flat hexagonal frame, you create a piece that feels sculptural and organic. Because hexagons interlock perfectly, they are much more dynamic than standard squares for blankets and bags.
Here is your detailed guide to constructing this professional-grade motif.
🧶 The Toolkit
- Yarn: DK or Worsted weight. Use a Vibrant Color for the petal core and a Neutral/Contrasting Color for the hexagonal frame.
- Hook: 4.0 mm (smaller hooks keep the 3D texture firm and structured).
- Stitch Key (US Terms):
- ch: Chain
- sl st: Slip Stitch
- sc: Single Crochet
- dc: Double Crochet
- tr: Treble Crochet
- Popcorn Stitch (PC): Work 5 dc in one stitch, remove hook, insert into the first dc, pull the loop through.

🛠 The Step-by-Step Construction
Round 1: The Petal Core (Color A)
- Start:
ch 6, join withsl stto form a ring. - The Base:
ch 3(counts as first dc), work 11 dc into the ring (12 stitches total).sl stto join. - The 3D Petals:
ch 3, work 4 dc into the same stitch, complete the PC.ch 2. - Repeat: Work a PC in every stitch around (12 Popcorns total), with
ch 2between each.sl stto join.
Round 2: The Transition (Color A)
- Placement: Work your stitches into the
ch-2spaces behind the petals. - The Base: Work
(3 dc, ch 1, 3 dc)in everych-2space. This round begins to “square off” (or rather, “hex-off”) the circle.sl stto join. Fasten off.

Round 3: The Hexagonal Frame (Color B)
- Attach: Join your frame color in any
ch-1space. - The Corner:
ch 3, 2 dc, ch 2, 3 dc(this is your corner). - The Side:
ch 1. Work3 dcinto the next space. - Repeat:
(3 dc, ch 2, 3 dc)in corner,3 dcin next space. Repeat around to create 6 corners. - Join:
sl stto join. Fasten off.
✨ Pro-Tips for “3D” Elegance
1. The “Floating” Effect
To make the flower look like it is “floating” on the hexagon, do not join the petals to the frame. Work the frame rounds entirely into the gaps behind the petals. This leaves the petals loose and dimensional, giving the motif a true 3D botanical look.

2. The “Picot” Edge (Optional)
If you want the hexagon to look even more intricate, add a final round to the frame: sc in each stitch, and in the corner, work (sc, ch 3, sc). This adds tiny “points” to the hexagon, which makes joining them into a blanket look like delicate lace.
3. Blocking: The Foundation of Structure
Hexagons have six corners, which means they are prone to warping if not blocked correctly.
- The Technique: Use a hexagon-shaped blocking board (or simply trace a paper hexagon template). Pin each of the 6 corners down firmly. Steam the piece.
- Why? This ensures that when you join your motifs, your blanket doesn’t end up wavy or stretched.
💡 Project Ideas
- For Bags: This motif is structurally sound. Join 7 hexagons (one in the center, six around it) to create a beautiful, “honeycomb” front panel for a summer tote. Use a sturdy, non-stretch cotton yarn to ensure the bag holds its shape when loaded.
- For Blankets: Because hexagons interlock, they create a “honeycomb” edge that is naturally decorative. You won’t even need a separate border. Just join them, and the zigzag edge becomes the finished product!
💡 The “Secret” to Hexagon Joining
Unlike squares, hexagons have a slightly different geometry for joining. Use the “Invisible Seam” (Whip Stitch).
- Place two hexagons with “wrong sides” together.
- Whip stitch through the back loops only.
- This creates a completely flat, seamless join that makes the hexagonal “honeycomb” pattern pop.
Would you like a guide on how to calculate how many hexagons you need for a specific size blanket, or would you like to learn how to crochet the “half-hexagons” needed to create a perfectly straight edge for a blanket?