 by
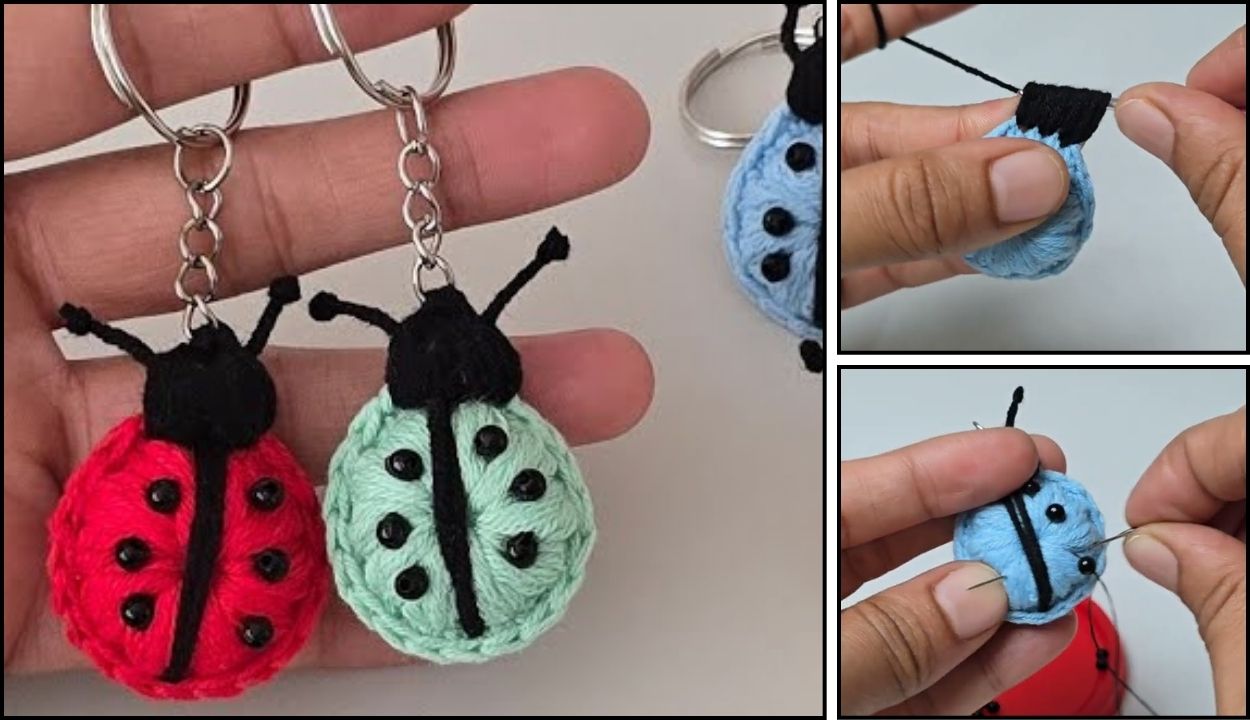
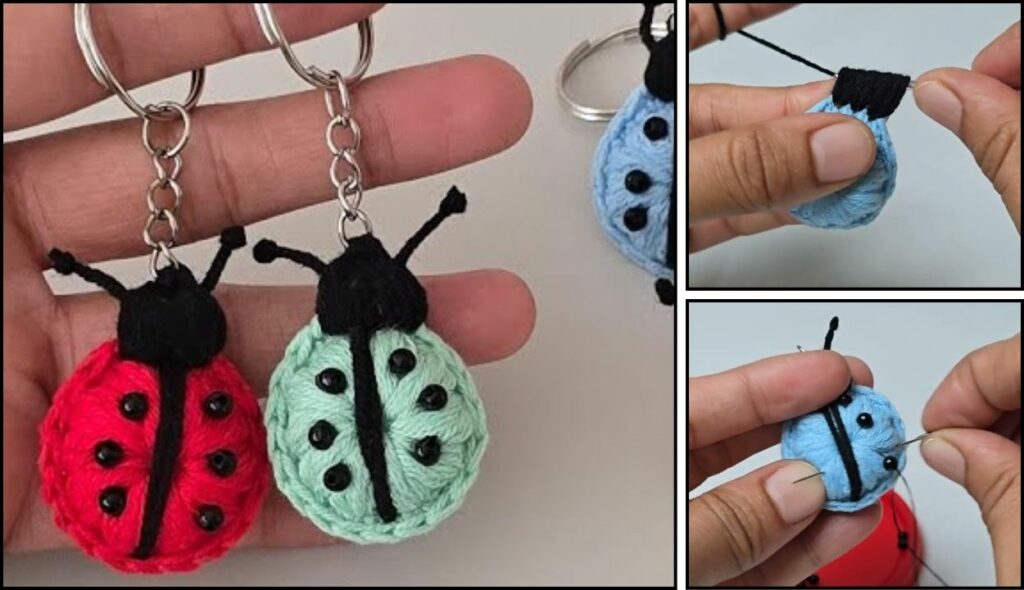
by That’s a super cute idea! A crochet ladybug keychain is a perfect project for beginners. It’s small, quick to make, and teaches you fundamental amigurumi (crocheted toy) techniques in a fun way. Plus, it’s a fantastic way to use up those little bits of scrap yarn you might have lying around!
Given that you’re in Phnom Penh, where it’s quite warm, a 100% cotton yarn or a smooth acrylic yarn would be ideal for this project. Cotton will give your ladybug a nice, crisp look and feel, while acrylic is readily available in many colors and is easy for beginners to work with.
How to Crochet a Ladybug Keychain: A Beginner Tutorial
This pattern creates a charming little ladybug, perfect for a keychain, backpack charm, or even a small gift. You’ll make two halves and then join them together, adding cute details like spots and antennae.
1. Essential Materials You’ll Need
- Yarn:
- Red Yarn: For the ladybug’s back. Worsted Weight (Aran / Medium / Category 4).
- Black Yarn: For the ladybug’s body, head, and spots. Worsted Weight.
- Small amounts of each color are sufficient.
- Crochet Hook:
- A 3.0mm (US C/2) or 3.5mm (US E/4) hook. For amigurumi, you want a hook size that creates a very tight fabric with no visible gaps when stretched, so the stuffing doesn’t show through. If your stitches are naturally loose, go down a hook size.
- Scissors: For cutting yarn.
- Yarn Needle (Tapestry Needle): Essential for weaving in ends, sewing parts together, and embroidering spots.
- Stuffing:
- Polyester Fiberfill (Poly-fil): Standard stuffing for amigurumi.
- Stitch Marker (Highly Recommended!): To mark the beginning of each round, as you’ll be working in continuous spirals.
- Keychain Ring/Split Ring: The key component that makes it a keychain!
2. Basic Crochet Stitches You’ll Use
This project focuses on fundamental amigurumi stitches:
- Magic Ring (MR) / Adjustable Ring: (Highly Recommended!) Creates a tight, hole-free center for starting spherical shapes. Alternatively, you can
ch 2, then work all stitches of Round 1 into the 2nd ch from the hook. - Chain (ch): For starting the antennae.
- Slip Stitch (sl st): For joining and neatening.
- Single Crochet (sc): This will be your primary stitch, creating a dense fabric.
- Increase (inc): Work 2 sc into the same stitch to add stitches.
- Decrease (sc2tog): Work 2 sc stitches together into one to reduce stitches. For a neater decrease in amigurumi, use the invisible decrease (insert hook into FLO of next 2 stitches, yarn over, pull through both FLO, yarn over, pull through 2 loops). This is optional but gives a cleaner finish.
- Working in Rounds (Continuous/Spiral): You’ll build the two halves of the ladybug in a continuous spiral.
- Fasten Off: To securely end your work.
- Weaving in Ends: Hiding yarn tails for a neat finish.
Crochet Ladybug Keychain Pattern
This pattern creates a ladybug about 2 inches (5 cm) in diameter.
Abbreviations (US Crochet Terms):
- MR: Magic Ring
- ch: chain
- sc: single crochet
- st(s): stitch(es)
- inc: increase (work 2 sc into the same stitch)
- sc2tog: single crochet 2 together (decrease)
(...): work stitches into the same stitch or space[...]: repeat instructions in brackets- FO: Fasten off
Part 1: The Ladybug’s Back (Red Half – Make 1)
Start with Red yarn. Work in continuous rounds.
- Round 1: Create a MR. Work 6 sc into the MR. (6 sc)
- Place your stitch marker in the first sc you made. You will move this marker up to the first stitch of each new round.
- Round 2: Inc in each st around. (12 sc)
- Round 3:
*Sc in the next st, inc in the next st.*Repeat from*to*around. (18 sc) - Round 4:
*Sc in the next 2 sts, inc in the next st.*Repeat from*to*around. (24 sc) - Round 5:
*Sc in the next 3 sts, inc in the next st.*Repeat from*to*around. (30 sc)- Fasten off, leaving a long tail (about 8-10 inches / 20-25 cm) for sewing.
Part 2: The Ladybug’s Belly/Head (Black Half – Make 1)
Start with Black yarn. Work in continuous rounds.
- Round 1: Create a MR. Work 6 sc into the MR. (6 sc)
- Place your stitch marker in the first sc you made. You will move this marker up to the first stitch of each new round.
- Round 2: Inc in each st around. (12 sc)
- Round 3:
*Sc in the next st, inc in the next st.*Repeat from*to*around. (18 sc) - Round 4:
*Sc in the next 2 sts, inc in the next st.*Repeat from*to*around. (24 sc) - Round 5:
*Sc in the next 3 sts, inc in the next st.*Repeat from*to*around. (30 sc)- Do NOT Fasten Off. Keep the black yarn attached. This will be used to join the two halves.

Part 3: Assembling the Ladybug
- Align the Halves: Place the red half on top of the black half, with the wrong sides facing each other. Make sure the stitches align.
- Start Joining:
- With the black yarn still attached to the black half, insert your hook through a stitch on the red half, and then immediately through the corresponding stitch on the black half.
- Yarn over and pull up a loop through both layers. Yarn over and pull through both loops on your hook to complete a single crochet (sc).
- Continue working sc through both layers (one stitch from the red half, one from the black half) around the edge.
- Stuff as You Go: When you’ve crocheted about halfway to two-thirds of the way around, stop to stuff the ladybug firmly with polyester fiberfill. Ensure it’s evenly filled to create a smooth, rounded shape. Don’t overstuff to the point of distorting stitches.
- Finish Joining: Continue working sc through both layers until the opening is closed.
- Fasten Off: After your last joining sc, sl st into the next stitch to create a neat finish. Cut your yarn, leaving a 6-inch tail. Yarn over and pull the tail completely through the loop on your hook. Pull tight to secure.
- Weave in All Ends: Use your yarn needle to carefully weave in any remaining tails into the body of the ladybug.
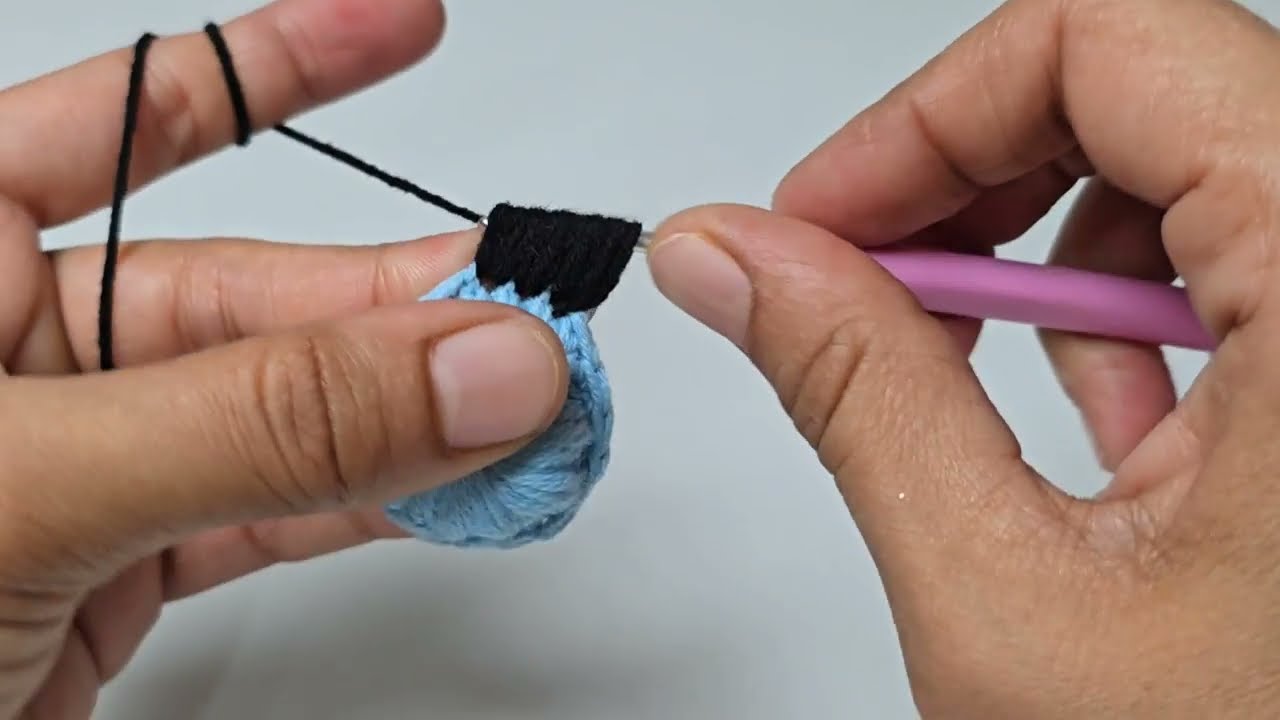
Part 4: Adding Details (Antennae & Spots)
- Antennae (Make 2):
- With Black yarn, ch 4.
- Sl st into the 2nd ch from hook. Sc in the next ch. Sl st in the last ch. (This creates a tiny curled antennae).
- FO, leaving a long tail for sewing.
- Sew the antennae to the top of the black head section of the ladybug, roughly 2-3 stitches apart. Securely knot and weave in ends.
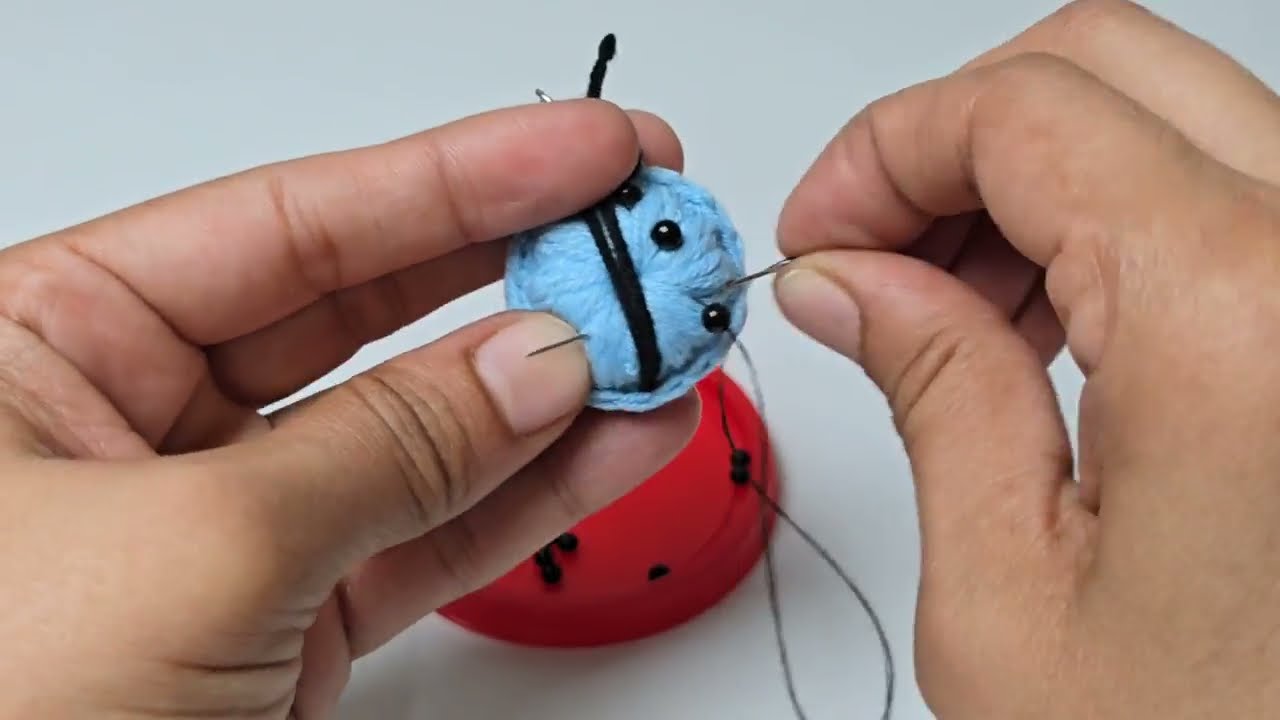
- Spots (Embroidered):
- With Black yarn and your yarn needle, thread a length of black yarn.
- Embroider small “French knots” or simple “satin stitches” (a few short, close stitches) onto the red back of the ladybug to create spots. Aim for 5-7 spots.
- Securely knot yarn on the underside of the red shell and weave in ends.

Part 5: Attaching the Keychain Ring
- Find the Top: Determine the top center of your ladybug’s head, between the antennae.
- Attach Ring: Use your yarn needle to thread a short piece of black yarn (about 6 inches) through a sturdy stitch at the top center.
- Thread both ends of this yarn piece through your keychain ring.
- Tie the yarn ends securely in a double knot, ensuring the keychain ring is firmly attached. Trim any excess yarn.
Tips for a Perfect Ladybug Keychain
- Tight Stitches: For amigurumi, always aim for tight stitches. This prevents stuffing from showing through and helps the ladybug hold its shape.
- Invisible Decrease: If you want very neat decreases, look up a tutorial for the “invisible single crochet decrease” (often abbreviated as “invdec”).
- Stuffing: Don’t be afraid to stuff firmly, but gently. Use the back of your hook or a chopstick to push stuffing into tight spots.
- Experiment with Size: To make a larger or smaller ladybug, simply add or subtract increase/decrease rounds in Parts 1 and 2, keeping the same increase/decrease rate.
- Other Details: You could embroider tiny white dots for eyes instead of using safety eyes if you prefer.
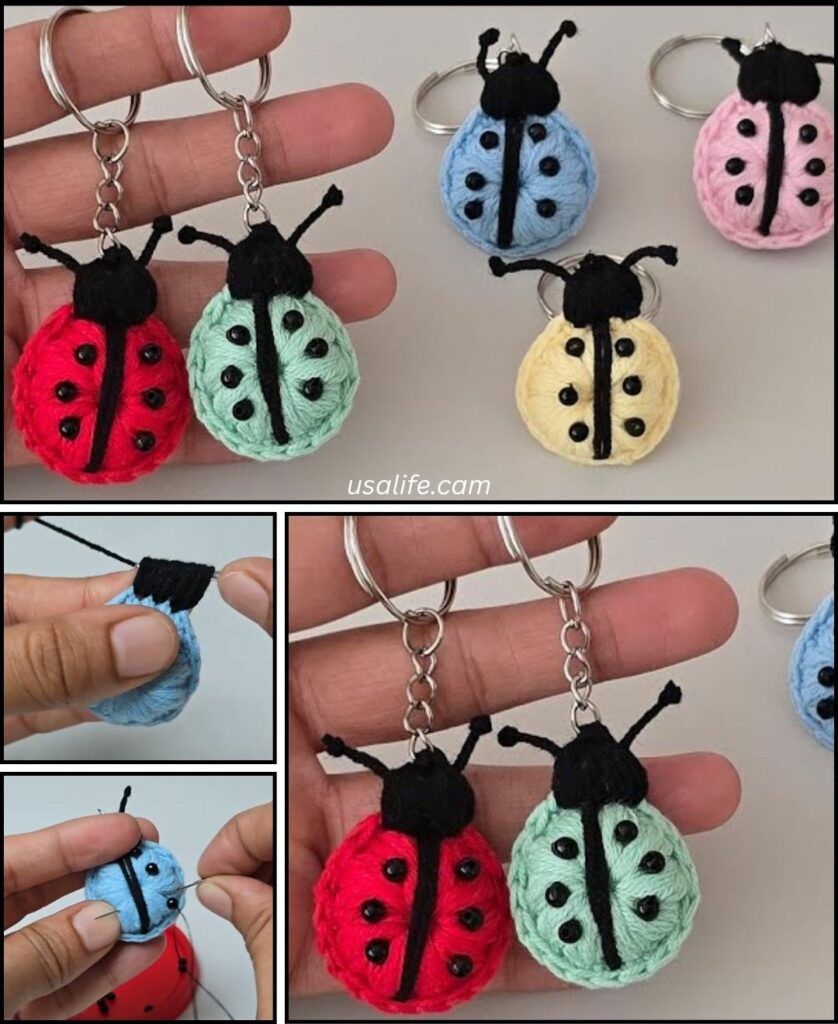
You’ve now got an absolutely adorable and unique handmade ladybug keychain! Enjoy carrying your little friend with you.