 by
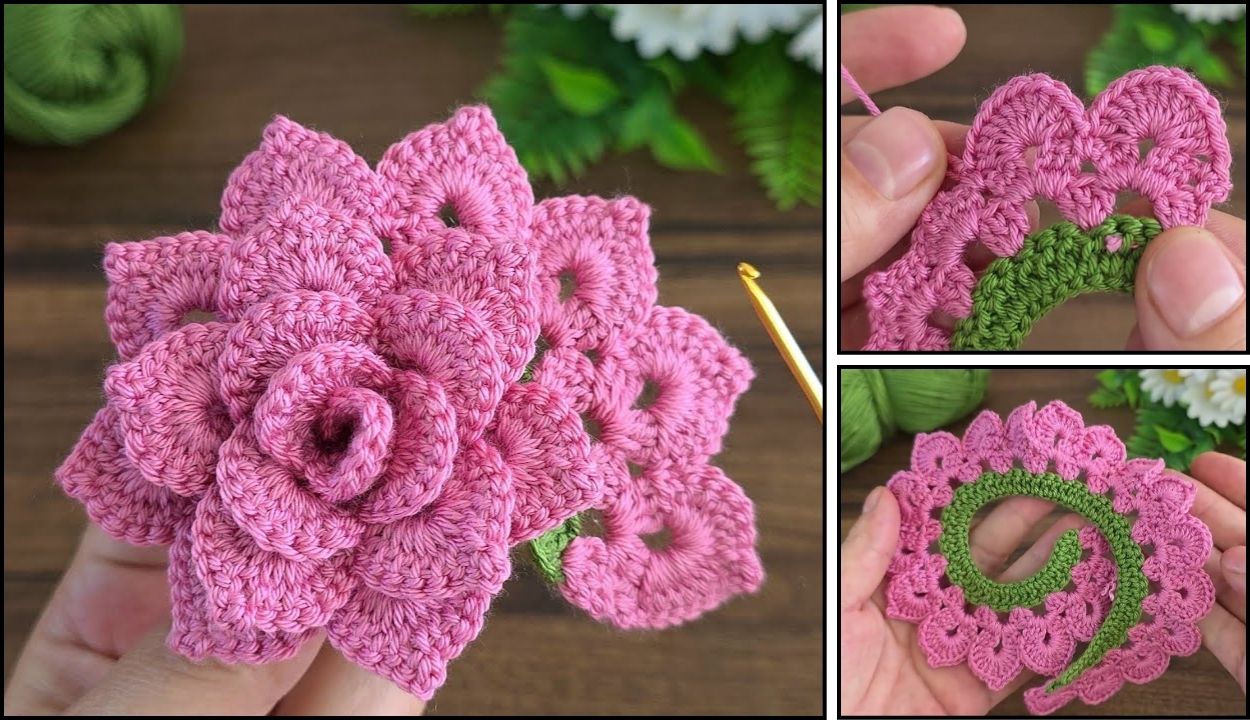
by Crocheting a rose is a wonderfully rewarding project, perfect for adding a touch of handmade elegance to blankets, hats, headbands, or even as a standalone decoration. It might look intricate, but it’s surprisingly simple, especially once you get the hang of working in rows and understanding how to create the curl!
Since you’re in Phnom Penh, where it’s quite warm, 100% cotton yarn or a smooth acrylic yarn would be excellent choices for your crochet rose. Cotton gives a beautiful, defined stitch and a natural feel, while acrylic is widely available in a huge range of colors and is easy to work with.
How to Crochet a Rose: Step-by-Step Tutorial
This tutorial will guide you through creating a flat strip that naturally curls into a lovely rose shape when sewn together. We’ll use simple stitches, making it accessible for beginners.
1. Essential Materials You’ll Need
- Yarn:
- Rose Color: Choose any shade of red, pink, yellow, white, or even purple! Worsted Weight (Aran / Medium / Category 4) is a good standard. You’ll only need a small amount, making it perfect for scrap yarn.
- Green Yarn (Optional): For a small leaf or if you want to make a stem later.
- Crochet Hook:
- A 4.0mm (US G/6) or 4.5mm (US 7) hook. Use a hook size that feels comfortable with your yarn and creates a fabric that isn’t too stiff, allowing the rose to curl easily.
- Scissors: For cutting yarn.
- Yarn Needle (Tapestry Needle): Absolutely essential for weaving in ends and, most importantly, for sewing the rose together into its final shape.
2. Basic Crochet Stitches You’ll Use
This pattern uses fundamental crochet stitches:
- Chain (ch): The foundation of most crochet.
- Slip Stitch (sl st): For joining and neatening.
- Single Crochet (sc): A short, dense stitch, sometimes used for borders or shaping.
- Half Double Crochet (hdc): A medium-height stitch.
- Double Crochet (dc): A taller stitch, used primarily for the petals.
- Working in Rows: You’ll create a flat strip that you’ll then roll up.
- Fasten Off: Securely ending your work.
- Weaving in Ends: Hiding yarn tails for a neat finish.
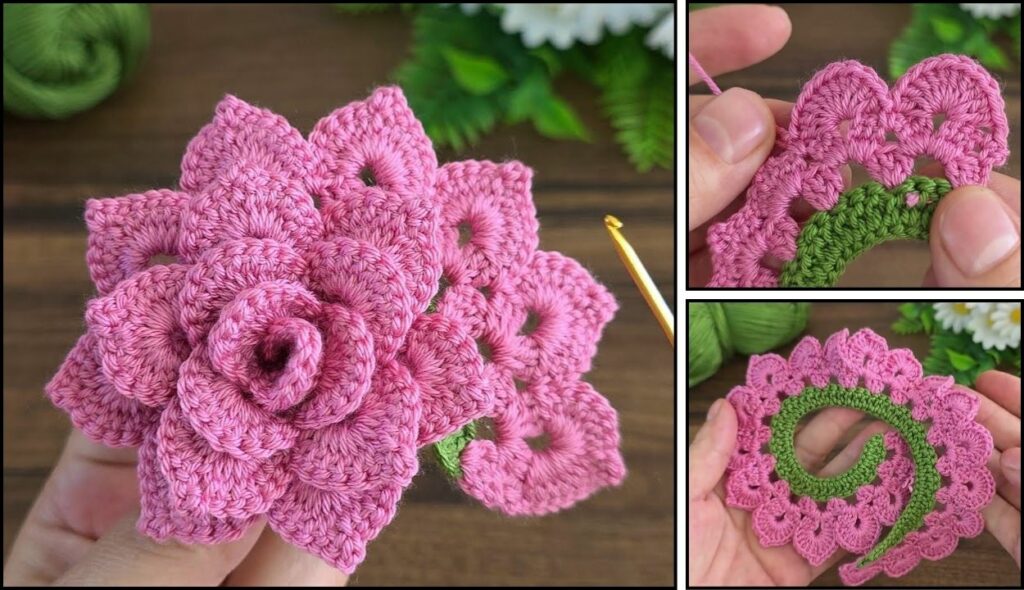
Crochet Rose Pattern (Basic Version)
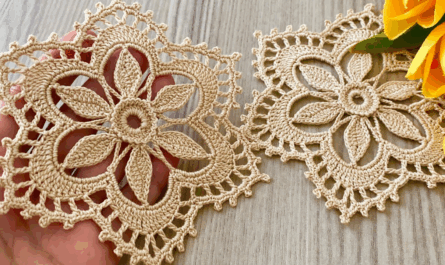
This pattern creates a charming rose, approximately 2-3 inches (5-7.5 cm) in diameter, depending on your tension and yarn.
Abbreviations (US Crochet Terms):
- ch: chain
- sl st: slip stitch
- sc: single crochet
- hdc: half double crochet
- dc: double crochet
- st(s): stitch(es)
- ch-sp: chain space
(...): work stitches into the same stitch or space- FO: Fasten off
Step 1: Create the Foundation Chain
This chain will form the base of your rose strip.
- With your Rose Color yarn, ch 31. (This will create a rose with a good number of petals. For a smaller rose, chain fewer stitches, always an odd number. For a larger rose, chain more.)

Step 2: Build the First Row (Foundation for Petals)
This row establishes the “holes” where your petals will form.
- dc in the 4th ch from the hook. (The first 3 chs count as 1 dc).
*Ch 1, skip 1 ch, dc in the next ch.*Repeat from*to*across the chain until you reach the end.- You should end with a dc in the very last chain.
- You’ve created a row of dc stitches separated by ch-1 spaces. This is sometimes called a “mesh” or “granny square” like foundation.
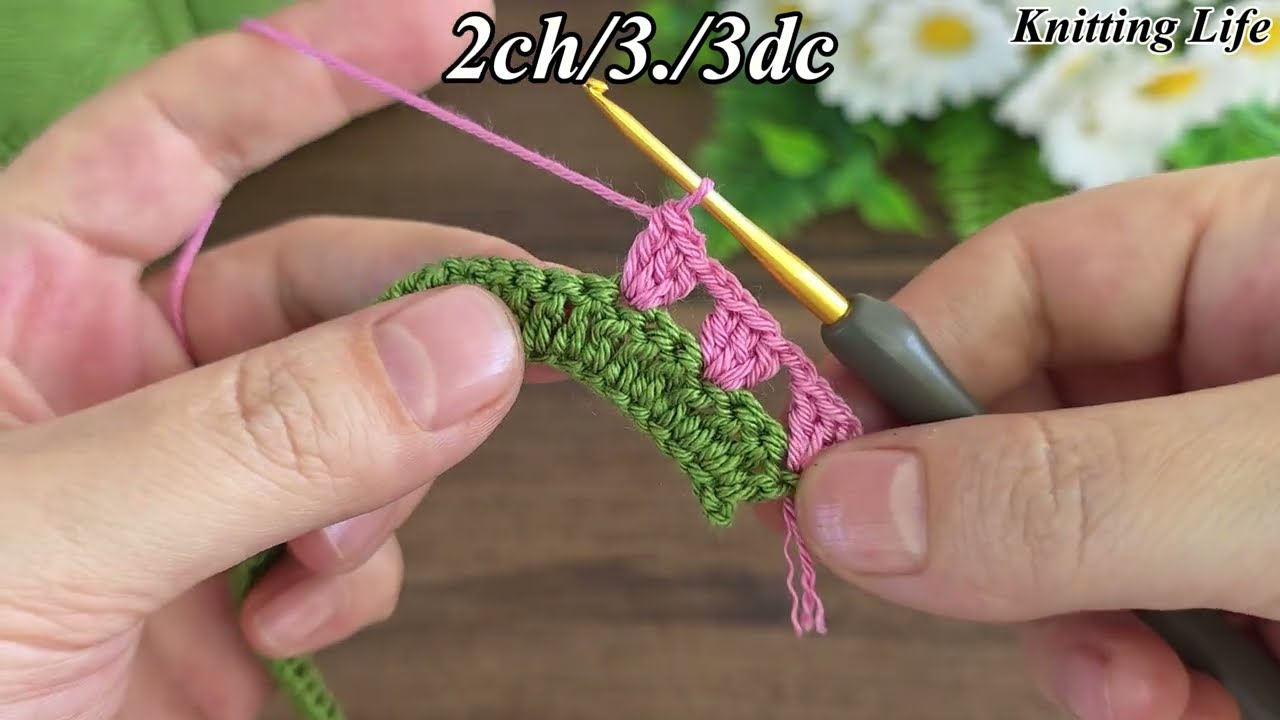
Step 3: Create the Petals
Now, you’ll work a series of stitches into each chain-1 space from the previous row to form the petals. This will make your strip start to get wavy.
- Ch 3 (counts as 1 dc). Turn your work.
- In the first ch-1 space (the one immediately next to your starting ch 3): Work (3 dc) into this space.
- In the next ch-1 space: Work (4 dc) into this space.
- Repeat Step 3, working (4 dc) into each remaining ch-1 space across the entire row.
- After working into the very last ch-1 space, you’ll have a dc from the beginning of the previous row. Work 1 dc into the top of this last dc.
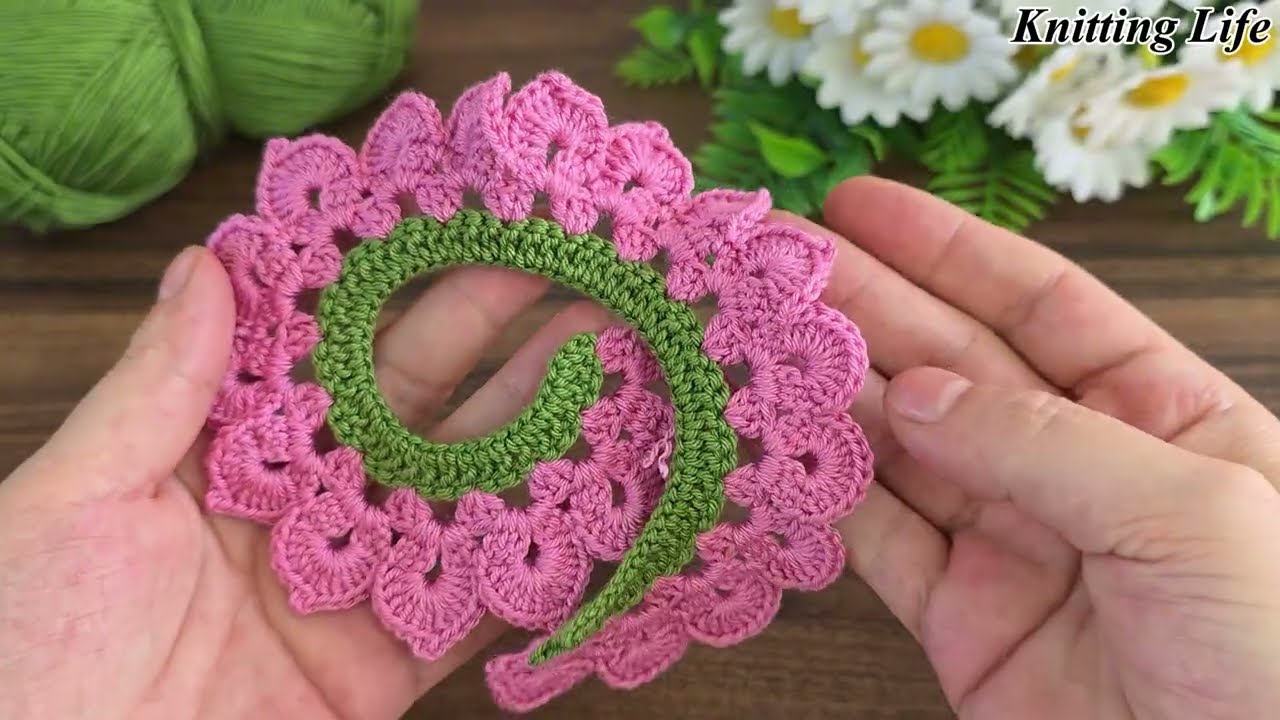
- Your strip should now look very wavy and curly – this is exactly what you want! These waves will become the petals of your rose.
Step 4: Finishing the Strip
- Fasten Off: Cut your yarn, leaving a very long tail (at least 15-20 inches / 38-50 cm). This tail is crucial for sewing the rose together.
- Weave in the starting tail (the short one from your initial chain) using your yarn needle.
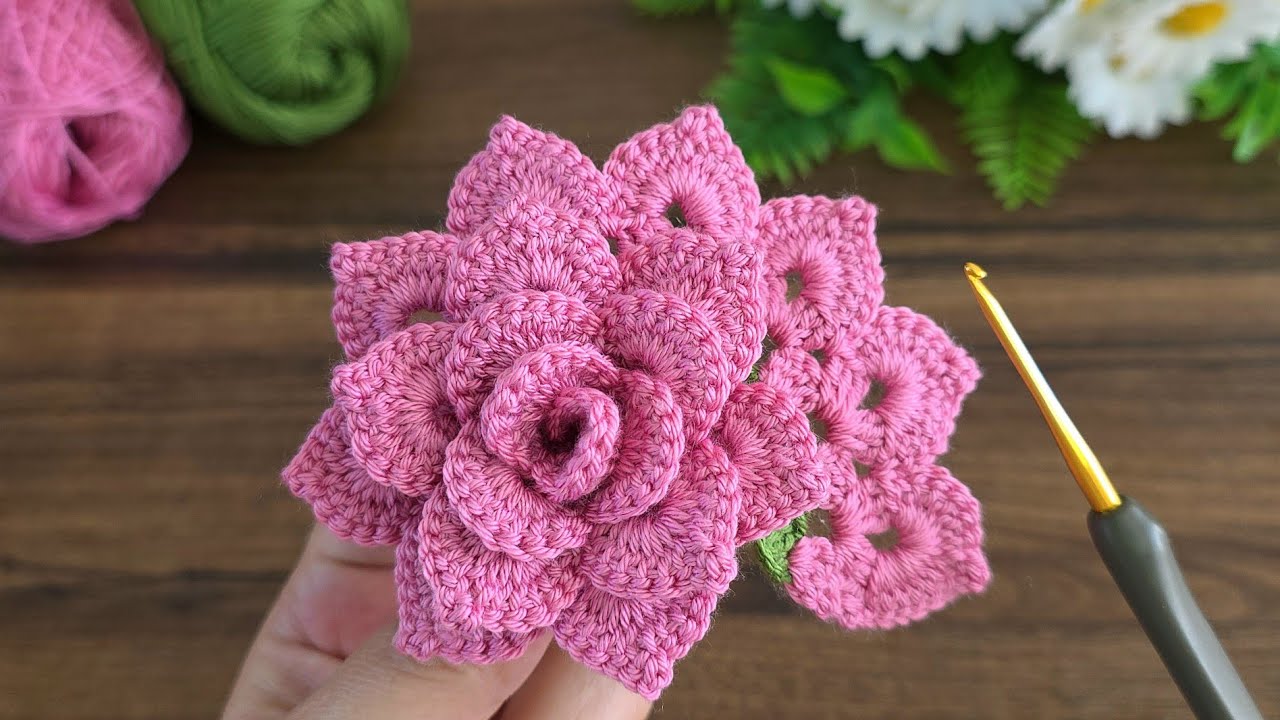
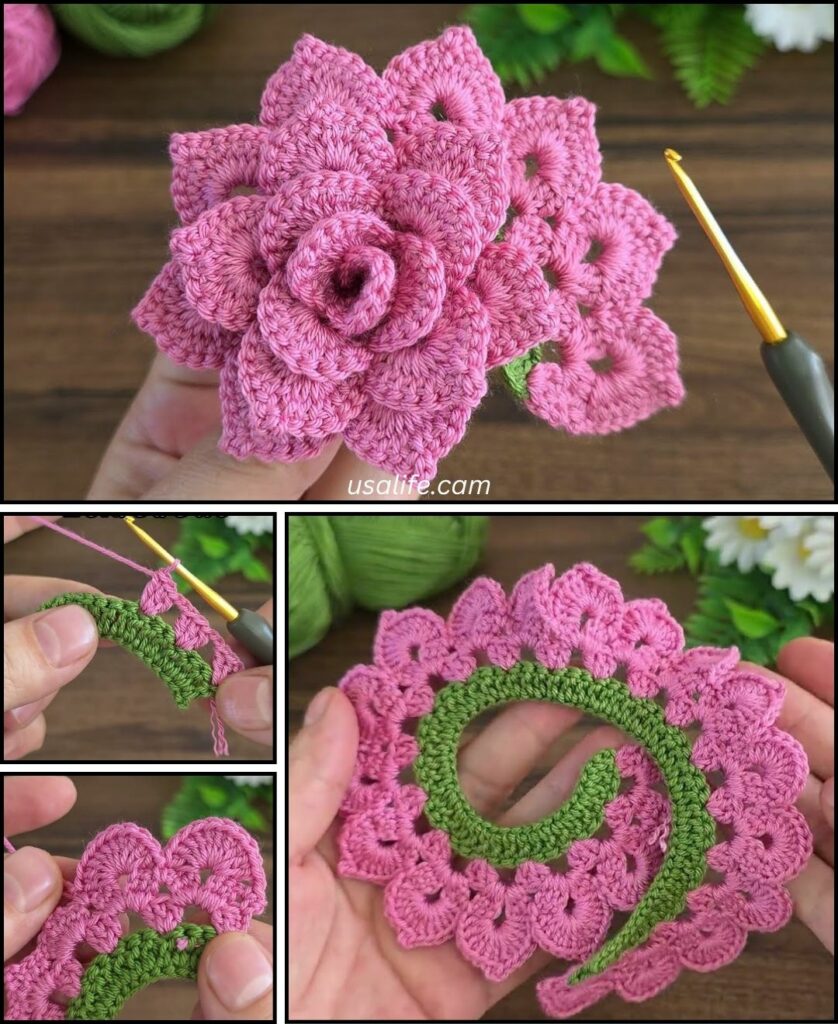
Step 5: Shaping and Sewing the Rose
This is where the magic happens!
- Starting the Roll: Take the end of your crocheted strip that doesn’t have the long sewing tail.
- Begin to tightly roll the very first few stitches into a small, tight spiral. This will be the center bud of your rose.
- Continue Rolling: As you continue to roll the strip, don’t roll it as tightly as the center. Allow the waves and curls from your petal row to naturally form around the center.
- Guide the strip so that the bottom (foundation chain) edges remain somewhat aligned. The top (petal) edges will naturally flare out.
- Secure with Needle: Once you’ve rolled the entire strip into a rose shape, hold it firmly with one hand.
- Thread the long sewing tail onto your yarn needle.
- Begin to sew through all layers of the rolled rose from the bottom. Make several stitches, going back and forth across the base, to securely hold all the layers together. Aim to make your stitches invisible from the top.
- Work your way around the base of the rose, securing it well. This is important to prevent it from unraveling.
- Final Touches: Once securely sewn, make a knot at the back/bottom of the rose and weave in any remaining tail.
Optional: Adding a Leaf
- With Green yarn, ch 6.
- Sl st in the 2nd ch from hook.
- sc in the next ch.
- hdc in the next ch.
- dc in the next ch.
- Sl st in the last ch.
- FO, leaving a long tail for sewing.
- Use your yarn needle to sew the leaf to the back/bottom of your rose, wherever it looks best.
Tips for a Beautiful Crochet Rose
- Tension: Consistent tension is important, but don’t make your stitches too tight. A slightly looser tension will allow the petals to curl more naturally.
- Experiment with Starting Chains: Different lengths of initial chains will yield different sized roses. Try
ch 21for a smaller rose, orch 41for a larger one. - Varying Stitches: For a more complex look, you can experiment with different stitches in your petal row:
(2 hdc, ch 1, 2 hdc)in each ch-1 space for a slightly different petal texture.(2 dc, ch 1, 2 dc)for larger, more pronounced petals.
- Color Changes: You could even try changing colors mid-strip for a multi-toned rose, or adding a contrasting color for the very first few stitches of the center bud.
- Attachment: Once finished, you can hot glue or sew your rose onto projects like hats, headbands, bags, or use them as embellishments on gift wrapping.
You’ve now created a beautiful, handmade crochet rose! Enjoy adding this lovely touch to your crafts.