 by
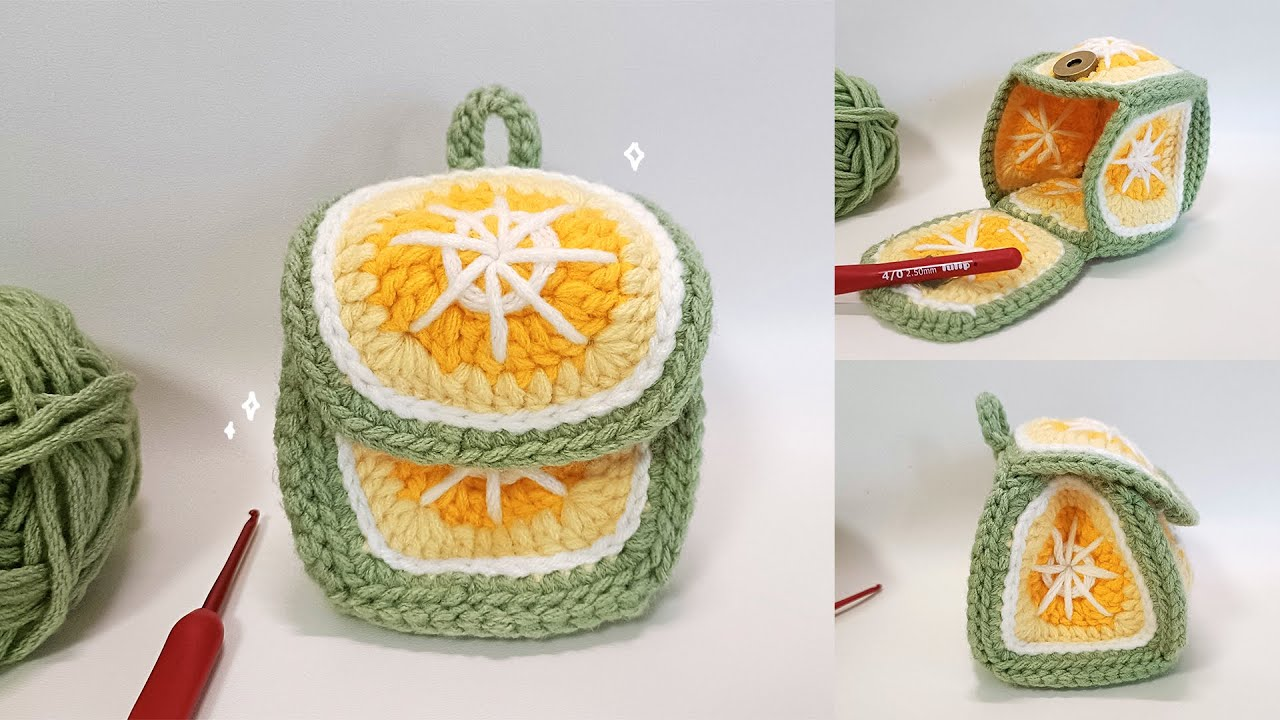
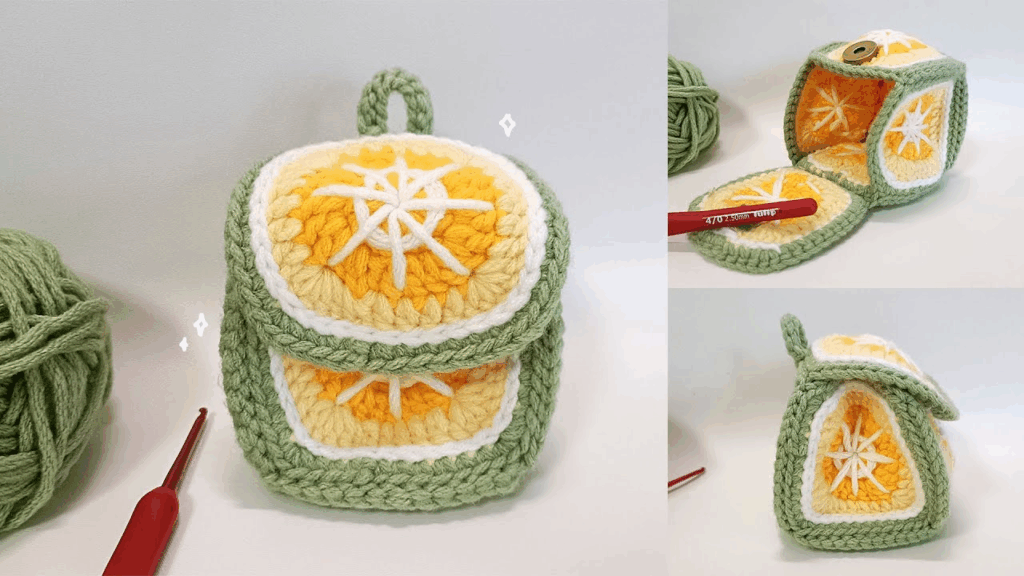
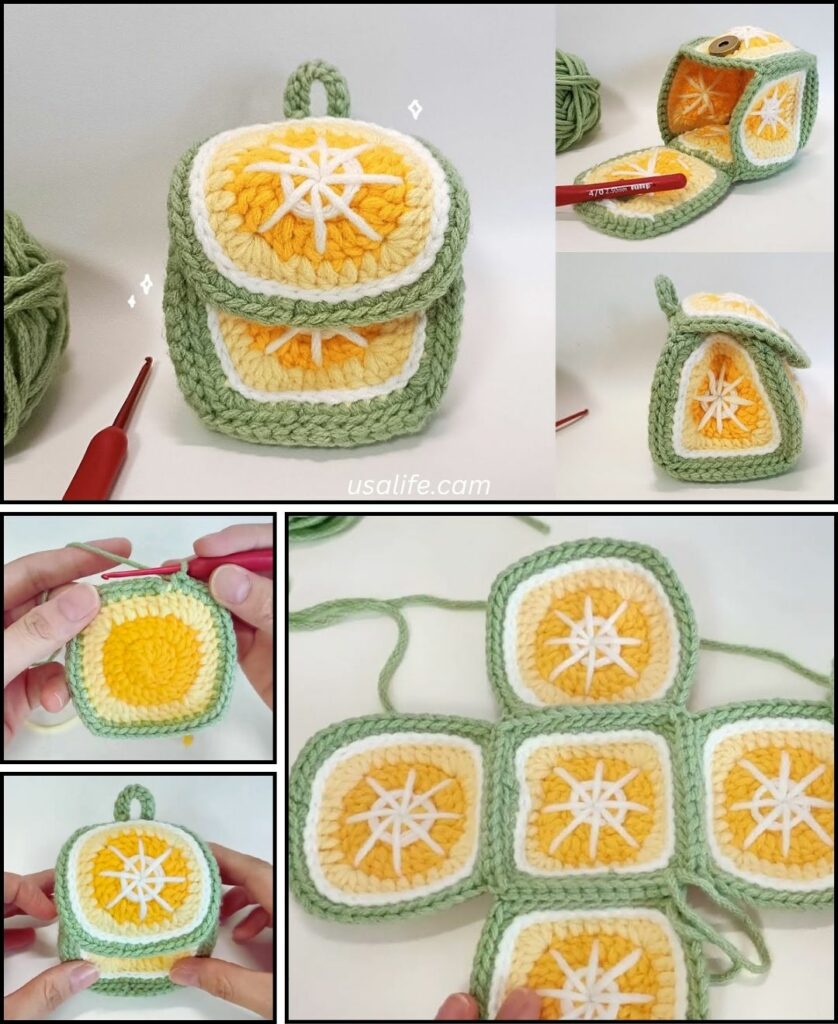
by A crochet lemon mini bag sounds like a delightful and refreshing project, perfect for the sunny weather in Phnom Penh! This project is great for confident beginners who are comfortable working in the round and changing colors. The finished bag will be a cheerful accessory, ideal for carrying small essentials like keys, lip balm, or coins.
For a project like this, 100% cotton yarn is an excellent choice. Cotton gives great stitch definition, is durable, and provides a nice, crisp texture that suits a fruit-themed item. It’s also breathable and won’t feel heavy in a warm climate. Acrylic yarn can also work, but cotton often gives a more professional and sturdy finish for bags.
How to Crochet a Lemon Mini Bag: A Step-by-Step Tutorial
This pattern will guide you through creating a half-circle lemon shape that forms the front and back of the bag, which are then joined together. You’ll also learn how to add a zipper and a simple strap.
1. Essential Materials You’ll Need
- Yarn:
- Lemon Yellow: Main color for the lemon rind. Worsted Weight (Aran / Medium / Category 4) Cotton Yarn.
- White: For the “pith” (white inner part). Worsted Weight Cotton Yarn.
- Cream/Light Yellow: For the lemon segments. Worsted Weight Cotton Yarn.
- Small amounts of each color are sufficient.
- Crochet Hook: A 3.5mm (US E/4) or 4.0mm (US G/6) hook. You want your fabric to be firm and dense so the bag holds its shape, but not so tight that it’s difficult to work with.
- Scissors: For cutting yarn.
- Yarn Needle (Tapestry Needle): Essential for weaving in ends and sewing the bag pieces together.
- Zipper: A 4-inch (10 cm) zipper in white, yellow, or a complementary color.
- Sewing Needle and Thread: For attaching the zipper (matching the zipper color).
- Stitch Marker (Highly Recommended!): To mark the beginning of rows or specific stitches.
2. Basic Crochet Stitches You’ll Use
This project focuses on fundamental stitches, but introduces working in rows to create flat shapes:
- Magic Ring (MR) / Adjustable Ring: (Highly Recommended!) Creates a tight, hole-free center for your initial half-circle. Alternatively, you can
ch 2, then work all stitches of Round 1 into the 2nd ch from the hook. - Chain (ch): For foundation, turning, and the strap.
- Slip Stitch (sl st): For joining rounds/rows and neatening.
- Single Crochet (sc): Creates a dense fabric, ideal for the bag’s structure.
- Half Double Crochet (hdc): A medium-height stitch, used for the main body of the segments.
- Increase (inc): Work 2 stitches into the same stitch to add stitches (essential for making the half-circle flat).
- Working in Rows: You’ll turn your work at the end of each row.
- Color Changes: You’ll be changing colors at the end of rows.
- Fasten Off: To securely end your work.
- Weaving in Ends: Hiding yarn tails for a neat and professional finish.
Crochet Lemon Mini Bag Pattern
This pattern creates a lemon mini bag approximately 4-5 inches (10-12.5 cm) in diameter.
Abbreviations (US Crochet Terms):
- MR: Magic Ring
- ch: chain
- sc: single crochet
- hdc: half double crochet
- st(s): stitch(es)
- inc: increase (work 2 stitches into the same stitch)
- sl st: slip stitch
(...): work stitches into the same stitch or space[...]: repeat instructions in brackets- FO: Fasten off
Understanding Color Changes at the End of a Row
For this project, you’ll join with a slip stitch at the end of each row and then change colors as you turn.
How to Change Colors at the End of a Row:
- Work the last stitch of the row (e.g., the last sc or hdc) up to the last yarn over. You should have 2 loops on your hook.
- Drop the current color. Pick up your new color.
- Yarn over with the new color and pull through both loops on your hook to complete the stitch.
- Now, with the new color, you’ll chain up for the next row and turn your work.
- Cut the old color yarn, leaving a 4-6 inch tail to weave in later.
Part 1: Crocheting the Lemon Halves (Make 2 Identical Pieces)
We’ll work in rows to create flat half-circles.
Piece 1 (Front Side of Bag)
Start with Lemon Yellow yarn.
- Row 1: Create a MR. Ch 2 (counts as 1st hdc). Work 5 hdc into the MR. (6 hdc total, including ch 2). Gently pull the MR closed but don’t tighten completely yet. Ch 2, turn.
- Row 2: Work inc hdc in each hdc across. (12 hdc) Ch 2, turn.
- Row 3:
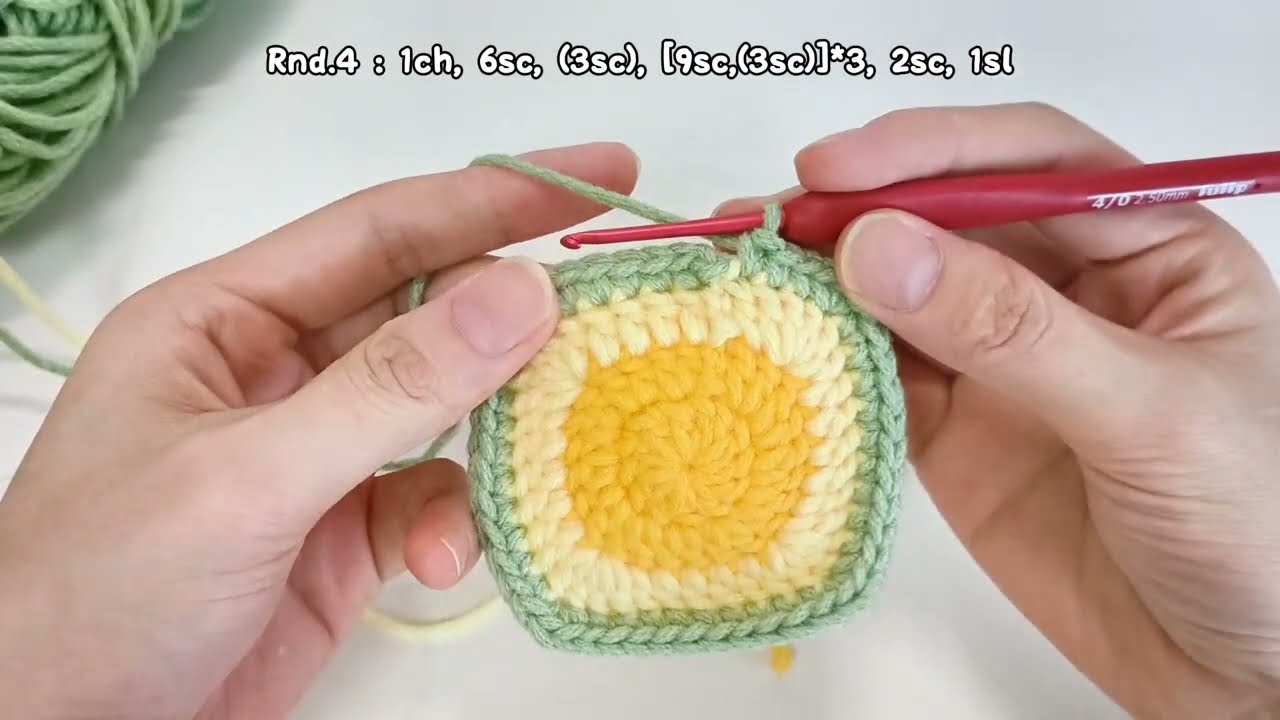
*Hdc in the next st, inc hdc in the next st.*Repeat from*to*across. (18 hdc) Ch 2, turn. - Row 4:
*Hdc in the next 2 sts, inc hdc in the next st.*Repeat from*to*across. (24 hdc) Ch 2, turn. - Row 5:
*Hdc in the next 3 sts, inc hdc in the next st.*Repeat from*to*across. (30 hdc) Ch 2, turn.- Color Change to White: Work the last hdc of Row 5 up to the last yarn over. Drop Yellow. Pick up White yarn. Yarn over with White and pull through both loops to complete the hdc. Ch 1, turn.
- Row 6 (White): Sc in each st across. (30 sc)
- Color Change to Cream/Light Yellow: Work the last sc of Row 6 up to the last yarn over. Drop White. Pick up Cream/Light Yellow yarn. Yarn over with Cream/Light Yellow and pull through both loops to complete the sc. Ch 2, turn.
- Row 7 (Cream/Light Yellow):
*Hdc in the next 3 sts, inc hdc in the next st.*Repeat from*to*across. (36 hdc) Ch 2, turn. - Row 8 (Cream/Light Yellow): Hdc in each st across. (36 hdc)
- Fasten off Cream/Light Yellow, leaving a long tail (at least 15-20 inches / 38-50 cm) for sewing.
Piece 2 (Back Side of Bag)
- Repeat all steps for Piece 1 exactly as described above. You will have two identical lemon half-circles.
- Fasten off the Cream/Light Yellow yarn after the last row, leaving a long tail on one of the pieces. Weave in the tail on the other piece.
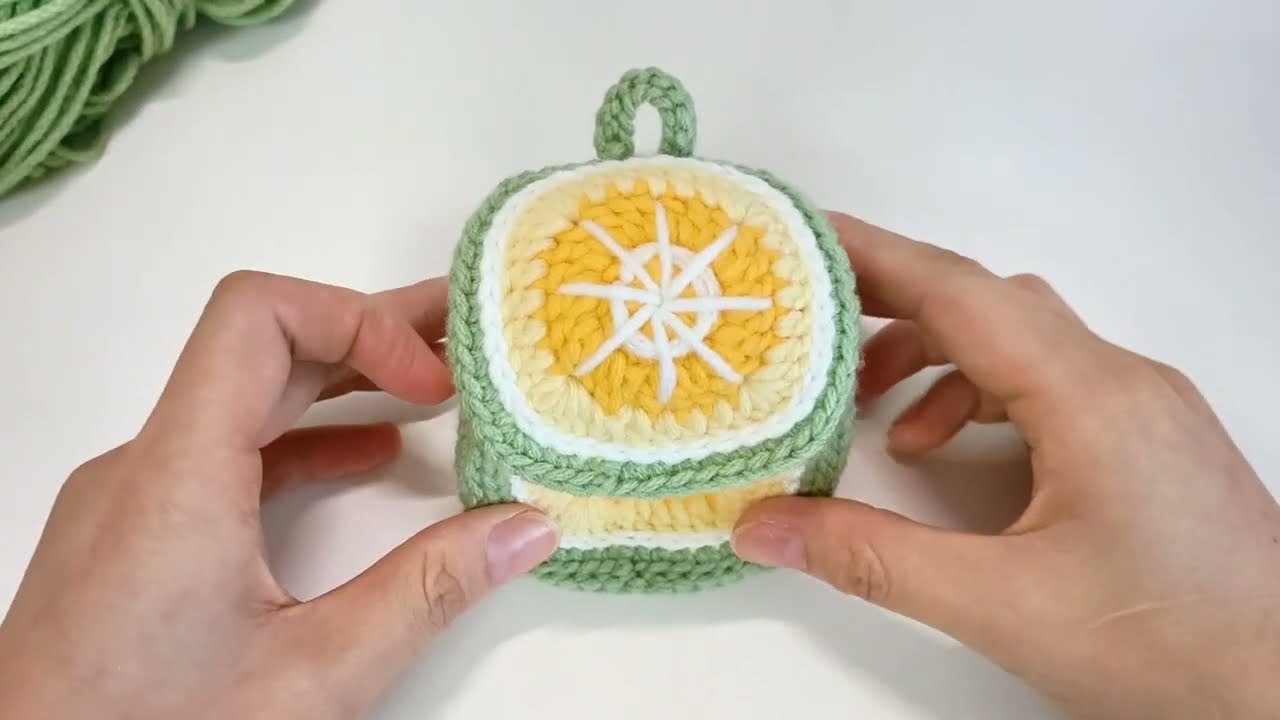
Part 2: Embroidering Lemon Segments
This step adds the signature look of a sliced lemon.
- With your yarn needle and White yarn, thread a piece of yarn about 12-15 inches long.
- On one of your lemon halves, starting from the center of the first yellow row (where the Magic Ring is), make long, straight stitches radiating out towards the white border. Imagine dividing the lemon into 6-8 segments.
- Bring the needle up through the center of the yellow.
- Push the needle down at the white border line.
- Repeat for each “segment,” creating triangular shapes.
- Securely knot your yarn on the back of the piece and weave in any remaining tail. Repeat for the second lemon half.
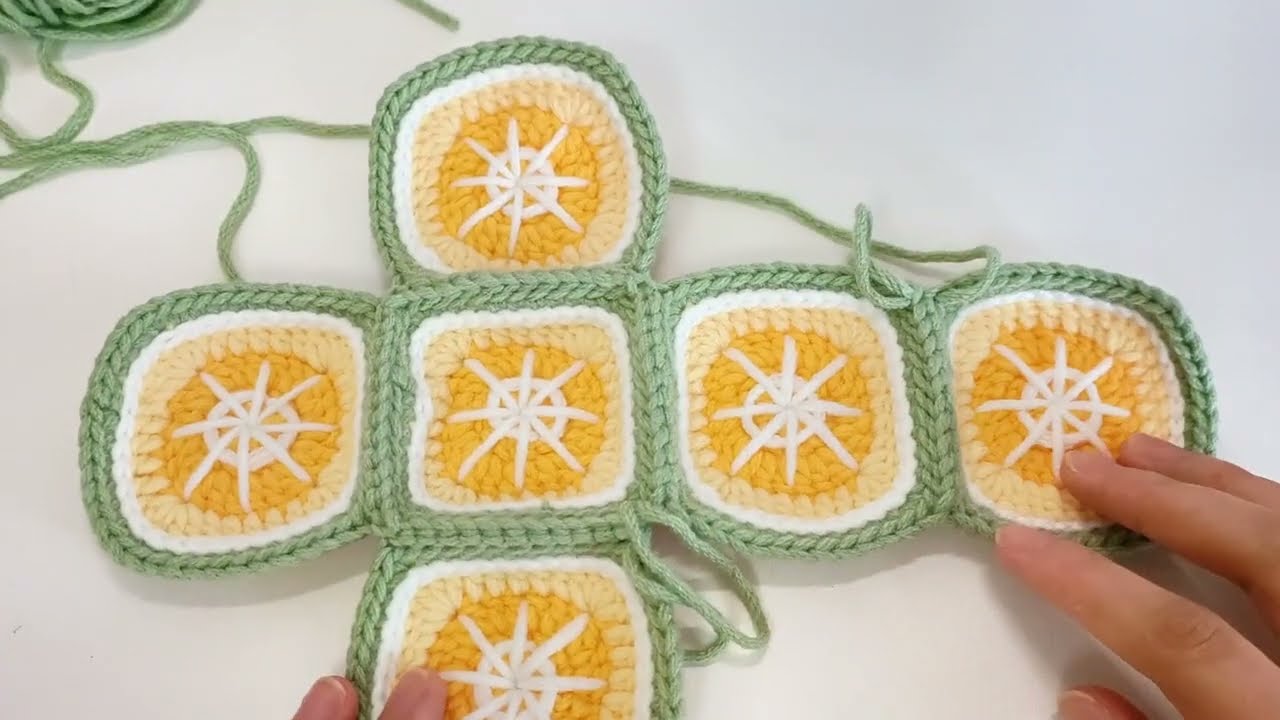
Part 3: Assembling the Bag
- Attach the Zipper:
- Lay one crocheted lemon half flat, right side up.
- Align one edge of the zipper with the straight bottom edge of the lemon half. The zipper teeth should face upwards.
- Using your sewing needle and matching sewing thread, carefully hand-stitch the zipper to the edge of the crocheted piece. Sew neatly and securely, going through the fabric of the zipper tape and the crocheted stitches.
- Repeat for the second lemon half, attaching the other side of the zipper to its straight bottom edge. Ensure the pieces align perfectly when zipped.
- Join the Halves:
- Open the zipper about halfway.
- Align the two crocheted lemon halves (with zipper attached), right sides facing out.
- Starting at one end of the zipper, use your yarn needle and the long tail of Cream/Light Yellow yarn left from Piece 2.
- Sew the two halves together using a whip stitch or mattress stitch along the curved edges, moving from one end of the zipper around the bottom to the other end of the zipper. Sew through the corresponding stitches on both pieces.
- Make sure your stitches are neat and secure. This will form the body of your mini bag.
- Securely knot and weave in any remaining tails.
Part 4: Creating the Strap
- With your Lemon Yellow yarn, make a foundation chain to your desired strap length.
- For a short wristlet or finger loop, ch 20-30.
- For a small shoulder strap, ch 80-120.
- Row 1: Sc in the 2nd ch from the hook, and sc in each ch across.
- Fasten off, leaving a tail for sewing.
- Attach the Strap:
- Determine where you want the strap to be on your bag (usually at the top corners of the zipped opening).
- Use your yarn needle and the tails of the strap to securely sew each end of the strap to the top corners of the bag opening. Go through several stitches to ensure it’s very strong.
- Securely knot and weave in all remaining ends.
5. Finishing Your Lemon Mini Bag
- Weave in All Ends: Double-check that all yarn tails from color changes, joining, and the strap are neatly woven into the fabric. This is crucial for a professional look and durability.
- Optional: Blocking: While not always necessary for small projects, a gentle steam block can help the bag maintain its shape and even out any stitches.
- Lightly mist the bag with water or use a steam iron (without touching the yarn directly).
- Gently reshape the bag.
- Let it air dry completely.
You now have a wonderfully bright and functional crochet lemon mini bag! It’s a fantastic accessory for summer or to add a pop of color to any outfit.