 by
by That’s a fantastic idea! Combining a Unique Pattern Square Motif into both a Runner and a Blouse demonstrates the incredible versatility of crochet. The key to a successful “unique pattern” is choosing a stitch that creates visual interest without being overly complicated.
For both tutorials, we will focus on the Star Stitch (or Daisy Stitch) because it creates a beautiful, dense, and striking texture that looks complex but is relatively easy to master.
Given the warm climate in Phnom Penh, choosing 100% cotton or a cotton blend (DK or Sport Weight) is essential for maximum breathability and excellent stitch definition.

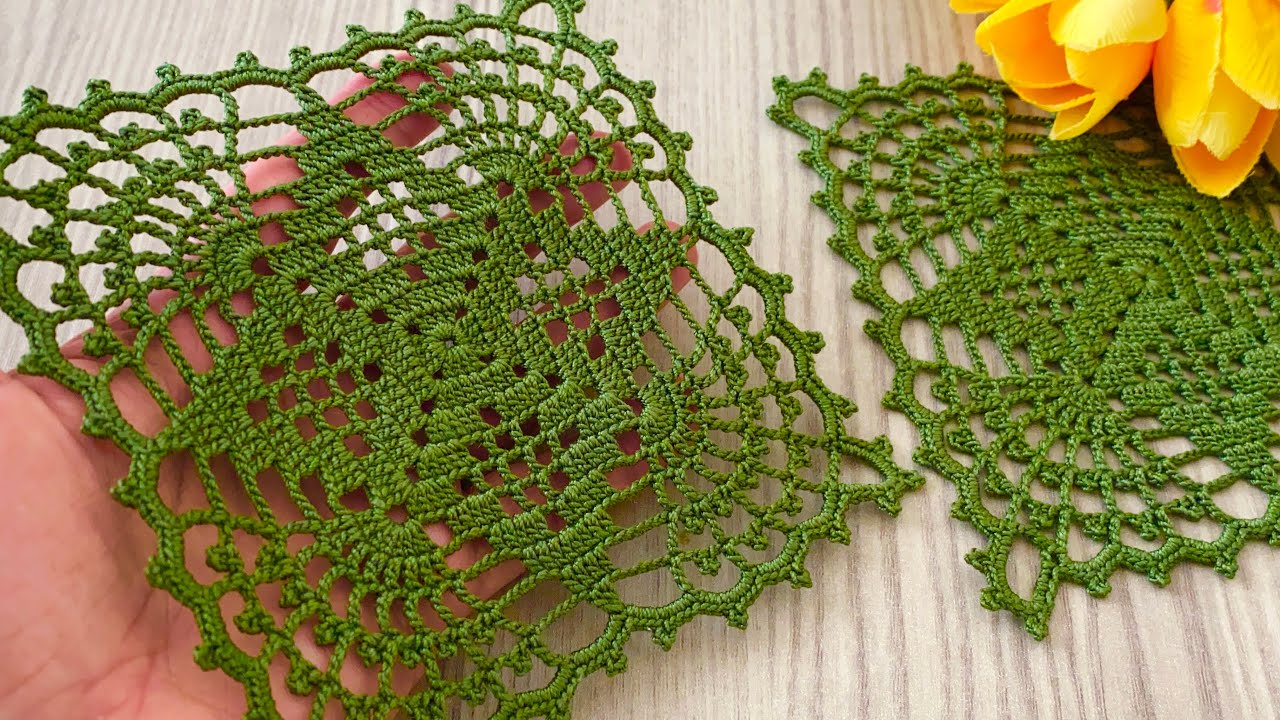
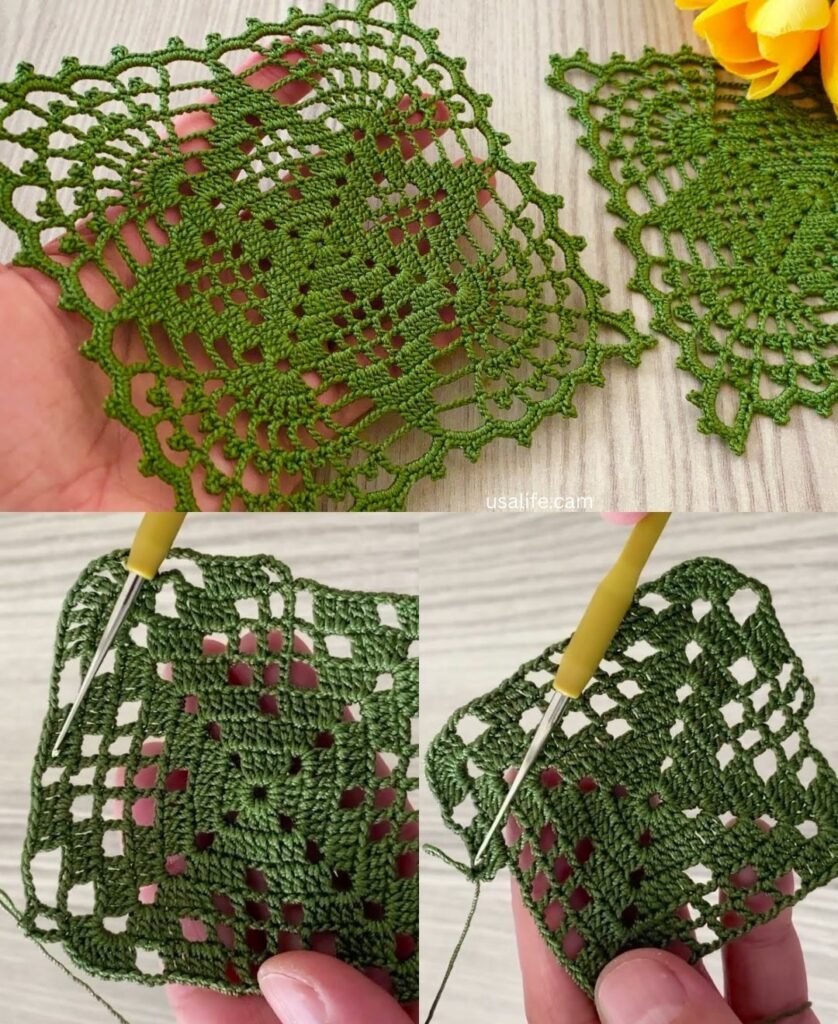
The Unique Pattern: The Star Stitch Square Motif
The Star Stitch creates a dense, highly textured fabric. We will learn how to create a flat square motif using this beautiful stitch.
A. Essential Stitches Used
- Magic Ring (MR)
- Chain (ch), Slip Stitch (sl st)
- Half Double Crochet (hdc) or Double Crochet (dc) (for border/stability)
- The Star Stitch (or Daisy Stitch): The main stitch, which involves pulling up loops from several stitches and then completing them together.
B. Star Stitch Square Motif Pattern Outline
A Star Stitch is typically worked in two rows: one row to build the star base, and the next row to complete the round and stabilize the stars.
- Start (Base): Create a MR.
ch 2(counts as first hdc). Work 8 hdc into the MR. Join with asl st. (9 hdc) - Round 1 (Star Setup):
ch 3. Insert hook into the 2nd ch from hook and pull up a loop (2 loops on hook).- Insert hook into the 3rd ch from hook and pull up a loop (3 loops on hook).
- Insert hook into the first st of the round and pull up a loop (4 loops on hook).
- Insert hook into the next st and pull up a loop (5 loops on hook).
- Insert hook into the next st and pull up a loop (6 loops on hook).
- Yarn over and pull through all 6 loops on the hook. $\rightarrow$ First Star Made
ch 1to close the star (the “eye”).
- Continue Round 1:
ch 2(corner space). Repeat Star Stitch starting with the eye of the previous star as the first loop base.- Repeat the Star Stitch process, ensuring you incorporate the correct number of stitches/spaces to create 4 corners and keep the motif flat.
- Note: Creating a perfect Star Stitch Square requires a specific increase formula at the corners, usually worked in the stabilizing row between the star rows.
- Round 2 (Stabilizing and Corner Row):
- Work
2 hdcin the eye of the last star made. - In the corner spaces (
ch 2), work(2 hdc, ch 2, 2 hdc). - Work
2 hdcin the eye of every star across the side. - Repeat until the round is complete. Join with a
sl st.
- Work
- Subsequent Rounds: Alternate between the Star Setup Row and the Stabilizing/Corner Row, ensuring that you maintain the
(2 hdc, ch 2, 2 hdc)corner structure to keep the motif square and growing. Continue until the desired motif size is reached.

1. Unique Pattern Square Motif Runner Tutorial
The Star Stitch motif is excellent for a runner as its density provides a sturdy fabric.
A. Construction Outline
- Design & Calculation:
- Measure the desired length and width of your runner.
- Crochet one Star Stitch Square motif and measure its dimensions.
- Calculate the number of motifs needed in a single row to reach the desired length.
- Crochet Motifs: Crochet all the necessary motifs. Crucially, ensure every motif is the exact same size.
- Joining (Recommended): Use the Join-As-You-Go (JAYG) method when working the final stabilizing row of a new motif. Instead of chaining in the corners/sides, use a
sl stto attach to the corresponding corner/side of the completed adjacent motif. This creates a clean, fast join. - Assembly: Join all motifs end-to-end to create the runner’s long strip.
- Border: Once assembled, work 2-3 rounds of a simple border (like
scorhdc) around the entire perimeter of the runner. This evens out any irregularities caused by the joining. - Blocking (Essential): Pin the finished runner to its final dimensions, stretching the motif seams and lace open. Wet block and allow to dry completely to ensure the runner lies flat.
2. Unique Pattern Square Motif Blouse Tutorial
Using the Star Stitch motif for a garment creates a unique, highly structured look. The blouse will be constructed using the Panel Method or the Joined Motif Method.
A. Construction Outline (Joined Motifs)
1. Motif Calculation & Creation
- Sizing: The sizing is determined by the motif size. For a fitted blouse, you might need motifs that are 5-6 inches wide; for a loose tunic, 8-10 inches wide. Calculate the number of motifs needed for the back, front, and sleeves (based on your chest measurement).
- Crochet: Crochet all Star Stitch motifs, leaving long tails on the last row for seaming/joining.

2. Assembly and Shaping
- Panels: Join the motifs together to form the large back and front panels (using JAYG or a
sl stseam). - Side Seams: Join the shoulder seams first, then join the side seams, leaving openings for the armholes.
- Sleeves (Optional): Join motifs into tubes for the sleeves, or leave the shoulder motif edges open for a cap sleeve/open armhole look (suitable for warm weather).
3. Neckline and Armhole Shaping (Crucial)
- The edges of the neck and armholes will be jagged due to the square corners. You must smooth these edges.
- Evening Rows: Work a few rows of “make-up” stitches (using
sl st,sc,hdc, anddc) around the armholes and neckline. Use shorter stitches (sl st, sc) in the tight corners/dips and taller stitches (hdc, dc) over the peaks of the motifs to create a smooth, even line. - Final Edge: Finish the neckline and armholes with 1-2 rounds of straight
scfor stability.
4. Finishing
- Blocking (Critical): Lay the blouse flat and pin the motifs, stretching the seams and smoothing out the neckline/armholes. Wet block to set the shape and improve the drape of the dense Star Stitch fabric.
This unique Star Stitch motif will result in a stunning, statement piece for both your home and your wardrobe!
Video tutorial: