by
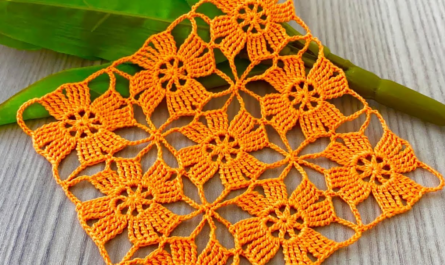
by The “Radiant Star” Hexagon is widely considered one of the most beautiful and versatile motifs in the crochet world. Unlike a standard square, the hexagon has an organic, honeycomb flow that makes it “multi-purpose.”
You can join these to create a vintage-style table runner, a bohemian summer blouse, or a magnificent heirloom shawl. The design features a raised 3D center that catches the light, transitioning into a lacy lattice that makes the piece lightweight and breathable.
🧶 The Multi-Purpose Material Guide
The “multi-purpose” nature of this pattern depends entirely on your fiber choice.
| If you are making a… | Use this Yarn | Hook Size |
| Elegant Table Runner | Size 10 Mercerized Cotton | 1.75 mm – 2.25 mm |
| Stylish Blouse | Bamboo, Silk, or Linen Blend | 3.5 mm – 4.0 mm |
| Heirloom Shawl | Lace-weight Mohair or Alpaca | 4.5 mm – 5.0 mm |
| Cozy Blanket | Soft Acrylic or Wool Blend | 5.5 mm – 6.0 mm |
🛠 Step-by-Step Tutorial: The Radiant Star Hexagon
Special Stitch: The Puff Stitch ($Puff$)
- Yarn over, insert hook in stitch, pull up a loop (3 loops on hook).
- Yarn over, insert hook in same stitch, pull up a loop (5 loops on hook).
- Yarn over, insert hook in same stitch, pull up a loop (7 loops on hook).
- Yarn over, pull through all 7 loops. ch 1 to close the puff.
Round 1: The Foundation
- Start: Make a Magic Ring.
- Stitches: ch 3 (counts as dc). Work 11 dc into the ring.
- Join: sl st to the top of the ch 3. (12 dc total).
Round 2: The 3D Star Center
- Stitches: Work a $Puff$ Stitch in every dc stitch around.
- Transition: ch 1 between each puff.
- Join: sl st to the top of the first puff.

Result: You should have 12 puffs that look like a small flower bud.
Round 3: Building the Hexagon Points
- Move Hook: sl st into the first ch-1 space.
- The Pattern: [In the next ch-1 space, work (2 dc, ch 2, 2 dc). In the next ch-1 space, work 2 dc.]
- Repeat: Repeat this sequence 5 more times.
- Join: sl st to the top of the starting stitches.
Result: You now have 6 clear “corners” (the ch-2 spaces) and 6 “sides.”
Round 4: The Lattice Frame
- The Corner: In every ch-2 space, work (2 dc, ch 3, 2 dc).
- The Side: ch 2, skip 2 stitches, sc in the middle of the side, ch 2.
- Repeat: Follow this around to define the hexagon shape.
- Join: sl st and fasten off.
🏛 How to Adapt This Pattern
1. For a Magnificent Table Runner
Join the hexagons in a Honeycomb Grid (3 hexagons wide by 10 long).
- Design Tip: Use a single, creamy white color. The “negative space” created by the lattice edges will make the table underneath look like it’s covered in falling stars.
2. For a Stylish Blouse
Hexagons are famous for the “Hexagon Cardigan” or blouse construction.
- Design Tip: Join two large hexagons to create the sleeves and body in one piece. Use a Bamboo yarn for “drape”—it will flow over your shoulders rather than standing stiffly.

3. For a Multi-Purpose Shawl
Join the motifs point-to-point in a large triangle.
- Design Tip: Because this pattern has a 3D puff center, the shawl will have a wonderful “weight” to it. It won’t slip off your shoulders as easily as a flat lace shawl would.
💡 Pro-Tip: The “Invisible” Join
To make this pattern truly beautiful, avoid chunky seams. Use the “Flat Slip Stitch Join”:
- Place two hexagons with right sides facing up.
- Insert your hook into the back loops only of both motifs.
- Slip stitch loosely across.This creates a seam that is completely flat and looks like a decorative braid between your stars.

Would you like me to draw a layout diagram for how to arrange these hexagons to create a standard-sized summer blouse?
Video tutorial: