 by
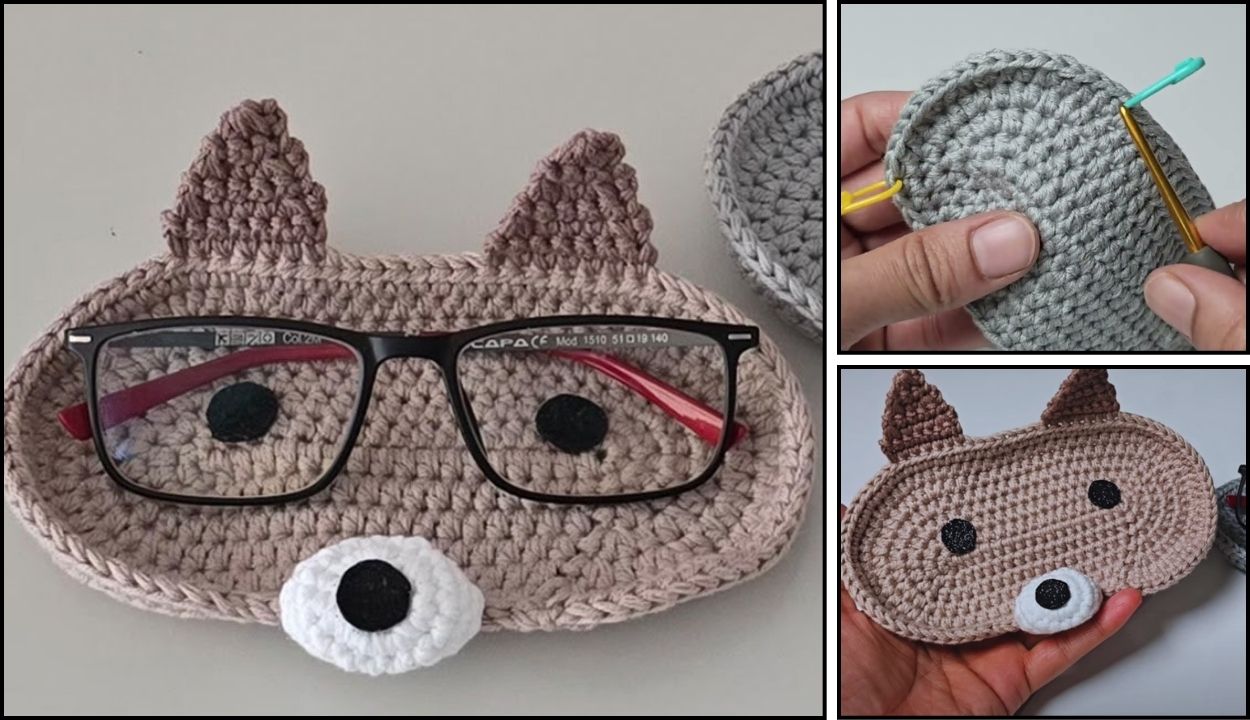
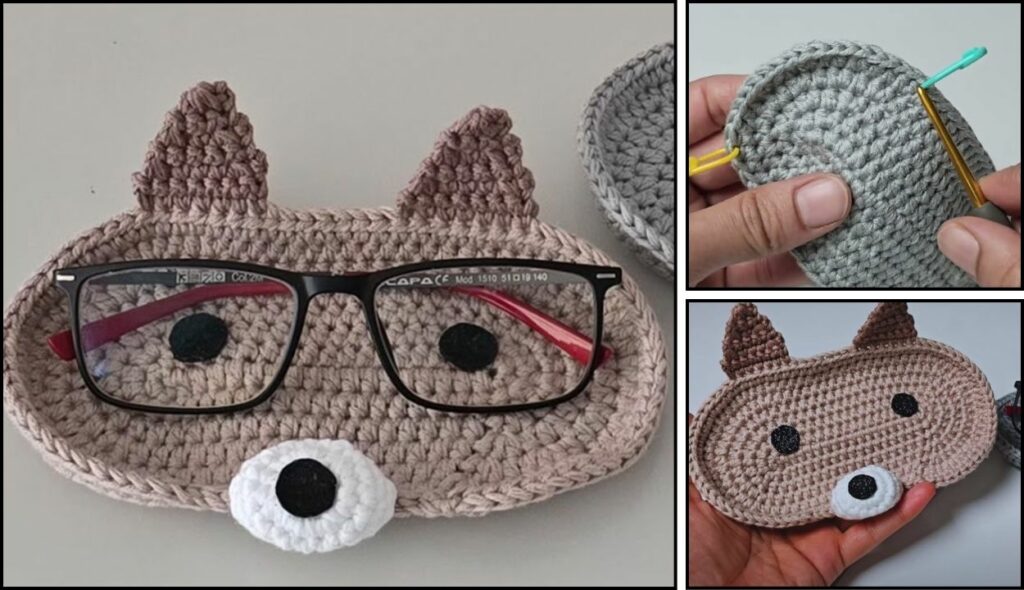
by Crocheting a bear glasses holder is a delightful and practical project, perfect for keeping spectacles safe and adding a touch of whimsy to your desk or nightstand! This type of holder is essentially a cute little ‘container’ that your glasses can rest in, often with a weighted base or a design that allows the arms of the glasses to hang over the sides. It’s a charming way to combine utility with a love for amigurumi.
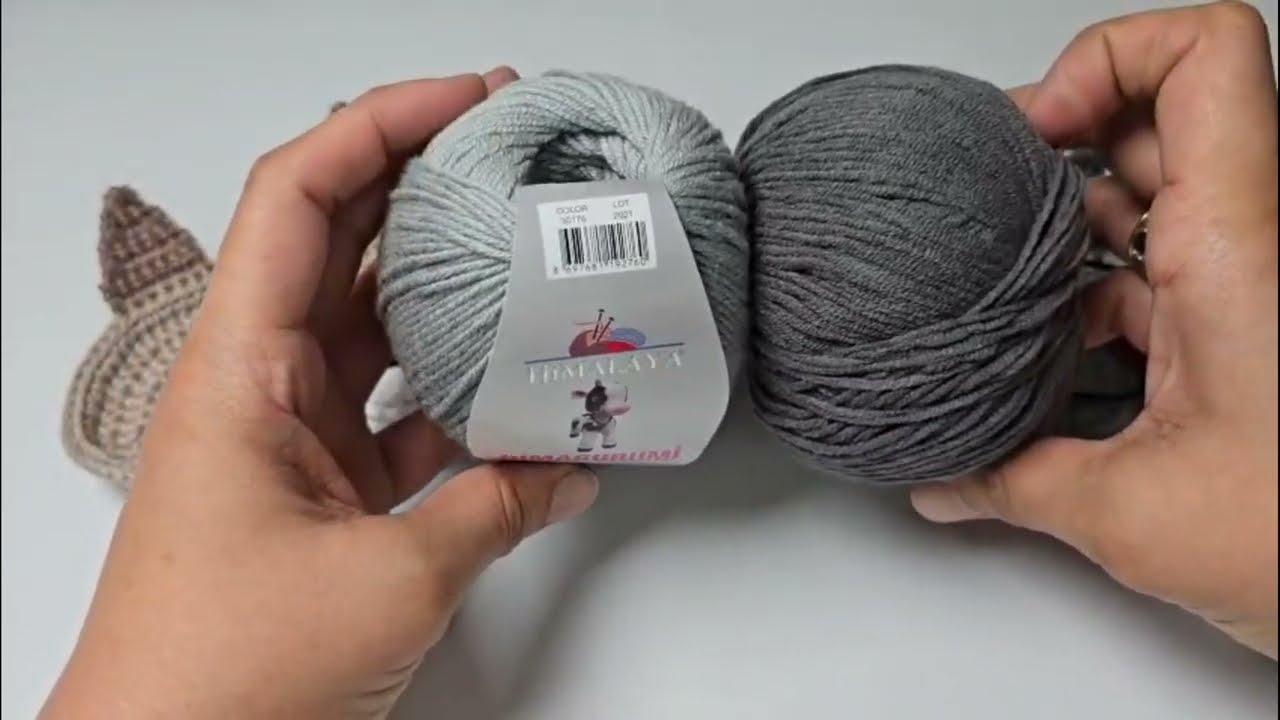
For a project like this, where you need the item to hold its shape well, 100% cotton yarn or a sturdy acrylic yarn are excellent choices. Given Phnom Penh’s warm climate, cotton is particularly suitable as it’s durable and breathable. Both options provide good stitch definition, which is great for capturing the details of a bear’s face.
How to Crochet a Bear Glasses Holder: A Detailed Tutorial
This tutorial will guide you through creating a charming bear-shaped holder, designed to prop up your glasses. The design will involve a sturdy base and a main cylindrical body that forms the bear’s head, with ears and facial features added separately.
1. Essential Materials You’ll Need
- Yarn:
- Main Color (MC): Brown, tan, cream, or any desired bear color. Worsted Weight (Aran / Medium / Category 4) Cotton or Acrylic Yarn.
- Contrast Color (CC): A lighter shade for the muzzle, or pink/black for nose/eyes. Worsted Weight. (Small amounts needed).
- Crochet Hook: A 3.5mm (US E/4) or 4.0mm (US G/6) hook. You want a hook size that creates a very dense fabric with no visible gaps when stretched, so the stuffing doesn’t show through and the holder stands upright.
- Scissors: For cutting yarn.
- Yarn Needle (Tapestry Needle): Absolutely essential for weaving in ends, sewing parts together, and embroidering features.
- Stuffing: Polyester Fiberfill (Poly-fil). You’ll need enough to firmly stuff the head.
- Weighting Material (Optional but Recommended): A small bag of poly pellets, rice, or dried beans. This goes into the base to make the holder more stable and less likely to tip over. You’ll also need a small piece of fabric (like an old stocking or scrap fabric) to make a pouch for the weight.
- Stitch Marker (Highly Recommended!): To mark the beginning of each round, as you’ll be working in continuous spirals.
- Safety Eyes (Optional): 6mm-8mm black safety eyes for a cute look. If making for a child, embroidery is safer.
- Black Embroidery Floss (Optional): For embroidering nose and mouth.
2. Basic Crochet Stitches You’ll Use
This project focuses on fundamental amigurumi stitches:
- Magic Ring (MR) / Adjustable Ring: Creates a tight, hole-free center.
- Chain (ch): For starting and basic structure.
- Slip Stitch (sl st): For joining and neatening.
- Single Crochet (sc): This will be your primary stitch, creating a dense fabric for the body, head, and ears.
- Increase (inc): Work 2 sc into the same stitch to add stitches.
- Decrease (sc2tog): Work 2 sc stitches together into one to reduce stitches. For a neater decrease in amigurumi, consider using the invisible decrease (insert hook into FLO of next 2 stitches, yarn over, pull through both FLO, yarn over, pull through 2 loops). This is optional for beginners but recommended for a cleaner finish.
- Fasten Off: To securely end your work.
- Weaving in Ends: Hiding yarn tails for a neat finish.
Crochet Bear Glasses Holder Pattern
This pattern creates a holder roughly 4-5 inches (10-12.5 cm) tall, suitable for most eyeglasses.
Abbreviations (US Crochet Terms):
- MC: Main Color (Bear’s body/head color)
- CC: Contrast Color (Muzzle color)
- MR: Magic Ring
- ch: chain
- sc: single crochet
- st(s): stitch(es)
- inc: increase (work 2 sc into the same stitch)
- sc2tog: single crochet 2 together (decrease)
- FO: Fasten off

Part 1: Base & Body (Cylinder)
Start with MC (Main Color) yarn. We’ll work in continuous rounds.
- Round 1: Create a MR. Work 6 sc into the MR. (6 sc)
- Place your stitch marker in the first sc. Move it up to the first stitch of each new round.
- Round 2: Inc in each st around. (12 sc)
- Round 3:
*Sc in the next st, inc in the next st.*Repeat from*to*around. (18 sc) - Round 4:
*Sc in the next 2 sts, inc in the next st.*Repeat from*to*around. (24 sc) - Round 5:
*Sc in the next 3 sts, inc in the next st.*Repeat from*to*around. (30 sc) - Round 6:
*Sc in the next 4 sts, inc in the next st.*Repeat from*to*around. (36 sc)- This completes the base diameter (approx. 2.5-3 inches). Make sure it’s flat.
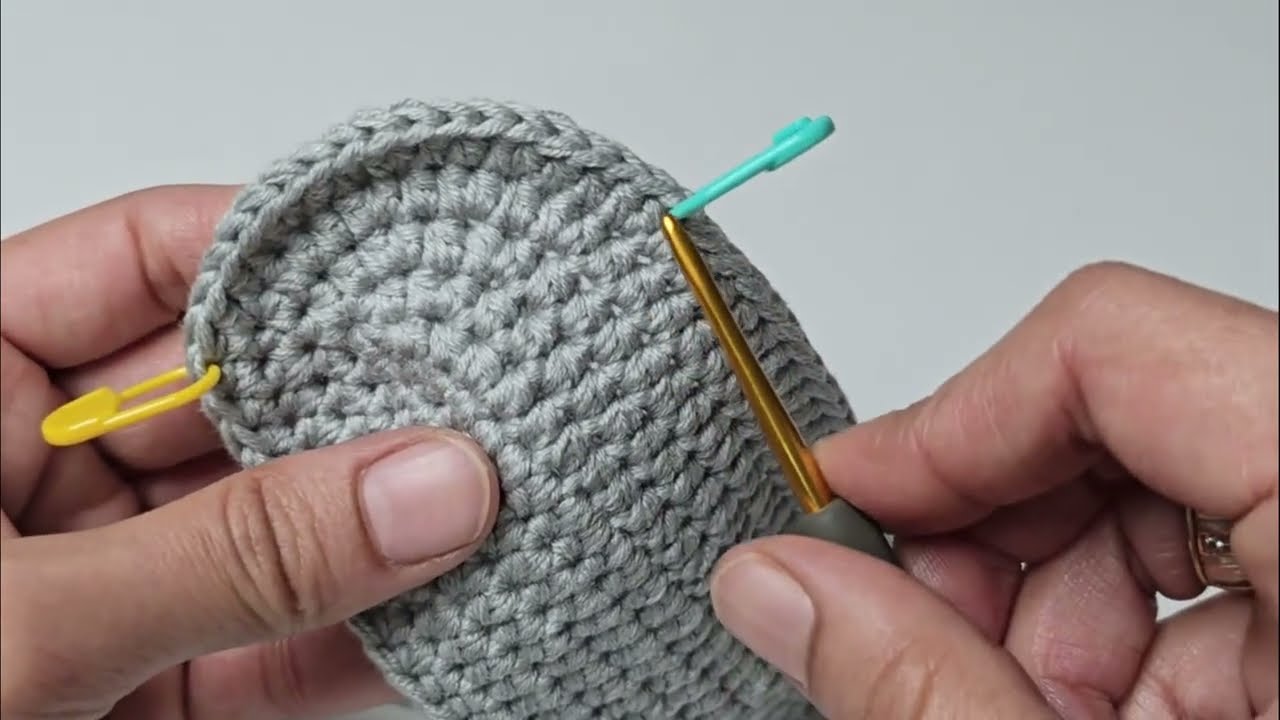
- Round 7 (Creating the Wall): Sc in each st around, working into the Back Loop Only (BLO) of each stitch. (36 sc)
- This BLO round creates a neat ridge that defines the base of the cylinder, helping it stand upright.
- Rounds 8-16: Sc in each st around, working through both loops (standard sc). (36 sc per round)
- This forms the main body/head of the holder. At the end of Round 16, your cylinder should be about 3.5-4 inches tall from the BLO ridge.
- Fasten off MC, leaving a long tail for sewing if you plan to close the top later (though often left open for glasses).
- Optional: Insert Weighting Material Here: Before continuing or closing, create a small fabric pouch filled with poly pellets, rice, or dried beans. Insert this into the bottom of the cylinder, pushing it firmly into the base. This adds stability to your holder.
Part 2: Muzzle
Use CC (Contrast Color) yarn. Work in continuous rounds.
- Round 1: Create a MR. Work 6 sc into the MR. (6 sc)
- Round 2: Inc in each st around. (12 sc)
- Round 3:
*Sc in the next st, inc in the next st.*Repeat from*to*around. (18 sc) - Round 4: Sc in each st around. (18 sc)
- Fasten Off CC, leaving a long tail (about 12-15 inches / 30-38 cm) for sewing.
Part 3: Ears (Make 2)
Use MC (Main Color) yarn. Work in continuous rounds.
- Round 1: Create a MR. Work 6 sc into the MR. (6 sc)
- Round 2: Inc in each st around. (12 sc)
- Fasten Off MC, leaving a long tail (about 8-10 inches / 20-25 cm) for sewing.
- Gently flatten the ear circles into a half-moon shape.
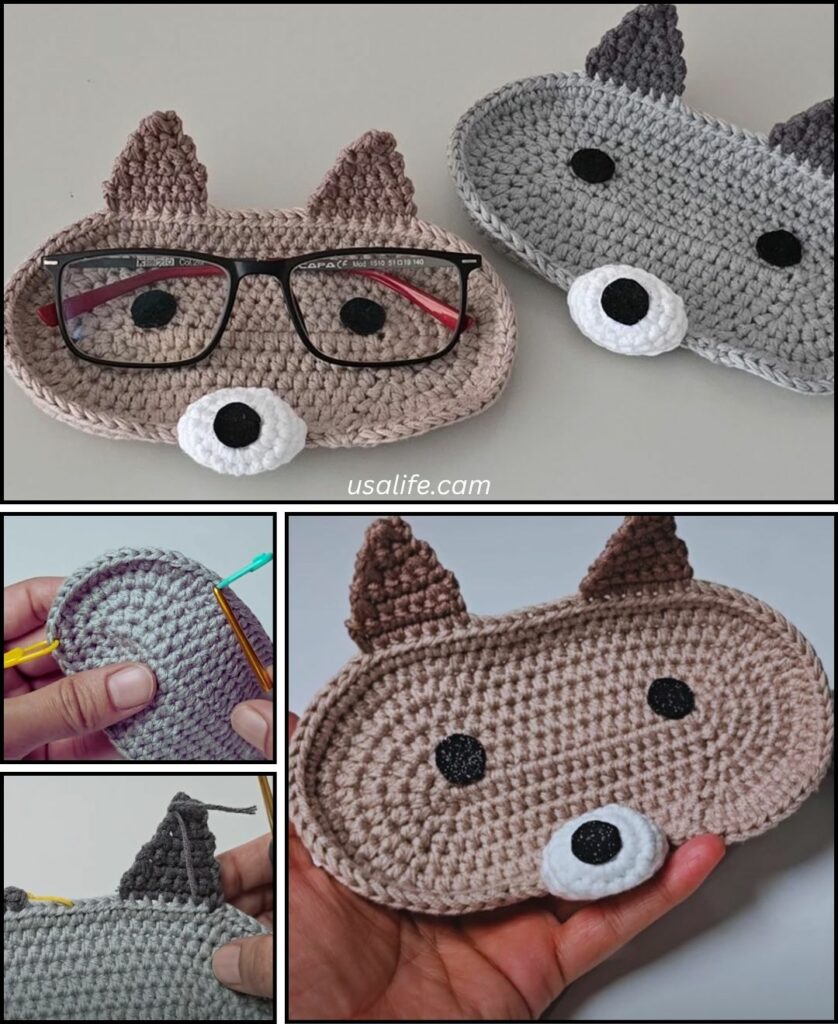
Part 4: Assembly & Facial Features
- Embroider Nose and Mouth (on Muzzle):
- Using black embroidery floss and your yarn needle, embroider a triangle-shaped nose onto the center of the muzzle.
- From the bottom of the nose, make a straight stitch down, then a small “Y” or inverted “V” for the mouth.
- Attach Muzzle to Head:
- Position the muzzle onto the front of the bear’s head (the main cylindrical body), usually around Rounds 10-14 of the body, centering it.
- Using the long tail from the muzzle and your yarn needle, sew the muzzle securely to the head. Stuff the muzzle lightly with fiberfill before fully closing the seam. Weave in the remaining tail.
- Attach Safety Eyes (or Embroider):
- If using safety eyes, insert them after the muzzle is attached. Push them through the stitches of the head, above the muzzle. Secure the washers on the inside. Position them carefully before securing, as they are permanent!
- If embroidering eyes, use black embroidery floss to stitch two small dots or French knots above the muzzle.
- Attach Ears:
- Position the flattened ears on top of the head, usually around Rounds 16-17, evenly spaced.
- Using the long tail from each ear and your yarn needle, sew the ears securely to the head. Fold the bottom edge of the ear slightly under as you sew for a neat finish. Weave in remaining tails.
- Stuff the Head (If not already firm): If the head section feels a bit soft, add more polyester fiberfill to the top, ensuring it’s firm and holds its shape.
- Optional: Close Top of Head (Alternative for Glasses Holder):
- If you prefer a fully enclosed head and want the glasses to rest on the front, you can decrease the top:
- Round 17:
*Sc in the next 4 sts, sc2tog.*Repeat 6 times. (30 sc) - Round 18:
*Sc in the next 3 sts, sc2tog.*Repeat 6 times. (24 sc) - Round 19:
*Sc in the next 2 sts, sc2tog.*Repeat 6 times. (18 sc) - Round 20:
*Sc in the next st, sc2tog.*Repeat 6 times. (12 sc) - Round 21:
*Sc2tog.*Repeat 6 times. (6 sc) - Fasten off, leaving a long tail. Thread onto yarn needle, pick up FLO of remaining 6 stitches, pull tight to close. Weave in tail.
- Round 17:
- In this case, glasses would rest against the embroidered face.
- If you prefer a fully enclosed head and want the glasses to rest on the front, you can decrease the top:
- Weave in ALL Remaining Ends: This is the most crucial step for a professional and durable finish. Double-check that all tails are neatly hidden.

Tips for a Perfect Bear Glasses Holder
- Tight Stitches: This cannot be stressed enough for amigurumi projects that need to hold shape. Use a smaller hook than usual for your yarn weight.
- Stuff Firmly: For the holder to stand well, the base and head need to be firmly stuffed.
- Invisible Decrease: Learning the invisible single crochet decrease (invdec) will make your decreases much neater, especially on the head shaping.
- Symmetry: Pay attention to placement when attaching the muzzle and ears to ensure a symmetrical and pleasing bear face.
- Experiment with Yarn: Different textures of brown yarn can create different bear looks (e.g., a slightly brushed acrylic for a fuzzy bear).
- Gift Idea: This makes a fantastic, personalized gift for anyone who wears glasses!
You’ve now got the detailed instructions to crochet an adorable and functional bear glasses holder. It’s a charming way to keep track of those specs!